
Are you ready to upgrade your car’s sound system with a Pioneer stereo but not sure where to start? Connecting a new car stereo might seem tricky, but with the right steps, you can do it yourself and enjoy crystal-clear music on the road.
Imagine turning every drive into a concert experience without paying for expensive installation. In this guide, you’ll discover simple, step-by-step instructions that make hooking up your Pioneer car stereo easy and stress-free. Keep reading, and by the end, you’ll have the confidence to transform your car’s audio system all on your own.

Credit: www.amazon.com
Tools And Materials Neededhttps://www.pinterest.com/pin/tools-name-complete-list-of-tools-and-equipment–939352434775226653/
Before installing a Pioneer car stereo, gather the right tools and materials. Having everything ready saves time and avoids frustration. The correct tools make the job safer and easier. Using proper materials ensures a secure and lasting connection.
Essential Tools
- Phillips screwdriver – to remove and tighten screws
- Flathead screwdriver – useful for prying off panels
- Wire stripper – to remove insulation from wires
- Crimping tool – to secure wire connectors
- Electrical tape – for insulating wire joints
- Multimeter – to check electrical connections and voltage
- Panel removal tool – to safely detach dashboard panels
Required Materials
- Pioneer car stereo unit
- Wiring harness adapter – matches your car’s wiring to the stereo
- Mounting kit – fits the stereo into your car’s dashboard
- Wire connectors or crimp caps – to join wires securely
- Ground wire – for proper electrical grounding
- Power cable – connects the stereo to the car battery
- Fuse – protects the stereo and wiring from electrical damage
Preparing Your Vehicle
Preparing your vehicle is the first step to install a Pioneer car stereo safely. This process ensures no damage happens to your car’s electrical system. Proper preparation also makes the installation easier and faster. Take your time to gather tools and create a clean workspace inside your car. Understanding the basic steps will help you avoid common mistakes.
Disconnecting The Battery
Start by disconnecting the car battery to prevent electrical shocks. Locate the negative terminal, usually marked with a minus (-) sign. Use a wrench to loosen the nut on the terminal clamp. Carefully remove the clamp from the battery post. Secure the cable away from the battery to avoid accidental contact. This step protects you and your vehicle’s electronics during the stereo removal and installation.
Removing The Old Stereo
Next, remove the old stereo to make room for the new Pioneer unit. Use a panel removal tool to gently pry off the dashboard trim. Locate the screws or bolts holding the stereo in place. Unscrew them and carefully slide the stereo out of the dash. Disconnect the wiring harness and antenna cable from the back. Keep all screws and parts safe for reassembly or future use.
Wiring The Pioneer Stereo
Wiring the Pioneer stereo is a key part of installation. It ensures the system works well and sounds great. The process involves connecting several wires to the car’s electrical system. Each wire has a specific role. Correct wiring prevents damage and poor performance. Follow clear steps to connect the stereo safely and efficiently.
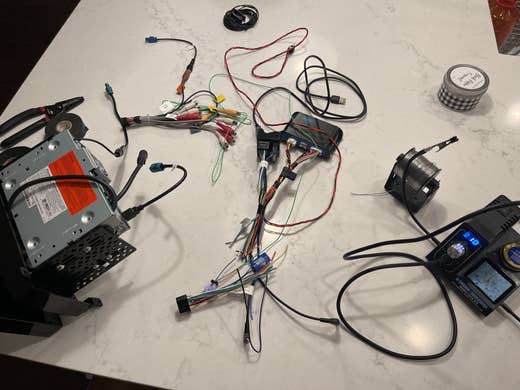
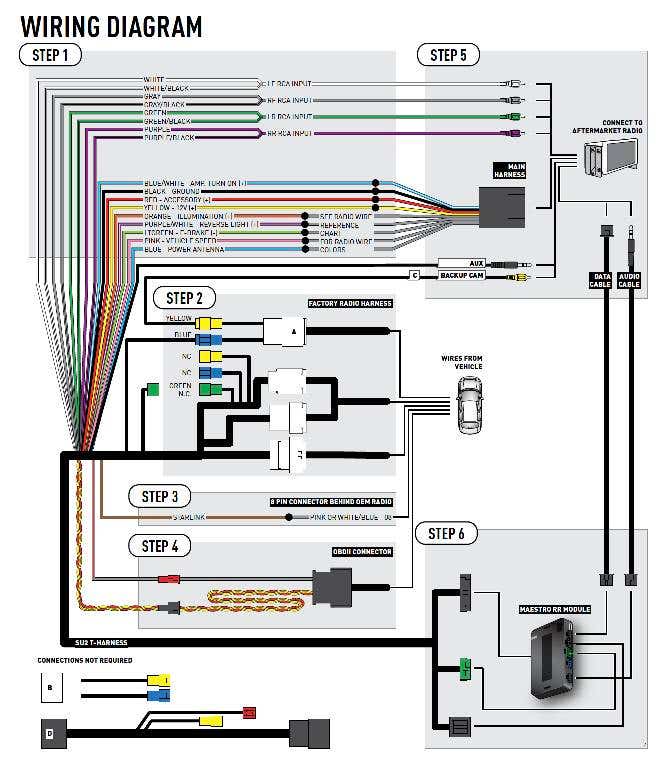
Identifying Wiring Harnesses
The wiring harness connects the stereo to the car’s power and speakers. It has many colored wires, each with a function. Match the harness with the stereo’s connector. Check the car’s manual or wiring diagram for colors and labels. Use a wiring harness adapter if available. This avoids cutting factory wires and keeps the car intact.
Connecting Power And Ground Wires
Power wires supply electricity to the stereo. The main power wire is usually red. Connect it to the car’s switched 12V power source. This turns the stereo on with the ignition. The ground wire is black. Connect it to a clean, metal part of the car’s body. A solid ground prevents electrical noise and issues. Secure all connections tightly with crimp connectors or solder.
Hooking Up Speaker Wires
Speaker wires carry sound from the stereo to the car speakers. They come in pairs: positive and negative. Colors often indicate polarity, like white and white with a stripe. Match each speaker wire with the car’s speaker wire. Avoid mixing left and right speaker wires. Use wire connectors or solder joints to ensure strong connections. Test speakers before final assembly to confirm sound quality.
Integrating Antenna And Accessories
Connect the antenna cable to the stereo’s antenna input. This allows radio signals to reach the unit. Some cars have power antenna wires; connect these to the stereo’s antenna power lead. Accessories like steering wheel controls or amplifiers may need extra wires. Use the stereo’s wiring guide to identify these connections. Proper integration ensures all features work smoothly with the new stereo.
Credit: www.subaruforester.org
Mounting The Stereo Unit
Mounting the stereo unit is a crucial part of setting up your Pioneer car stereo. It ensures the device stays securely in place while you enjoy your music. If the stereo isn’t mounted properly, it can cause vibrations, poor sound quality, or even damage to the unit.
Installing The Mounting Bracket
The mounting bracket acts as the backbone for your stereo. First, check if your car’s dash has a standard mounting sleeve or if you’ll need an adapter. Most Pioneer stereos come with a universal bracket that fits various vehicles.
Slide the bracket into the dash opening. You want it to fit snugly without forcing it. Use the provided tabs or screws to lock the bracket in place. If you encounter loose spots, adding small washers can help tighten the fit. Have you ever tried to mount a stereo that kept rattling? A firm bracket installation prevents that noise and ensures stability.
Securing The Stereo
After the bracket is secure, slide your Pioneer stereo unit into it. You’ll feel it click once it locks in place. This click is important—it confirms the unit is properly seated.
Use the screws that come with your stereo to fasten it tightly to the bracket. Avoid overtightening, which can damage the stereo or bracket. Instead, aim for a firm hold that prevents any movement.
Don’t forget to test the stereo’s position before fully securing it. Can you see the display clearly? Are the buttons easy to reach? Adjust if necessary before finalizing the screws.
Testing Sound And Functions
After hooking up your Pioneer car stereo, testing the sound and functions is crucial to ensure everything works perfectly. This step helps you catch wiring issues, speaker problems, or settings that need adjustment before hitting the road. Let’s dive into how you can confidently test your system and make it sound just right.
Powering On And Initial Checks
Start by turning on your car stereo to see if it powers up correctly. If the display lights up and you hear a startup sound, that’s a good sign your wiring is solid. But if it doesn’t turn on, double-check your connections—especially the power and ground wires.
Listen carefully for any unusual noises like static or distortion. These could indicate a loose wire or a grounding issue. Also, test different audio sources such as the radio, Bluetooth, or USB to confirm all inputs work.
Adjusting Sound Settings
Once the stereo powers on smoothly, it’s time to fine-tune the audio settings. Start with the volume, then move on to bass, treble, and balance. Adjusting these can dramatically improve your listening experience.
Try creating a clear and balanced sound by increasing the bass slightly but avoid overpowering the mids and highs. Don’t forget to check the fader settings to balance sound between front and rear speakers.
Have you ever noticed how a small tweak in equalizer settings can make your favorite song sound completely different? Take your time experimenting with presets or custom settings until the sound matches your taste perfectly.

Credit: www.amazon.com
Troubleshooting Common Issues
Troubleshooting your Pioneer car stereo can feel frustrating, but many issues have simple fixes you can handle yourself. Understanding the common problems helps you save time and avoid unnecessary expenses. Let’s look at the main issues users face and how to quickly identify what’s going wrong.
No Power Or Display
If your stereo shows no power or display, start by checking the fuse. A blown fuse is often the culprit and easy to replace.
Make sure the wiring harness is securely connected to both the stereo and your vehicle’s power source. Loose or disconnected wires can prevent power from reaching the unit.
Have you tested the ignition switch? Sometimes the stereo won’t turn on unless the key is in the accessory or on position.
No Sound From Speakers
When the display works but you hear no sound, check the speaker wires for any loose connections or damage. Faulty wiring is a common cause of silence.
Verify the balance and fade settings on your stereo. Sometimes audio is sent to the wrong speakers or turned all the way down.
Could your speakers be blown? Try connecting headphones or external speakers to isolate the problem.
Static Or Interference Problems
Static or interference often comes from bad grounding. Ensure the stereo’s ground wire is attached to a clean, unpainted metal surface in your car.
Check for nearby electronic devices or cables causing interference. Routing wires away from power cables can reduce noise.
Using shielded RCA cables instead of unshielded ones can also improve sound quality and cut down on static.
Frequently Asked Questions
How Do I Connect A Pioneer Stereo To My Car Battery?
To connect a Pioneer stereo, attach the red wire to the positive battery terminal. Ensure a secure connection and use a fuse for safety.
What Tools Are Needed To Hook Up A Pioneer Car Stereo?
You’ll need wire strippers, screwdrivers, electrical tape, and a wiring harness adapter for easy and safe installation.
Can I Install A Pioneer Stereo Without Professional Help?
Yes, with proper instructions and tools, you can install a Pioneer stereo yourself. Follow the manual carefully for best results.
How Do I Match Pioneer Stereo Wires To Car Wires?
Use a wiring harness adapter that matches your car model. This avoids cutting factory wires and ensures proper connections.
Conclusion
Connecting a Pioneer car stereo is simple with the right steps. Follow the guide carefully to ensure a smooth setup. Remember to double-check each connection for safety. Secure all wires properly to avoid any future issues. Enjoy the improved sound experience in your car.
This setup can enhance your driving pleasure. Share these tips with friends who need help. A little patience goes a long way. Happy listening and safe driving!

