
Are you ready to take your car audio experience to the next level? Building your own car audio amplifier might sound tricky, but it’s easier than you think—and it lets you customize sound like never before.
Imagine having powerful, clear music that fills your car just the way you want it. In this guide, you’ll discover simple steps to create a reliable amplifier that boosts your music’s quality and volume. Keep reading, and you’ll unlock the secrets to making your car’s sound system truly yours.

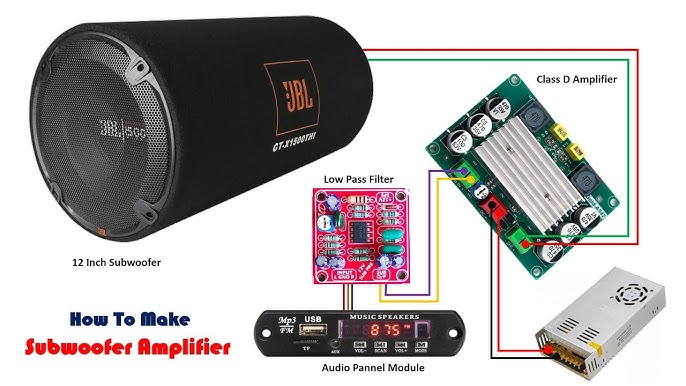
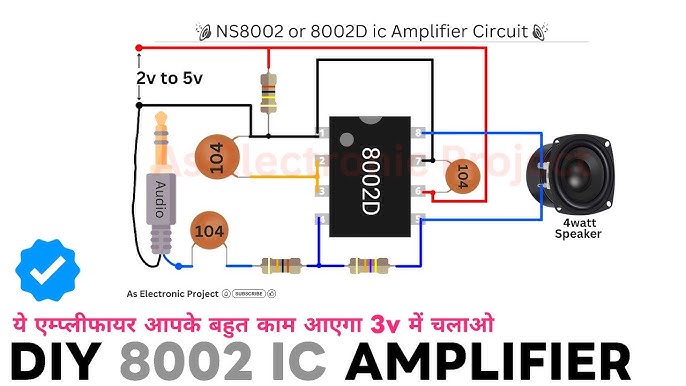
Credit: www.youtube.com
Basics Of Car Audio Amplifiers
Car audio amplifiers play a vital role in enhancing sound quality inside vehicles. They boost audio signals, making music louder and clearer. Understanding the basics helps in choosing or building the right amplifier for your car system.
Purpose And Benefits
Car audio amplifiers increase the power of audio signals. This power boost drives speakers to produce louder and clearer sound. Amplifiers reduce distortion, improving overall sound quality.
Key benefits include:
- Louder music without distortion
- Improved bass and treble clarity
- Better control over speaker output
- Enhanced listening experience in noisy environments
Types Of Amplifiers
Different amplifiers suit different audio needs. Each type offers unique features and power levels.
- Class A:High sound quality but less efficient.
- Class B:More efficient but may cause distortion.
- Class AB:Combines quality and efficiency, popular choice.
- Class D:Very efficient, ideal for subwoofers and bass.
Selecting the right type depends on your sound goals and power needs.
Essential Tools And Materials
Building a car audio amplifier needs the right tools and materials. Without them, the project becomes hard and frustrating. This section lists all essentials for a smooth assembly and excellent results.
Required Components
- Amplifier circuit board
- Transistors or MOSFETs
- Capacitors (electrolytic and ceramic)
- Resistors
- Inductors
- Heat sink for cooling
- Power supply (12V car battery or adapter)
- Input/output connectors (RCA jacks, speaker terminals)
- Printed circuit board (PCB) or breadboard
- Wires and cables
- Fuse for safety
Tools For Assembly
- Soldering iron with a fine tip
- Solder wire (preferably lead-free)
- Wire stripper and cutter
- Multimeter for testing voltage and continuity
- Small screwdriver set
- Heat shrink tubing and electrical tape
- Pliers for bending and holding parts
- Drill and bits (for mounting the amplifier)
- Safety glasses to protect eyes
- Workbench or flat surface for assembly
Designing The Amplifier Circuit
Designing the amplifier circuit is a key step in building a car audio amplifier. This process defines how well the amplifier will perform and how clear the sound will be. Careful planning ensures the circuit can handle the power and deliver strong, clean audio to your subwoofer or speakers.
Choosing The Circuit Type
Select a circuit type based on sound quality and complexity. Common types include Class A, Class AB, and Class D. Class A offers excellent sound but uses more power. Class AB balances sound quality and efficiency well. Class D is highly efficient and ideal for powerful bass.
Think about your needs. For deep bass, Class D is popular. For clear, distortion-free sound, Class AB works great. Consider space and cooling too. Class D circuits run cooler and are smaller.
Calculating Power Requirements
Calculate the power your amplifier needs to deliver. Check the subwoofer’s power rating first. Match the amplifier’s output power to avoid damage and distortion.
Use this simple formula for power:
| Parameter | Value |
|---|---|
| Voltage (V) | 12V (car battery) |
| Current (I) | Depends on amplifier design |
| Power (P) | P = V × I |
Estimate the current based on desired wattage and efficiency. Always allow extra capacity for safety and quality sound. Proper power calculation protects components and improves sound clarity.
Assembling The Components
Assembling the components of your car audio amplifier is where the project begins to take real shape. This phase demands precision and patience to ensure every part fits perfectly and functions as intended. How you prepare and connect each element directly affects the sound quality and durability of your amplifier.
Preparing The Circuit Board
Start by inspecting your circuit board for any manufacturing defects or debris. A clean board ensures reliable solder joints and prevents shorts. Use a soft brush or compressed air to remove dust and dirt before you begin placing components.
Next, organize your components by type and value. This step saves time and reduces errors during assembly. Lay out resistors, capacitors, transistors, and ICs near their corresponding spots on the circuit board for easy access.
Check the board’s layout and compare it with your schematic diagram. Confirm that all holes align with the component leads. If the board has markings, use them to place each part correctly, avoiding confusion during soldering.
Soldering Techniques
Your soldering skills impact the amplifier’s performance more than you might expect. A good solder joint looks smooth and shiny, not dull or cracked. Poor soldering can cause intermittent connections and degrade sound quality.
Heat your soldering iron to the right temperature, usually between 350°C and 400°C. Touch the iron tip to both the component lead and the circuit pad simultaneously, then feed the solder into the joint. Remove the solder first, then the iron, to form a clean connection.
Avoid using too much solder—just enough to cover the pad and lead is ideal. Excess solder can create shorts, especially on tightly spaced boards. If you spot a solder bridge, use a solder wick or a desoldering pump to clean it up quickly.
- Work in a well-lit area to see small details clearly.
- Use a magnifying glass for inspecting solder joints.
- Practice on spare components if you’re new to soldering.
Have you noticed how your first solder joint often looks different from the rest? That’s normal—soldering takes practice, and each attempt sharpens your technique. What’s one tip you’ve found helpful to make your solder joints better?
Wiring And Connections
Wiring and connections form the backbone of your car audio amplifier setup. Without proper wiring, even the best amplifier won’t deliver the sound quality you expect. Paying close attention to how you connect power, ground, inputs, and outputs can make a huge difference in performance and reliability.
Power And Ground Wiring
Supplying clean and stable power to your amplifier is crucial. Use a thick enough gauge wire—usually 8 or 4 gauge depending on your amplifier’s power needs—to prevent voltage drops.
Connect the power wire directly to the positive terminal of your car battery. Don’t forget to add an inline fuse close to the battery; this protects your system from electrical shorts.
Grounding is just as important as power. Attach the ground wire to a solid metal point on your car’s chassis, ideally within 18 inches of the amplifier. A poor ground connection can cause noise and reduce amplifier efficiency.
Input And Output Connections
For input, use RCA cables to connect your head unit’s preamp outputs to the amplifier. Make sure these cables are high-quality and routed away from power cables to minimize interference.
Speaker wires carry the amplified signal to your speakers or subwoofers. Use the correct gauge—14 to 16 gauge typically works for most setups—and ensure secure connections at both amplifier and speaker terminals.
Double-check polarity on speaker wires; reversing positive and negative leads can cause sound cancellation and weak bass. Do you know how much cleaner your sound can get just by correcting this simple wiring detail?

Credit: www.reddit.com
Testing The Amplifier
Testing the amplifier is crucial to ensure it works correctly and safely. This step checks if all parts function well together. Proper testing helps avoid damage to the amplifier and your car’s audio system.
Initial Power-up
Start by connecting the amplifier to a power source. Use a fuse to protect the circuit. Turn on the power switch carefully. Watch for any unusual sounds or smells. The amplifier should power up without noise or sparks.
Check the indicator lights on the amplifier. Green usually means normal operation. Red or no light signals a problem. Use a multimeter to measure voltage at the amplifier’s terminals. It should match the car battery voltage, around 12 volts.
Troubleshooting Common Issues
If the amplifier does not turn on, check the power connections. Make sure the ground wire is secure and clean. Loose or corroded connections cause power loss. Inspect the fuse and replace it if blown.
Distorted sound can come from poor wiring or speaker issues. Verify speaker wires are connected correctly. Check for shorts or breaks in the wiring. Adjust the gain control to avoid distortion.
Overheating may occur if the amplifier is not ventilated well. Ensure it has enough space around it. Turn off the amplifier and let it cool before testing again.
Installing In The Car
Installing a car audio amplifier requires careful planning and precise work. The amplifier must be mounted securely and connected correctly to the car’s audio system. Proper installation ensures clear sound and protects the amplifier from damage. Safety is also important to prevent electrical issues. Follow these steps to install your amplifier effectively.
Mounting The Amplifier
Choose a dry, cool spot to mount the amplifier. Common places include under a seat or in the trunk. Make sure there is enough space around the amplifier for ventilation. Avoid areas near heat sources or where water may reach.
Use screws or brackets to fix the amplifier firmly. Loose mounting can cause noise and damage. Check that the amplifier does not move when the car is in motion.
Integrating With The Audio System
Connect the amplifier to the car’s power supply using the correct gauge wire. Use a fuse close to the battery for safety. Connect the ground wire to a clean metal part of the car’s frame.
Link the amplifier to the head unit or receiver with RCA cables. Match the left and right audio channels correctly. Use high-quality cables to reduce interference.
Run the speaker wires from the amplifier to the speakers or subwoofers. Check the polarity of each wire to avoid phase issues. Secure all wires to prevent them from moving or getting damaged.
Optimizing Sound Quality
Optimizing the sound quality of your car audio amplifier is key to enjoying clear, powerful music on the road. It’s not just about turning up the volume; it’s about fine-tuning settings to get the best balance and clarity. Small adjustments can make a big difference in how your system performs.
Adjusting Gain And Filters
Gain controls the amplifier’s input sensitivity. Setting it too high causes distortion, while too low results in weak sound. Start by turning the gain down low, then slowly increase it until the sound is loud and clear without any fuzziness.
Filters help shape the sound by cutting off unwanted frequencies. Use a low-pass filter to focus on bass frequencies for your subwoofer. A high-pass filter protects smaller speakers by blocking deep bass that could damage them.
Try adjusting filters while playing a variety of music genres. Notice how different settings affect the clarity and punch. Are vocals crisp? Is the bass tight? These questions guide your tweaks.
Avoiding Distortion And Noise
Distortion ruins the listening experience and can damage your speakers. To prevent it, avoid pushing your amplifier beyond its power limits. If you hear crackling or buzzing, reduce the volume or check your wiring.
Noise often comes from ground loops or poor connections. Ensure all cables are securely connected and use quality, shielded wires. Keep audio cables away from power cables to minimize interference.
Ever noticed a humming sound when your car is running? That’s usually a grounding issue. Fixing it might involve reconnecting the ground wire to a clean, paint-free metal surface.
Credit: www.youtube.com
Frequently Asked Questions
What Components Are Needed To Build A Car Audio Amplifier?
To build a car audio amplifier, you need transistors, resistors, capacitors, a power supply, and a heat sink. Additional parts include a printed circuit board and wiring for connections.
How Do I Choose The Right Amplifier Power For My Car?
Select amplifier power based on your speaker’s RMS rating and car audio system size. Match power output to avoid distortion or damage.
What Tools Are Essential For Assembling A Car Amplifier?
Essential tools include a soldering iron, multimeter, wire strippers, screwdrivers, and pliers. These help ensure precise assembly and testing.
How Can I Ensure My Amplifier Won’t Overheat In The Car?
Use a heat sink and ensure proper ventilation around the amplifier. Avoid installing near heat sources or enclosed spaces.
Conclusion
Building a car audio amplifier can be rewarding. You gain control over sound quality. The process involves understanding components and their functions. Patience is key. Ensure all connections are secure and safe. Testing brings satisfaction. Enjoy the improved music experience in your car.
A custom amplifier can enhance every drive. Remember, practice makes perfect. Each step offers learning opportunities. Keep exploring and experimenting. With time, skills will grow. Your knowledge will expand. Enjoy the journey of creating. Happy amplifying!

