
Are you ready to upgrade your car stereo but unsure which wires to connect? Getting the wiring right is key to enjoying clear sound and avoiding frustrating problems.
In this guide, you’ll learn exactly which wires to connect and how to do it safely. By the end, you’ll feel confident handling your car stereo wiring like a pro. Keep reading to unlock the simple steps that will bring your music to life on the road!
Car Stereo Wiring Basics
Understanding the basics of car stereo wiring is essential before you start connecting wires. Knowing which wire does what prevents mistakes that could damage your system or car. It also saves you time and frustration during installation.
Common Wire Colors
Car stereo wires often follow a color code, making it easier to identify their purpose. However, colors can vary between manufacturers, so always double-check your car’s wiring diagram.
- Yellow:Usually the constant 12V power source that keeps your memory settings alive.
- Red:The switched 12V power that turns the stereo on and off with the ignition.
- Black:Ground wire, essential for completing the electrical circuit.
- Blue:Often the power antenna or amplifier turn-on wire.
- White and White with Black stripe:Front left speaker (positive and negative).
- Gray and Gray with Black stripe:Front right speaker (positive and negative).
- Green and Green with Black stripe:Rear left speaker (positive and negative).
- Purple and Purple with Black stripe:Rear right speaker (positive and negative).
Wire Functions
Each wire in your car stereo system has a specific job. Understanding these roles helps you connect everything correctly.
| Wire Color | Function | Why It Matters |
|---|---|---|
| Yellow | Constant 12V Power | Keeps clock and presets even when the car is off |
| Red | Switched 12V Power | Turns the stereo on with ignition |
| Black | Ground | Completes the electrical circuit |
| Blue | Power Antenna/Amplifier Turn-On | Activates external devices like amps or antennas |
| Speaker Wires | Audio Signal | Delivers sound to your speakers |
Have you ever connected wires without knowing their purpose and ended up with no sound or blown speakers? Taking time to learn these basics saves you from those headaches. Always test connections with a multimeter or test light before finalizing your setup.
Identifying Key Wires
Identifying the right wires in your car stereo setup is crucial before making any connections. Mistaking wires can lead to poor sound quality or even damage to your audio system. Taking the time to recognize each wire ensures a smooth and safe installation process.
Power And Ground Wires
The power wire usually carries a red color and connects directly to your car’s battery or fuse box. This wire supplies the necessary voltage to power your stereo. The ground wire, often black, completes the electrical circuit by connecting to the car’s metal chassis.
Ensuring a solid ground connection can prevent static noise and electrical interference. Have you checked your car’s manual to confirm wire colors? Not all models use the same color coding, so double-checking saves headaches.
Speaker Wires
Speaker wires come in pairs, with one wire positive and the other negative. They often use colors like white, gray, green, and purple, sometimes with stripes to indicate polarity. Connecting these correctly is vital for balanced sound and to avoid speaker damage.
One trick is to label each wire as you disconnect the old stereo. This keeps you from guessing and ensures you connect the right speaker to the right channel. What’s your plan for keeping track of wires during installation?
Antenna Wire
The antenna wire is usually a single thicker wire with a cylindrical connector at the end. This wire connects your stereo to the car’s antenna for radio reception. It’s often blue or black and looks different from the thinner speaker and power wires.
If your radio signals seem weak, double-check the antenna wire connection first. Sometimes a loose antenna wire causes poor reception rather than a stereo issue. Have you noticed any static or signal drops that might be related?
Tools Needed For Wiring
Wiring a car stereo requires the right tools to ensure a safe and efficient connection. Using proper tools helps avoid damage and ensures all wires link securely. The right tools make your work faster and cleaner, avoiding future problems with sound or power.
Wire Strippers And Crimpers
Wire strippers remove insulation from wires without cutting the wire itself. They help expose clean copper for a solid connection. Crimpers press connectors onto wire ends, securing wires firmly. Both tools reduce the chance of loose connections and shorts.
Multimeter Use
A multimeter tests electrical currents, voltage, and resistance in wires. It helps identify power wires and ground wires easily. Using a multimeter prevents wrong connections that can damage the stereo or car.
Connectors And Tape
Connectors join wires without twisting or soldering. They create strong, reliable links that resist vibration. Electrical tape insulates and protects connections from moisture and wear. Using connectors and tape keeps wiring safe and neat.

Credit: www.amazon.ca
Step-by-step Wiring Processhttps://www.linkedin.com/pulse/step-by-step-guide-how-wire-house-safe-efficient-electrical-barua-py8zf
Wiring a car stereo might seem tricky, but breaking it down into clear steps makes it manageable. Understanding which wires to connect and how to do it safely ensures your audio system performs at its best without any electrical issues. Let’s walk through the wiring process carefully, so you can get your stereo up and running smoothly.
Disconnecting The Battery
Start by disconnecting your car’s battery to avoid any electrical shorts or shocks. This simple safety step protects both you and your vehicle’s electronics. Always remove the negative terminal first, then the positive, to ensure complete power isolation.
Connecting Power And Ground
Locate the power wire, usually red, which supplies the stereo’s ignition power. Connect it to the car’s switched power source so the stereo turns on with the ignition. The ground wire, typically black, needs a clean metal surface on the car’s chassis for a secure connection.
- Make sure the ground point is free of paint and rust.
- Use a ring terminal and screw it tightly for a solid ground.
Have you checked your car’s manual to confirm wire colors? It’s a simple step that can save a lot of confusion.
Wiring The Speakers
Match each speaker wire from your stereo harness to the corresponding speaker wires in your vehicle. Speaker wires usually come in pairs with one solid and one striped wire to indicate polarity. Connecting these correctly avoids sound distortion and keeps your speakers safe.
- Use crimp connectors or solder the wires for a reliable join.
- Wrap connections with electrical tape to prevent shorts.
Double-check speaker wire polarity before finalizing to ensure the best sound quality.
Attaching The Antenna
Plug the antenna cable into your stereo’s antenna input. This wire is usually thicker and has a unique connector to fit snugly. A loose antenna connection can cause poor radio reception, so make sure it’s firmly attached.
If your car has a power antenna, don’t forget to connect the antenna power wire, often blue, to the stereo’s antenna lead.
Testing The Connections
Before reassembling the dash, reconnect the battery and turn on the stereo. Check for power, sound from each speaker, and radio reception. Listen for any static, hums, or interruptions that might indicate a wiring issue.
- Test the volume and balance to verify speaker wiring.
- Use a multimeter to check voltage if the stereo won’t turn on.
Have you experienced unexpected noises or no sound at all? This testing phase helps pinpoint wiring mistakes early, saving you from dismantling everything later.
Common Wiring Mistakes
Wiring a car stereo sounds simple but errors happen often. Mistakes can cause poor sound or damage to the system. Understanding common wiring mistakes helps avoid frustration and extra costs.
Many problems start with small wiring errors. These errors affect the speaker performance and overall stereo function. Careful attention during wiring saves time and improves sound quality.
Mixing Up Speaker Polarity
Connecting speakers with wrong polarity reverses the audio signal. This causes speakers to push and pull air out of sync. The result is weak bass and unclear sound.
Check speaker wires carefully. Positive wires should connect to positive terminals. Negative wires must connect to negative terminals. Use color codes or labels to keep track.
Loose Connections
Loose wires create poor contact and signal loss. This leads to crackling sounds or no sound at all. Vibration from driving can worsen loose connections over time.
Always strip wires properly and use secure connectors. Crimp or solder wires for a solid bond. Double-check each connection before final assembly.
Ignoring Grounding
Grounding completes the electrical circuit and prevents noise. A bad ground causes humming, buzzing, or static sounds. It can also damage the stereo system.
Attach ground wires to clean, bare metal surfaces. Avoid painted or rusty areas. Use a short, thick wire for grounding to ensure good contact.
Credit: www.crutchfield.ca
Upgrading Or Adding Components
Upgrading or adding components to your car stereo can dramatically improve your listening experience. However, knowing which wires to connect and how to connect them is crucial to avoid damage and ensure optimal performance. Whether you’re boosting power, enhancing bass, or adding wireless features, understanding the wiring basics makes the process smoother and safer.
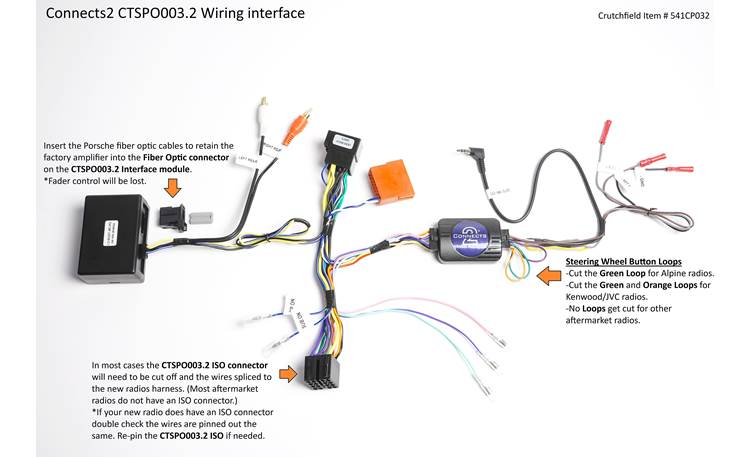
Adding Amplifiers
Amplifiers need both power and signal connections. You’ll typically connect the amplifier’s power wire directly to the car battery using a fuse to protect your system. The ground wire must attach to a clean, unpainted metal surface to prevent noise interference.
Signal wires, usually RCA cables, run from your stereo’s preamp outputs to the amplifier inputs. Don’t forget to connect the remote turn-on wire from the stereo to the amp; this tells the amp when to power up. Have you checked if your amplifier’s gain settings match your stereo output? Setting them incorrectly can cause distortion or weak sound.
Connecting Subwoofers
Subwoofers require special attention due to their power demands. Connect the subwoofer to the amplifier’s dedicated sub output using speaker wires rated for high power. Ensure the positive and negative terminals match on both the subwoofer and amplifier to avoid phase issues.
Using the right gauge speaker wire is important; thicker wires handle more power and reduce signal loss. If you’re adding multiple subs, wiring them in series or parallel affects the total impedance—make sure your amplifier supports the load. What’s the best location for your subwoofer to get the deepest bass in your car?
Integrating Bluetooth Modules
Bluetooth modules add wireless streaming to your car stereo without replacing the head unit. Connect the module’s power wires to an accessory power source so it turns on with the car. Audio output from the module usually connects to the stereo’s auxiliary input or through RCA cables.
Some modules require a ground wire connection to reduce static noise. Pay attention to wiring the control buttons or microphones if your module supports hands-free calling. Have you tested the range and audio quality after installation? Small adjustments in wiring can significantly improve wireless performance.
Safety Tips And Best Practices
Connecting wires in your car stereo isn’t just about making the right electrical connections—it’s about doing it safely. Mistakes can lead to short circuits, blown fuses, or even fires. Taking the time to follow safety tips protects both you and your vehicle while ensuring your stereo system performs flawlessly.
Avoiding Short Circuits
Short circuits happen when wires touch in ways they shouldn’t, causing sudden surges of electricity. Always double-check that positive and negative wires never come into direct contact. Use electrical tape or heat shrink tubing to cover exposed wire ends.
Think about a time when you rushed wiring and ended up with a blown fuse or worse. A simple slip can damage your car’s electrical system. Prevent this by organizing wires carefully and keeping them separate from metal parts.
Using Proper Fuses
Fuses act as safety guards that stop electrical flow if something goes wrong. Make sure the fuse rating matches the stereo’s power requirements exactly. Too high a fuse can fail to protect, while too low may blow unnecessarily.
Keep spare fuses handy in your car. If a fuse blows, replace it with one that has the correct amperage, not just any fuse you find. This small step saves you from bigger electrical problems down the road.
Securing Wires
Loose wires can get caught, pulled, or frayed, creating hazards. Use zip ties, clamps, or wire looms to keep everything tight and tidy. Secure wires away from sharp edges and moving parts to avoid damage.
Have you ever heard a rattle or noticed flickering sound from your speakers? Loose wiring is often the culprit. Keeping wires secure not only protects your system but also improves sound quality by maintaining solid connections.

Credit: www.reddit.com
Frequently Asked Questions
What Wires Connect A Car Stereo To Power?
The red wire connects to switched 12V power, and the yellow wire links to constant 12V power. The black wire grounds the stereo.
How To Connect Speaker Wires In A Car Stereo?
Connect the positive speaker wires (usually white or gray) to the stereo’s positive terminals. Connect the negative wires (often white/black or gray/black) to negative terminals.
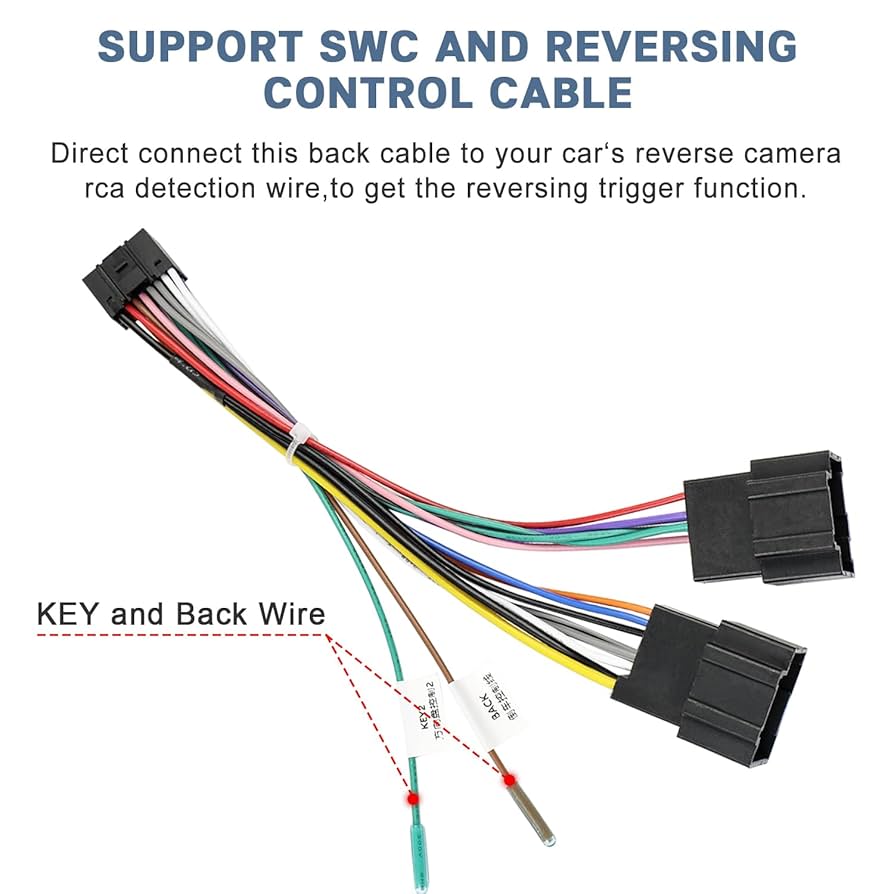
Which Wire Controls The Car Stereo’s Antenna?
The blue wire with a white stripe controls the power antenna or amplifier turn-on in most car stereos.
What Is The Purpose Of The Remote Wire In Car Stereos?
The blue remote wire sends a 12V signal to external amplifiers, turning them on and off with the stereo.
Conclusion
Connecting car stereo wires can seem tricky at first. But it gets easier with practice. Remember to match colors and follow the manual. This ensures your stereo works correctly and safely. Double-check your connections to avoid future issues. Safety should always be a priority.
Take your time and be patient. This helps prevent mistakes. Once connected, enjoy your music on the road. A well-connected stereo makes every drive enjoyable. Keep learning and exploring more about car audio systems. Your efforts will pay off with great sound quality.

