How to Fix My Car Speakers: Easy DIY Solutions
Are your car speakers not working like they used to? Maybe the sound is crackling, cutting out, or there’s no sound at all.
It’s frustrating when your favorite music or podcasts lose their power on the road. But don’t worry—fixing your car speakers might be easier than you think. You’ll discover simple, step-by-step solutions that can bring your sound back to life. Keep reading, and by the end, you’ll have the confidence to enjoy clear, powerful audio every time you drive.
Diagnose Speaker Problems
Diagnosing problems with car speakers helps pinpoint the exact issue. This saves time and effort during repair. Start by understanding how the speakers behave and what might cause the problem. Careful checks reveal if the sound is off, connections are loose, or physical damage exists. Each step provides clues for a clear fix.
Check For Distorted Sound
Play music through the speakers at low and high volumes. Listen closely for any buzzing, crackling, or muffled sounds. Distortion may occur from blown speakers or interference. Try different audio sources to rule out the player or radio. Note which speakers produce distorted sounds and when.
Test Speaker Connections
Loose or damaged wires cause many speaker problems. Remove speaker covers to access wiring. Check if all wires connect firmly to the speaker terminals. Wiggle the wires gently to see if the sound cuts out. Inspect the wiring harness for corrosion or breaks. Secure or replace faulty connections to restore sound.
Inspect Speaker Damage
Look closely at the speaker cones and surrounds. Tears, holes, or dents affect sound quality. Use a flashlight to see hidden damage inside the speaker. Press lightly on the cone to check for stiffness or rattling. Broken parts often need replacement. Minor damage might be fixed with special repair kits.
Gather Necessary Tools
Before you dive into fixing your car speakers, gathering the right tools can save you time and frustration. Having everything ready helps you avoid interruptions and keeps you focused on the task. Let’s look at the essential tools that make speaker repair smoother and a few extras that can help diagnose tricky issues.
Basic Tools Needed
Start with a simple toolkit that covers most speaker repairs. You’ll want a set of screwdrivers—both flathead and Phillips—to remove speaker covers and panels. A panel removal tool or a plastic pry tool is handy to avoid scratching your car’s interior.
Don’t forget a multimeter. It lets you check the electrical connections and speaker continuity. Wire cutters and strippers are crucial if you need to replace or repair wiring. Lastly, having some electrical tape or heat shrink tubing helps you safely secure any new wire connections.
Optional Diagnostic Devices
Sometimes, a speaker issue isn’t obvious. A signal tracer can help you follow the audio signal through the system to find where it breaks down. This device pinpoints if the problem is in the speaker itself or somewhere else in the audio chain.
Another useful tool is an oscilloscope, which shows the audio signal’s waveform. This can reveal distortions or irregularities that a multimeter might miss. These tools are not essential but can make diagnosing complex problems faster and more accurate.
Remove Car Door Panels
Removing your car door panels is a crucial step when fixing car speakers. It gives you direct access to the speaker units and wiring inside the door. Although it might seem tricky at first, careful handling and the right approach will make the process smooth and safe.
Locate Screws And Clips
Before you start pulling on the panel, find all the screws and clips holding it in place. Look closely around the edges, under the armrest, and near the door handle. Sometimes screws hide behind small plastic covers—gently pry these off with a flat tool.
Different car models use various types of clips, so check for plastic push pins or metal fasteners. Missing one can cause damage, so take your time identifying each attachment point. Have a small container ready to keep screws and clips organized.
Safely Detach Panels
Once all screws and clips are located, it’s time to remove the panel carefully. Use a panel removal tool or a flat, sturdy object to gently pry the panel away from the door frame. Start at a corner and work your way around, releasing each clip without forcing anything.
If you feel resistance, double-check for hidden screws or clips you might have missed. Disconnect any electrical connectors for power windows or locks slowly to avoid damage. Have you noticed how much easier it is when you take your time instead of rushing?
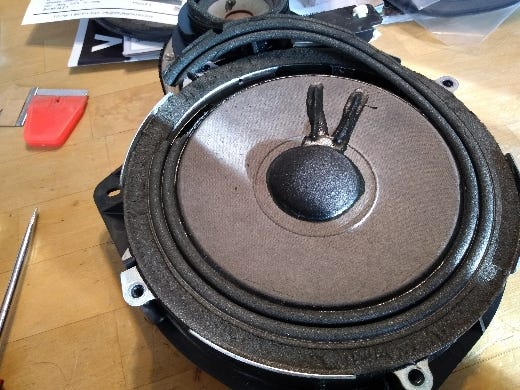
Credit: www.toyotanation.com
Repair Or Replace Speaker Wires
Repairing or replacing speaker wires is a key step in fixing car speakers. Damaged wires can cause poor sound or no sound at all. Checking wires saves money and avoids full replacement. This process involves finding broken wires and reconnecting them properly. It requires simple tools and basic skills anyone can learn.
Identify Broken Or Frayed Wires
Start by inspecting all speaker wires closely. Look for cuts, cracks, or worn insulation. Wires with exposed copper or missing insulation need attention. Gently bend wires to find hidden breaks inside. Test wires by listening for crackling or no sound. Use a multimeter to check for continuity. No continuity means the wire is broken. Mark damaged wires to fix or replace later.
Strip And Reconnect Wires
Strip about half an inch of insulation from wire ends. Use a wire stripper to avoid damaging copper inside. Twist the exposed copper strands tightly to prevent fraying. Connect wires by twisting matching colors together. Cover the joined wires with electrical tape or heat shrink tubing. This prevents shorts and keeps connections secure. Test the speaker after reconnecting to ensure sound is clear. Replace wires if damage is too severe.
Fix Speaker Cone Issues
Fixing speaker cone issues is essential to restore your car audio’s clarity and performance. The speaker cone is the heart of sound production, and any damage can cause distortion or rattling. Addressing these problems early can save you from costly replacements and improve your listening experience.
Patch Small Tears
Small tears in the speaker cone often cause unwanted buzzing or crackling sounds. You can repair these tears using simple materials like tissue paper and white glue or a specialized speaker repair kit. Gently apply a thin layer of glue over the tear, then press a small piece of tissue paper onto it to reinforce the area.
Allow the patch to dry completely before testing the speaker. Be careful not to add too much glue, as it can stiffen the cone and affect sound quality. Have you checked if the tear is affecting just one speaker or multiple ones? This helps decide if patching is enough or replacement is needed.
Replace Damaged Cones
If the cone is heavily damaged or warped, replacement is the best option. Look for a cone that matches your speaker’s size and specifications to ensure compatibility. Removing the old cone usually involves unscrewing the speaker frame and carefully detaching the damaged cone from the voice coil.
Installing the new cone requires precision—make sure the cone is centered and the voice coil moves freely. Testing the speaker after installation is key; listen for clear, distortion-free sound. Have you considered professional help if the replacement feels too technical? Sometimes, a small investment in expertise saves frustration and guarantees quality sound.
Credit: www.tsxclub.com
Upgrade Speaker Components
Upgrading your car speaker components can dramatically improve your audio experience. Instead of just fixing broken parts, investing in better speakers can bring clearer sound and deeper bass. This approach often solves underlying issues and gives your car stereo a fresh, vibrant feel.
Choose Compatible Speakers
Start by checking your car’s speaker size and power limits. Not all speakers fit every vehicle, so compatibility is key to avoid extra work or damage.
Look for speakers with matching impedance and wattage ratings to your car’s audio system. This helps prevent blown speakers or weak sound output.
Think about the type of sound you want. Do you prefer punchy bass, crisp highs, or balanced tones? Different speakers focus on different sound qualities, so pick what fits your listening style.
Install New Speakers
Before installing, disconnect your car battery to keep everything safe. Then, carefully remove the old speakers without damaging the wiring or mounts.
Use the right tools to secure the new speakers firmly in place. Loose speakers can rattle and affect sound quality.
Test the sound before putting everything back together. Play some music at different volumes to ensure the new speakers work smoothly and deliver the sound you expected.
Test And Adjust Sound Quality
Testing and adjusting the sound quality of your car speakers is a crucial step to ensure you get the best audio experience possible. It’s not just about fixing a problem—it’s about fine-tuning the sound to match your personal taste and the acoustics of your vehicle. Taking the time to carefully test and tweak your settings can transform a basic setup into a rich, immersive audio environment.
Use Audio Test Tracks
Start by playing high-quality audio test tracks. These tracks are designed to highlight different frequencies and sounds, making it easier to spot issues with your speakers.
Look for any distortion, buzzing, or imbalance between the left and right speakers. Pay attention to how well the bass, midrange, and treble come through.
Try a variety of genres—classical, rock, and electronic all reveal different strengths and weaknesses in your system.
Adjust Equalizer Settings
Once you identify how your speakers perform, tweak the equalizer (EQ) settings to balance the sound. Most car stereos or audio apps have built-in EQ controls that let you adjust bass, midrange, and treble levels.
Start with small adjustments and listen carefully after each change. Boosting the bass too much can cause distortion, while raising the treble excessively might make the sound harsh.
Consider creating custom EQ presets for different music styles or driving conditions. Have you noticed how a quick EQ tweak can make your favorite song feel brand new?
Prevent Future Speaker Problems
Fixing your car speakers is only part of the battle. Preventing future problems keeps your sound system working smoothly and saves you time and money. Taking simple steps can extend the life of your speakers and maintain audio quality.
Regular Maintenance Tips
Check your speakers regularly for signs of wear or damage. Dust buildup or loose wires can cause distortion or complete failure. Make it a habit to gently clean speaker grills and connections every few weeks.
Inspect the wiring behind the dashboard and doors whenever you have the chance. Loose or corroded wires often lead to sound issues. Tighten any connectors and replace damaged cables to avoid interruptions.
Have you noticed a drop in volume or clarity? It might be a warning sign to act before permanent damage occurs. Consistent maintenance keeps your system crisp and reliable.
Protect From Moisture And Dust
Moisture is a silent enemy to car speakers. Even small amounts can cause corrosion or damage speaker cones. Always park your car in a dry place or use a cover if you expect rain or humidity.
Seal any gaps around your doors and windows to prevent water from seeping inside. If you live in a dusty area, consider installing speaker covers or filters to block particles. Dust can clog the speaker components and degrade sound quality over time.
Think about how often you clean your car’s interior. Regular vacuuming and wiping surfaces reduce dust buildup, indirectly protecting your speakers. What small change can you make today to shield your speakers better?

Credit: m.youtube.com
Frequently Asked Questions
How Do I Know If My Car Speakers Are Broken?
Check for distorted or no sound from your speakers. Listen for buzzing, crackling, or uneven volume. If sound quality is poor or speakers produce no sound, they may be damaged and need repair or replacement.
What Tools Do I Need To Fix Car Speakers?
You will need a screwdriver, wire strippers, electrical tape, and a multimeter. These tools help remove panels, test wiring, and securely reconnect speaker wires. Having the right tools ensures a smooth repair process.
Can I Fix Car Speakers Myself Easily?
Yes, if you follow clear instructions and have basic tools. Simple issues like loose wires or blown fuses are easy to fix. For complex problems, consider professional help to avoid further damage.
How Do I Test Car Speakers Before Fixing?
Use a multimeter to check speaker resistance and continuity. Play audio to identify sound issues like crackling or silence. Testing helps pinpoint the exact problem before starting repairs.
Conclusion
Fixing car speakers can improve your driving experience a lot. Start by checking wires and connections carefully. Clean or replace damaged parts to get better sound. Small problems often cause big sound issues. Taking time to fix your speakers saves money on repairs.
Clear sound makes every drive more enjoyable. Keep your tools ready for quick checks anytime. A little effort goes a long way with car audio. Now, your music will sound much better on the road.