
Are you ready to upgrade your car stereo but worried about the wiring? Connecting a wiring harness might sound tricky, but with the right steps, you can do it yourself and save time and money.
Imagine enjoying your favorite music with crystal-clear sound, all set up by your own hands. This guide will walk you through every step, making the process simple and stress-free. Keep reading, and soon you’ll have your car stereo working perfectly, without any guesswork or frustration.
Preparing For Installation
Preparing for the installation of a car stereo wiring harness is essential. It ensures a smooth and safe setup. Proper preparation reduces mistakes and saves time. Focus on three key areas before starting the work.
Gathering Necessary Tools
Collect all tools required for the installation. Common tools include:
- Wire strippers
- Electrical tape
- Crimp connectors
- Screwdrivers
- Multimeter
- Panel removal tools
Having these tools ready makes the process easier and faster. It also helps avoid interruptions during wiring.
Choosing The Right Wiring Harness
Select a wiring harness designed for your car model. The right harness matches the stereo and vehicle connections. It prevents cutting or splicing factory wires. Check compatibility before purchase. This step protects your vehicle’s electrical system.
Disconnecting The Car Battery
Always disconnect the car battery before working on wiring. It stops electrical shocks and short circuits. Remove the negative terminal first to cut power safely. Confirm no power flows before starting the installation. This step protects you and your car.
Credit: www.myjeepcompass.com
Removing The Old Stereo
Removing the old stereo is the first real test of your patience and precision. It might seem straightforward, but dashboards and wiring can be trickier than they look. Knowing how to carefully take apart the panels, disconnect the wires, and pull out the unit will save you a lot of frustration.
Taking Out Dashboard Panels
The dashboard panels around your stereo are often held in place by clips or screws. Use a plastic trim removal tool to gently pry them off without scratching or breaking anything. If you rush this part, you might end up damaging your dashboard, which no one wants.
Look carefully for hidden screws behind vents or small covers. Keep these screws in a small container so you don’t lose them. Have you noticed how many different clips and screws manufacturers use? It’s like they don’t want you to take anything apart easily.
Unplugging Existing Wiring
Once the panels are off, you’ll see the wiring harnesses connected to the back of the stereo. Each connector usually has a clip or tab that you need to press to unplug it. Pulling the wires forcefully can break the connectors or damage the wires themselves.
Take a moment to note or photograph how the wires are connected. This will help when you install the new stereo. Are you surprised by how many wires are involved? It’s not just power and speakers; sometimes there are antenna wires, USB connections, and more.
Extracting The Stereo Unit
The stereo unit itself may be secured by screws or metal brackets. Locate these and remove them carefully. After that, gently slide the stereo out of the dashboard.
Sometimes the stereo feels stuck—don’t force it. Check if any wires are still connected or if a clip is holding it in place. Removing the old stereo correctly sets you up for a smooth installation of the new one.
Identifying Wiring Colors And Functions
Understanding the wiring colors and their functions is key to connecting your car stereo wiring harness correctly. Each wire color usually corresponds to a specific function, like power, ground, or speaker output. Misidentifying these can lead to poor sound, blown fuses, or even damage to your stereo system.
Matching Car Wires To Harness
Your car and the stereo harness may use different color codes, which can be confusing. Start by comparing the wiring colors from your car’s factory harness to those on the new stereo harness. Keep a list or take pictures to track each wire’s function.
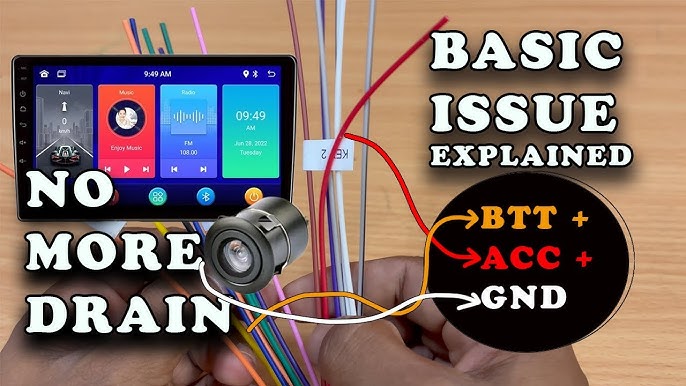
- Red:Usually the ignition power wire that turns on the stereo when the key is in the accessory position.
- Yellow:Constant 12V power, keeps memory settings active.
- Black:Ground wire, essential for completing the circuit.
- White and Gray:Front left and right speaker positive wires.
- White/Black and Gray/Black:Front left and right speaker negative wires.
- Green and Purple:Rear left and right speaker positive wires.
- Green/Black and Purple/Black:Rear left and right speaker negative wires.
Does your car use a different color scheme? Identifying these early saves time and frustration.
Using A Wiring Diagram
A wiring diagram is your roadmap through the maze of wires. These diagrams can be found in your car’s manual or online forums specific to your vehicle model. They show exact wire colors and their roles, helping you avoid guesswork.
Print or keep the diagram handy as you work. Highlight the wires you’ve identified to keep track. Have you ever tried wiring without a diagram? It’s like assembling a puzzle with missing pieces.
Testing Wire Connections
Before making permanent connections, test each wire to confirm its function. A simple multimeter can check for voltage, continuity, and ground. Testing prevents mistakes like connecting power wires to speakers.
- Set the multimeter to DC voltage to check power wires (red and yellow).
- Test for continuity to identify speaker wires by connecting the meter leads to each end.
- Verify ground by ensuring the black wire shows continuity with the car’s chassis.
Taking these extra moments to test can save you from rewiring headaches later. What’s your experience with testing wires before installation?

Credit: www.amazon.ca
Connecting The Wiring Harness
Connecting the wiring harness for your car stereo is a crucial step that ensures all components communicate correctly. It’s not just about plugging wires together; it requires precision to avoid shorts or connection failures. Taking the time to prepare and secure each wire properly can save you from headaches down the road.
Stripping And Preparing Wires
Start by carefully stripping about half an inch of insulation from the end of each wire. Use a wire stripper to avoid damaging the copper inside—damaged wires can lead to poor connections or signal loss. Make sure the exposed wire is clean and free from any frayed strands before moving on.
Have you noticed how a clean wire end makes twisting or connecting so much easier? It’s a small step, but it greatly improves the reliability of your connection.
Splicing And Crimping Connections
Once your wires are prepared, align the matching wires from the car harness and the stereo harness. Twist them tightly together or use a crimp connector to join them. Crimping provides a stronger and more permanent connection, especially if you use a high-quality crimping tool.
Don’t just rely on twisting wires; a loose connection can cause intermittent sound or power issues. Crimp connectors or soldering (if you’re comfortable) add durability and reduce the chance of wires coming apart while driving.
Securing With Electrical Tape Or Connectors
After connecting the wires, wrap each connection with electrical tape or slide on heat shrink tubing. This insulation prevents shorts by keeping exposed wires from touching metal parts or each other. If you use connectors, ensure they snap firmly and hold the wires without slipping.
Consider this: a small spark from an unprotected wire can cause major damage to your car’s electrical system. Taking the extra minute to secure your connections can protect your stereo and your vehicle.
Installing The New Stereo
Installing the new stereo is an exciting part of upgrading your car’s audio system. This process involves connecting the wiring harness, securing the stereo unit, and putting everything back in place. Each step needs care to ensure the stereo works perfectly and fits well inside the dashboard.
Plugging In The Wiring Harness
Start by matching the wiring harness connectors. They should fit snugly without force. The harness links the stereo to your car’s power and speakers. Check that each wire color matches the correct connector. Secure the connections tightly to avoid loose contacts. This step is key for sound and power to work correctly.
Mounting The Stereo Unit
Slide the stereo unit into the dashboard slot carefully. Align it so the screw holes match the mount points. Use screws to fasten the stereo firmly. Avoid overtightening to prevent damage. The unit should feel stable and not move when touched. A secure mount helps avoid vibrations while driving.
Reassembling Dashboard Panels
Put back all dashboard panels you removed earlier. Snap or screw each piece into its original place. Take care not to force panels, which may cause cracks. Make sure all clips and screws are tight. Check that buttons and vents work smoothly once reassembled. This step finishes your stereo installation neatly.
Credit: www.youtube.com
Testing The Stereo System
Testing the stereo system after connecting the wiring harness is essential. It ensures all connections work properly and the stereo functions as expected. This step helps catch any mistakes early and avoids damage to the components.
Reconnecting The Car Battery
Before testing, reconnect the car battery carefully. Secure the positive terminal first, then the negative. Make sure the connections are tight to avoid sparks or power loss. Never test the stereo with the battery disconnected.
Powering On And Checking Functions
Turn on the car ignition to power the stereo. Listen for sound from all speakers. Check the volume, bass, and treble settings. Test radio reception and CD or USB playback if available. Confirm that the display lights up and buttons respond correctly.
Troubleshooting Common Issues
If the stereo does not power on, recheck all wiring connections. Loose or reversed wires often cause problems. No sound? Verify speaker wires and the mute function. Static noise may indicate poor grounding. Reset the stereo if settings seem wrong.
Tips For A Safe And Clean Installation
Ensuring a safe and clean installation of your car stereo wiring harness is key to avoiding future headaches. Taking a little extra time now can prevent wire damage, electrical shorts, or a messy setup that’s hard to troubleshoot later. How you handle each wire and connection really impacts your stereo’s performance and your car’s electrical system.
Avoiding Wire Damage
Always inspect wires for any cuts, nicks, or frays before you start connecting. Damaged wires can cause shorts or signal loss, which might not be obvious until you test the system. Use wire strippers designed for automotive wiring to avoid nicking the copper inside.
Think about where your wires will run. Avoid sharp edges or areas that get hot, like near the engine or exhaust. Adding protective tubing or electrical tape around wires in risky spots adds an extra layer of safety.
Organizing And Securing Wires
Messy wires are not just an eyesore—they can cause problems down the line. Use zip ties or Velcro straps to bundle wires neatly. This keeps everything in place and makes future repairs or upgrades easier.
Labeling each wire can save you hours of confusion later. Use small pieces of masking tape or pre-made wire labels. Organized wiring also prevents accidental unplugging or short circuits when you’re under the dash.
Maintaining Factory Settings
Preserving your car’s original wiring and settings helps avoid electrical issues. Don’t cut or splice factory wires unless absolutely necessary. Instead, use adapters or harness connectors designed for your vehicle model.
This approach keeps your warranty intact and makes reversing the installation simple. Have you ever had to reinstall a factory stereo? Keeping the original setup intact made that process much smoother.
Frequently Asked Questions
How Do I Identify Car Stereo Wires?
To identify car stereo wires, use a multimeter to test each wire. Typically, red indicates power, black is ground, and yellow is constant power. Speaker wires are often color-coded in pairs. Always refer to the car’s wiring diagram for accuracy and ensure the ignition is off during testing.
What Tools Do I Need For Wiring A Car Stereo?
You will need a multimeter, wire strippers, crimping tool, and electrical tape. Additionally, a set of connectors or soldering equipment is useful. Having the car’s wiring diagram is essential for reference. These tools ensure a secure and efficient installation process, minimizing potential errors.
Can I Install A Car Stereo Myself?
Yes, you can install a car stereo yourself with the right tools and instructions. Familiarize yourself with your car’s wiring diagram first. Follow the stereo manufacturer’s manual closely. Take precautions and double-check connections to avoid errors. If unsure, consult a professional for assistance.
What Is A Wiring Harness Adapter?
A wiring harness adapter connects your new stereo to your car’s existing wiring. It simplifies the installation process by matching the stereo’s wires to the car’s wiring without cutting. Using an adapter ensures a secure and reversible connection, making future upgrades or repairs easier.
Conclusion
Connecting a wiring harness for your car stereo is simple with the right steps. Match each wire color carefully to avoid mistakes. Use tools like wire strippers and connectors for a secure fit. Take your time and double-check every connection.
This helps your stereo work well and last longer. Enjoy clear sound and easy control while driving. Remember, patience and care make the process smooth and safe. Now, your car stereo is ready to enhance your driving experience.

