
Are you ready to upgrade your car’s audio but feel overwhelmed by all the wires? Installing a car stereo system might seem tricky at first, but with the right wiring diagram and clear steps, you can do it yourself—no need to pay for expensive help.
Imagine enjoying crystal-clear sound and your favorite tunes on every drive. In this guide, you’ll discover exactly how to connect your car stereo system wiring without confusion or mistakes. By the end, you’ll have the confidence to handle the installation like a pro and bring your car’s audio to life.
Keep reading, and let’s get started!
Credit: www.elementownersclub.com
Tools And Materials Needed
Setting up your car stereo system wiring correctly depends heavily on having the right tools and materials at hand. Without these essentials, even the clearest wiring diagram can turn into a frustrating puzzle. Let’s look at what you need to make the installation smooth and efficient.
Essential Tools
First, gather the tools that will help you handle wires, connectors, and panels easily. A quality wire stripper is a must—it ensures clean cuts without damaging the wires’ core. Next, a crimping tool helps secure connectors firmly, preventing loose connections that cause sound issues.
Don’t forget a multimeter to check voltage and continuity. This tool saved me hours on a past install by quickly pinpointing a bad connection. Other helpful items include a screwdriver set, electrical tape, and a panel removal tool to avoid damaging your car’s interior.
Required Materials
Having the right materials means you won’t have to stop mid-installation. You’ll need the stereo wiring harness designed for your car model to ensure compatibility. Wire connectors, such as butt connectors or soldering supplies, are necessary to join wires securely.
Good quality speaker wires and power cables with the correct gauge make a big difference in sound quality and safety. Also, pick up a fuse holder with the proper fuse rating to protect your new system from electrical faults. Do you already have some wires lying around? Double-check their condition and thickness before using them.
Safety Precautions
Safety should never be an afterthought when working with your car’s electrical system. Always disconnect the battery before you start to prevent shocks or short circuits. Wear safety glasses to protect your eyes from wire strands or debris.
Make sure your workspace is well-lit and free from clutter. Avoid working near flammable materials since sparks can occur when cutting or stripping wires. How often do you pause to consider these precautions before diving in? Taking a moment for safety can save you from costly mistakes and injuries.
Preparing Your Vehicle
Preparing your vehicle is an essential first step before installing a car stereo system wiring diagram. This stage ensures safety and smooth progress during installation. Proper preparation helps avoid electrical shorts and damage to your vehicle’s electronics.
Start by creating a clear workspace around your car’s dashboard. Gather all necessary tools like screwdrivers and panel removers. Keep a container handy to store small screws and parts. This organization saves time and prevents lost pieces.
Disconnecting The Battery
Always disconnect the car battery before working on the stereo system. This step prevents electrical shocks and protects your vehicle’s wiring. Use a wrench to loosen the negative battery terminal. Remove the cable and secure it away from the battery post. Avoid touching any metal parts with the cable to prevent sparks.
Removing The Old Stereo
Carefully remove the dashboard panels surrounding the old stereo. Use a panel remover tool to avoid damaging the trim. Unscrew the mounting screws holding the stereo in place. Gently pull the stereo out of the dash. Disconnect the wiring harness and antenna cable from the back of the unit. Keep the screws and panels organized for reinstallation.
Inspecting The Wiring Harness
Check the wiring harness for any signs of damage or corrosion. Look for frayed wires or loose connections. Clean any dirty connectors with electrical contact cleaner. Compare the wiring harness to the new stereo’s diagram. Make sure the connectors match or identify if adapters are necessary. Proper inspection prevents connection issues later.
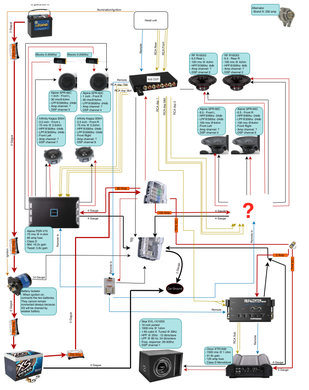
Reading The Wiring Diagram
Reading a car stereo wiring diagram is key to a smooth installation. It shows how each wire connects and works. This guide helps you understand the symbols, colors, and connections used in the diagram. Knowing this makes wiring easier and safer.
Color Codes And Symbols
Wires in the diagram use colors to show their function. Common colors include:
- Red for power
- Black for ground
- Yellow for constant power
- Blue for antenna or amplifier control
- White and gray for speaker wires
Symbols represent parts like speakers, power sources, and switches. A circle often shows a speaker, and a line with a zigzag means a resistor. Learning these symbols helps you follow the diagram easily.
Identifying Key Wires
Focus on wires that deliver power, ground, and audio signals. Power wires supply electricity to the stereo. Ground wires complete the electrical circuit safely. Speaker wires carry sound signals from the stereo to the speakers.
Look for labels next to wires in the diagram. They often indicate wire purpose, such as “12V,” “GND,” or “SPK.” This helps avoid mistakes during installation.
Common Wiring Configurations
Most car stereos use similar wiring setups. A typical layout includes:
- Power wires connected to the battery and ignition switch
- Ground wires attached to the car’s metal frame
- Speaker wires paired by color for front and rear speakers
- Control wires for antenna or amplifier activation
Understanding these common patterns lets you connect the stereo without confusion. It also helps in troubleshooting any wiring issues later.
Credit: www.toyotanation.com
Connecting The Wiring Harness
Connecting the wiring harness is a crucial step in installing a car stereo system. This process links the stereo to the car’s electrical system, allowing power and sound signals to flow properly. Careful attention ensures a stable and safe connection that prevents shorts and signal loss.
Matching Wire Colors
Most car stereo wiring harnesses use color-coded wires. Matching these colors correctly is essential for proper function. Common colors include:
- Red for power supply
- Black for ground
- Yellow for constant power
- Blue for antenna or amplifier control
- White, gray, green, and purple for speaker wires
Always compare the car’s wiring colors with the stereo’s manual. Some cars may have different color codes, so double-checking avoids mistakes.
Using Connectors And Crimps
Using the right connectors ensures a strong electrical connection. Crimp connectors or butt connectors are popular choices. They join wires without soldering and provide a secure link. Follow these tips:
- Strip wires about half an inch before connecting.
- Insert wires fully into the connector.
- Use a crimping tool to press the connector tightly.
- Test the connection by gently pulling the wires.
A good crimp prevents loose connections that cause sound issues or power loss.
Securing The Connections
Securing connections protects them from vibration and moisture. Use electrical tape or heat shrink tubing around connectors for insulation. Bundle wires neatly with zip ties to avoid tangling or damage. Secure the harness away from moving parts and heat sources in the car. Proper securing extends the life of the stereo system and improves safety.
Installing The New Stereo
Installing the new stereo is an exciting moment where all your preparation comes to life. This step requires careful attention to ensure the unit fits securely and functions perfectly. Getting this right not only protects your investment but also guarantees a great listening experience every time you turn on your car.
Mounting The Unit
Start by sliding the new stereo into the dash opening. Make sure it fits snugly without forcing it, as too much pressure can damage the unit or your dashboard. Use the mounting brackets that came with the stereo to secure it firmly in place.
Check that all screws are tight but avoid over-tightening, which can crack plastic parts. If your car uses a mounting sleeve, bend the metal tabs outward to lock the stereo in position. You want the unit to feel solid when you press on the buttons or knobs.
Reconnecting The Battery
Before testing anything, reconnect your car battery. This restores power to the electrical system and allows your new stereo to start up. Remember, working without the battery connected can prevent damage and keep you safe, but now it’s time to bring the power back.
Take a moment to double-check that all wiring connections are secure and insulated. Loose connections can cause shorts or intermittent problems that are frustrating to diagnose later.
Testing The System
Turn on your car and power up the stereo to see if it boots correctly. Test the volume, radio reception, CD player (if applicable), and any other features like Bluetooth or USB ports. Make sure sound plays clearly from all speakers without distortion or cuts.
If something doesn’t work as expected, don’t ignore it. Check the wiring diagram again and revisit each connection. Sometimes a single loose wire or wrong color match can cause the entire system to malfunction. What would you do if your favorite song suddenly cuts out mid-drive? Catching issues now saves you from frustration on the road.
Troubleshooting Tips
Troubleshooting a car stereo wiring system can save time and frustration. Identifying common problems early helps fix them quickly. Focus on power issues, sound quality, and wiring errors. Clear steps improve your success with installation and repairs.
No Power Issues
Check the fuse first. A blown fuse stops power to the stereo. Test the wiring harness for loose or disconnected wires. Use a multimeter to verify power at the stereo connector. Make sure the ignition is on, as some systems need it to power up.
- Inspect ground wire connection to the car chassis.
- Ensure the battery is fully charged.
- Look for corrosion or damage on connectors.
Sound Quality Problems
Distorted or weak sound often comes from poor wiring. Check speaker wires for secure connections and no cuts. Adjust the balance and fade controls on the stereo. Verify the correct speaker impedance matches the stereo’s output.
- Make sure no wires touch each other causing shorts.
- Test speakers individually to isolate issues.
- Replace damaged speaker wires or speakers if needed.
Common Mistakes To Avoid
Avoid rushing the wiring process. Wrong wire connections can damage the stereo or car electrical system. Do not ignore the wiring diagram; follow it carefully. Avoid using cheap or incorrect wire types. Double-check wire colors and labels before connecting.
- Never connect power wires without proper insulation.
- Do not force connectors into the wrong slots.
- Always secure wires to prevent them from moving or breaking.
Credit: www.diymobileaudio.com
Frequently Asked Questions
What Tools Are Needed For Car Stereo Wiring Installation?
You need wire strippers, crimp connectors, electrical tape, a multimeter, and screwdrivers. These tools ensure safe, accurate connections and secure mounting.
How Do I Identify Car Stereo Wiring Colors?
Refer to your car’s wiring diagram. Common colors are red for power, black for ground, and blue for antenna. Correct identification prevents damage.
Can I Install A Car Stereo Without A Wiring Diagram?
It’s not recommended. A wiring diagram guides proper connections, avoiding short circuits and damage. Always use a diagram for accuracy.
How To Connect The Stereo Wiring Harness To The Car?
Match the harness wires by color and function. Use crimp connectors or soldering for secure joins. Insulate connections with electrical tape.
Conclusion
Installing a car stereo system can be simple. Follow the steps carefully. Use the wiring diagram for guidance. Double-check all connections for safety. Remember, patience is key. Make sure each wire is secure. Test the system once installed. Enjoy your new sound experience.
Share your success with friends. Happy listening!

