Has your car amplifier suddenly stopped working, leaving your music silent and your drive less exciting? You’re not alone, and the good news is that fixing a blown car amplifier might be easier than you think.
Whether you’re a music lover or just want to enjoy clear sound on the road, understanding how to diagnose and repair this problem can save you time and money. In this guide, you’ll discover simple steps to bring your amplifier back to life and get your tunes blasting again.
Ready to take control of your car audio? Let’s dive in.

Credit: www.youtube.com
Signs Of A Blown Amplifier
Recognizing the signs of a blown car amplifier is crucial before diving into any repairs. Your amplifier communicates its health through various symptoms, and catching these early can save you time and money. Let’s look closely at the most common indicators that your amplifier might be blown.
Distorted Sound Output
One of the first signs you’ll notice is distorted or crackling sound from your speakers. Music might sound muffled, fuzzy, or unusually quiet even at higher volumes. If you hear popping noises or the sound cuts in and out, your amplifier could be struggling to send a clean signal.
Think about the last time you cranked up your car stereo and the music didn’t feel right. Did the sound suddenly lose its clarity or punch? That’s a strong hint that your amplifier’s internal components may be damaged.
No Power Or Response
If your amplifier doesn’t power on at all, it’s a clear warning sign. You might flip the switch or turn on your stereo and get nothing in return—no lights, no sound, no vibration.
Sometimes, this happens because of a blown fuse or a wiring issue, but often it points to a dead amplifier. Have you checked your connections thoroughly? A lack of response often means the amplifier’s circuits have been compromised.
Overheating And Smell
Have you ever noticed your amplifier getting unusually hot or releasing a burning smell? Overheating is a serious sign that something is wrong inside the unit.
An amplifier that runs hot can be on the verge of failure, and the smell of burnt plastic or electronics is a red flag you shouldn’t ignore. Do you feel your amp is hotter than usual after a short period of use? This could mean internal components are damaged or short-circuiting.
Safety Precautions Before Repair
Repairing a blown car amplifier requires care and attention. Safety must come first. Taking the right precautions prevents injury and damage to your vehicle. Simple steps can protect you and your equipment. Follow these safety guidelines before starting any repair work.
Disconnecting The Battery
Always disconnect the car battery before working on the amplifier. This stops electrical shocks and short circuits. Use a wrench to remove the negative terminal first. Keep the cable away from the battery terminal. This simple step protects you from electric hazards.
Using Proper Tools
Use the right tools for the job. Screwdrivers, pliers, and a multimeter are essential. Avoid makeshift tools that can slip or break. Proper tools ensure safe and effective repair. Check tools for damage before use to avoid accidents.
Working In A Safe Environment
Choose a clean, dry, and well-lit workspace. Avoid clutter to prevent tripping or losing small parts. Work on a flat surface to keep the amplifier stable. Keep liquids away to stop spills that can cause shorts. Good ventilation helps if you solder parts during repair.
Diagnosing The Problem
Diagnosing a blown car amplifier starts with careful inspection. The goal is to find the exact cause of the problem. This helps avoid unnecessary repairs and saves time. Follow simple checks to identify common issues. Focus on fuses, wiring, speaker connections, and electrical testing.
Checking Fuses And Wiring
Fuses protect your amplifier from power surges. Check the fuse near the amplifier and the main car fuse box. Look for blown or melted fuses. Replace any damaged fuses with the correct rating.
Inspect wiring for cuts, burns, or loose connections. Damaged wires can cause shorts or power loss. Ensure all wires connect tightly to the amplifier terminals. Secure any loose wires to avoid future problems.
Testing The Speaker Connections
Speaker wires must be intact and connected properly. Check for frayed or broken wires at both ends. Confirm the positive and negative terminals match on the amp and speakers. Incorrect connections can cause distortion or no sound.
Try disconnecting the speakers and testing the amplifier alone. If the amp works without speakers, the issue lies in the speaker wiring or speakers themselves.
Using A Multimeter For Electrical Testing
A multimeter helps measure voltage, current, and resistance. Set the multimeter to the correct mode for each test.
- Test the power supply voltage at the amplifier. It should match the car battery voltage.
- Check the continuity of speaker wires. No continuity means a broken wire.
- Measure the resistance of speakers to ensure they are not damaged.
- Test amplifier fuse continuity to confirm it is functional.
Electrical testing pinpoints faulty parts. Replace damaged components based on your findings.
Common Amplifier Issues And Fixes
Car amplifiers can face several common problems that affect sound quality and performance. Understanding these issues and knowing how to fix them can save you time and money. Let’s look at some typical amplifier problems and practical ways to address them.
Replacing Blown Fuses
Blown fuses are one of the simplest yet most frequent amplifier issues. A fuse protects your amplifier from electrical damage by breaking the circuit when there’s an overload. If your amplifier suddenly stops working, check the fuse first—it might just need replacing.
Make sure to use a fuse with the exact rating specified by the manufacturer. Using a higher-rated fuse can cause more damage to your amplifier. Keep spare fuses in your car for quick fixes on the go.
Repairing Damaged Wiring
Wiring problems often cause amplifiers to malfunction or produce distorted sound. Inspect all wires for cuts, frays, or loose connections. Damaged wiring can cause shorts or poor power delivery, leading to blown amplifiers.
Use electrical tape or heat shrink tubing to insulate exposed wires. Tighten any loose connections to ensure stable power flow. If a wire is severely damaged, replace it entirely to avoid repeated issues.
Fixing Overheated Components
Amplifiers generate heat, and excessive heat can damage internal parts. Overheating usually happens if the amplifier is placed in a confined space or if cooling fans fail. You might notice the amplifier shutting down unexpectedly or sound cutting out.
Improve ventilation around your amplifier by relocating it or adding cooling fans. Clean dust off the heatsinks and vents regularly to maintain airflow. If components are already damaged from heat, professional repair or replacement may be necessary.
Step-by-step Repair Process
Fixing a blown car amplifier requires careful steps to avoid further damage. This process helps restore sound quality and saves repair costs. Follow these clear instructions to repair your amplifier safely and effectively.
Opening The Amplifier Case
Begin by unplugging the amplifier from power and audio sources. Place it on a clean, flat surface. Use a screwdriver to remove screws holding the case. Keep screws safe for reassembly. Gently lift the cover to expose internal parts. Avoid forcing the case open to prevent damage.
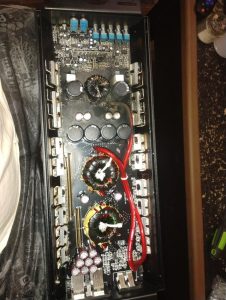
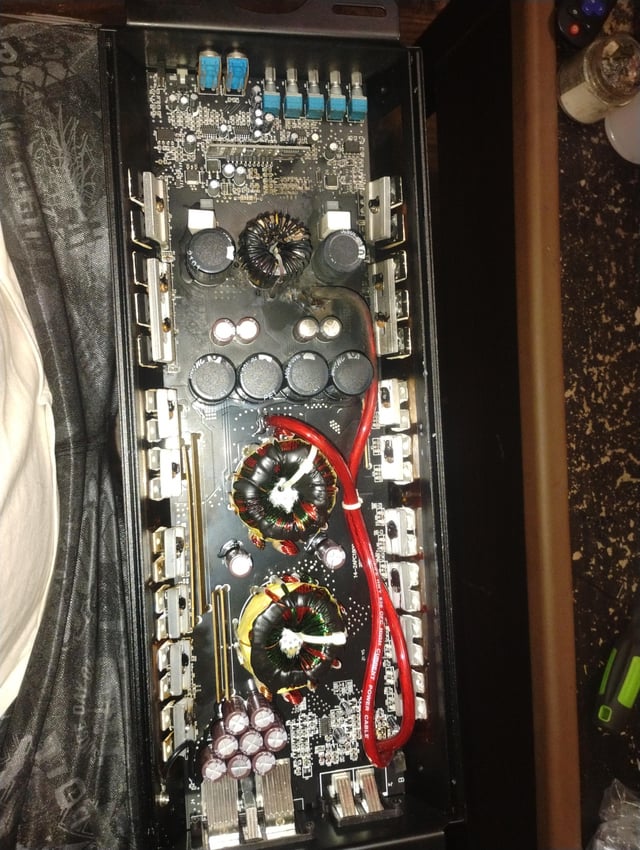
Identifying Faulty Components
Look for burnt or damaged parts inside the amplifier. Common faults include blown fuses, burnt resistors, or swollen capacitors. Use a multimeter to test fuses and resistors for continuity. Check capacitors for bulging or leaks. Mark any components that need replacement.
Soldering And Replacing Parts
Gather replacement parts matching the faulty components exactly. Heat the soldering iron and carefully remove old solder from damaged parts. Remove the faulty components without harming the circuit board. Insert new parts into the correct positions. Solder each connection firmly but avoid excess solder. Let the board cool before moving on.
Reassembling The Amplifier
Place the amplifier cover back carefully on the base. Align screw holes and tighten screws securely. Ensure no wires are pinched or out of place. Reconnect power and audio cables. Test the amplifier at low volume first. Confirm the repair worked before regular use.

Credit: www.reddit.com
Testing The Amplifier After Repair
After repairing your blown car amplifier, testing it carefully is essential to ensure it runs smoothly and safely. This phase helps you confirm that your fixes hold up under real conditions and that your sound system performs at its best. Taking your time here can save you from future headaches and improve your listening experience.
Connecting To Power And Speakers
Start by reconnecting the amplifier to your car’s battery and speakers. Make sure all connections are secure and correctly matched to avoid shorts or damage. Double-check the polarity on speaker wires; reversing them can lead to poor sound or even harm the amplifier.
Use a multimeter to verify voltage at the amplifier terminals before powering it on. This step ensures the amplifier receives the correct voltage and protects it from unexpected power surges. Have you ever skipped this and faced a sudden shutdown? Avoid that by always testing your power source first.
Listening For Sound Quality
Once powered, play a variety of music tracks to assess the sound quality. Listen closely for any distortion, buzzing, or dropouts—these signs suggest the amplifier may still have issues. Adjust the gain and crossover settings gradually to find the sweet spot without pushing the amp beyond its limits.
Try different volume levels to check how the amplifier handles both low and high power demands. Does the sound remain clear at high volume, or does it clip and distort? Your ears are your best diagnostic tool here, so trust what you hear and tweak accordingly.
Monitoring Temperature And Performance
Keep an eye on the amplifier’s temperature during testing. Overheating can indicate internal problems or inadequate ventilation. Feel the amplifier’s casing after 15–20 minutes of use; it should be warm but not uncomfortably hot.
If you have a temperature sensor or thermal camera, use it to get precise readings. Consistent overheating might mean you need to improve cooling or check for faulty components. How often do you check your amplifier’s heat during normal use? Making this a habit can extend its lifespan significantly.
Preventing Future Amplifier Damage
Preventing future damage to your car amplifier is just as important as fixing it. Taking the right steps can save you from costly repairs and frustrating downtime. By paying attention to installation, load management, and maintenance, you extend your amplifier’s life and keep your sound system performing at its best.
Proper Installation Tips
Incorrect installation is a common cause of amplifier failure. Make sure your amplifier is securely mounted to avoid vibrations that can loosen connections. Use the right gauge wiring to handle the amplifier’s power demand—thin wires can overheat and cause shorts.
Ground your amplifier properly to prevent electrical noise and voltage spikes. Have you checked if your amplifier’s fuse rating matches the system’s requirements? Using the wrong fuse can leave your amp unprotected or cause unnecessary blowouts.
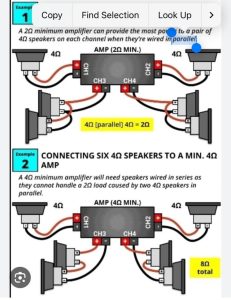
Avoiding Overloading
Amplifiers can blow if they’re pushed beyond their limits. Don’t connect too many speakers or use speakers with lower impedance than your amp can handle. This forces the amplifier to work harder, increasing heat and stress.
Keep volume levels reasonable and avoid distortion. When sound starts to crackle or cut out, it’s a sign you’re overloading your system. Have you ever noticed your amp getting unusually hot during long drives? That’s your cue to ease up on the power.
Regular Maintenance
Dust and dirt buildup can cause overheating and connection issues. Clean your amplifier and wiring regularly using a soft brush or compressed air. Check all connections for corrosion or looseness every few months.
Pay attention to your sound quality—sudden drops or changes can indicate underlying problems. Testing your system occasionally helps catch issues before they cause permanent damage. How often do you inspect your car’s audio setup? Making it a habit can protect your investment.
Credit: www.diymobileaudio.com
Frequently Asked Questions
What Are Common Signs Of A Blown Car Amplifier?
A blown car amplifier may produce distorted sound or no sound at all. You might notice unusual noises like popping or buzzing. The amplifier may also overheat frequently, and its protection light might turn on. Identifying these symptoms early can prevent further damage to your car’s audio system.
How Can I Test My Car Amplifier?
To test your car amplifier, use a multimeter to check the power and ground connections. Ensure the voltage levels are within the recommended range. You can also test the speaker outputs for continuity. This will help identify any internal issues that might be causing problems.
Why Does My Car Amplifier Keep Blowing?
A car amplifier might keep blowing due to faulty wiring or incorrect impedance loads. Overloading the amplifier with too many speakers can also cause it to fail. Ensure your amplifier’s power and ground connections are secure and that the speaker impedance matches the amplifier’s specifications.
Can I Fix A Car Amplifier Myself?
Yes, you can fix a car amplifier yourself if you have basic technical skills. Start by identifying the problem, such as checking the wiring and connections. Replace any blown fuses or damaged components. If you’re unsure, consult a professional to avoid further damage to your amplifier.
Conclusion
Fixing a blown car amplifier can save money and time. Start by checking all connections carefully. Replace any damaged fuses or wires. Test the amplifier with a small sound to avoid further damage. Keep your system clean and dry to prevent future issues.
Regular checks help spot problems early. Remember, patience and careful work lead to good results. Taking simple steps can bring your music back to life. Stay safe and enjoy your car’s sound again.