Are you ready to take your car’s sound system to the next level? Installing a 4 channel car amplifier can dramatically boost the quality and power of your music.
But if you’ve never done it before, the process might seem confusing or even intimidating. Don’t worry—you’re in the right place. This guide will walk you through every step, using simple language and clear instructions. By the end, you’ll know exactly how to install your amplifier like a pro and enjoy crystal-clear sound on every drive.
Keep reading, and let’s get started!
Choosing The Right Location
Choosing the right location for your 4 channel car amplifier is more important than you might think. A well-chosen spot can improve sound quality and prevent future problems. It also makes installation easier and helps keep your amplifier safe from damage.
Consider Ventilation And Space
Your amplifier needs room to breathe. It generates heat while working, and without proper ventilation, it can overheat and shut down.
Look for a spot with enough open space around the amp. Areas under seats or near the trunk are common choices, but make sure air can flow freely.
Think about how much space you have. You don’t want to squeeze the amplifier into a tight corner where wires get tangled or damaged.
Avoid Interference Sources
Amplifiers can pick up electrical noise from other devices in your car. This noise can cause unwanted buzzing or humming in your speakers.
Keep your amplifier away from power cables, the engine, and other electronic components. This reduces the chance of interference affecting your sound.
Have you noticed a strange buzzing sound in your car audio? Moving your amplifier just a few inches can sometimes fix it completely.
Gathering Necessary Tools And Materials
Before you start installing your 4 channel car amplifier, gathering the right tools and materials is crucial. Having everything ready saves time and prevents frustration during the installation. Missing a small part or tool can stall your progress and lead to unnecessary trips to the store.
Essential Tools
You’ll want a basic toolkit that covers both electrical work and mechanical adjustments. A good quality wire stripper and crimper are must-haves for clean, secure connections. Screwdrivers with various heads help you access tight spaces and mount the amplifier firmly.
- Wire stripper and crimper:For cutting and securing wires without damaging them.
- Socket wrench set:To tighten or loosen nuts and bolts with precision.
- Multimeter:To check voltage, continuity, and ensure proper power flow.
- Electrical tape and heat shrink tubing:For insulating and protecting wire joints.
- Panel removal tools:Useful for safely removing interior panels without damage.
Do you have a dedicated workspace with good lighting? It makes a huge difference when handling small connectors and wires. Trust me, working in a cramped, dark space only adds to the challenge.
Required Wiring And Accessories
The right wiring kit is essential to power your amplifier and connect it to your car’s audio system. Using wires that match your amplifier’s power needs ensures optimal performance and prevents overheating. Don’t guess on wire gauge; check your amplifier’s manual for recommended sizes.
- Power cable:Usually 4 or 8 gauge, depending on amplifier specs.
- Ground wire:Same gauge as the power cable, to create a reliable ground connection.
- RCA cables:High-quality shielded cables to carry audio signals from the head unit to the amplifier.
- Speaker wires:Proper gauge to connect your amplifier to the speakers or subwoofers.
- Fuse holder and fuse:To protect your electrical system from potential short circuits or overloads.
Consider the length of your wiring runs carefully. Longer runs need thicker wires to avoid power loss. Have you measured the distance from your battery to the amplifier location yet? Planning this step saves a lot of headaches down the line.
Preparing The Car Battery
Before you install your 4 channel car amplifier, preparing the car battery is a crucial step that ensures safety and optimal performance. Handling the battery correctly protects your vehicle’s electrical system and prevents damage to your new amplifier. Let’s focus on the key actions you need to take to get your battery ready.
Disconnecting The Negative Terminal
Start by disconnecting the negative terminal of your car battery. This step cuts off the power supply and reduces the risk of electrical shorts or shocks while you work. Use a wrench to loosen the nut on the negative terminal clamp and carefully remove the cable.
Remember to tuck the disconnected cable away so it doesn’t accidentally touch the battery or metal parts. Have you ever experienced a spark or short circuit because of a loose connection? Taking this precaution avoids those unexpected and dangerous moments.
Installing The Fuse Holder
Next, install a fuse holder on the power wire that will connect your amplifier to the battery. This fuse acts as a safety device, protecting your amplifier and wiring from power surges or shorts. Position the fuse holder as close to the battery as possible to ensure maximum protection.
Choose a fuse with the correct amperage rating based on your amplifier’s power needs. Installing the fuse holder might seem like a small step, but it can save you from costly repairs and electrical fires. Have you checked if your current setup includes proper fusing?
Running Power And Ground Wires
Running power and ground wires correctly is essential to ensure your 4 channel car amplifier performs reliably and safely. Poor wiring can lead to voltage drops, noise interference, or even damage to your vehicle’s electrical system. Taking the time to route power and secure a good ground connection will save you headaches and improve your audio experience.
Routing Power Cable
Choose a path for the power cable that keeps it away from moving parts and hot engine components. Ideally, run the wire along the vehicle’s frame or under the carpet, avoiding sharp edges that might cut the insulation. Use cable ties to secure the wire and prevent it from rattling or getting pinched.
Think about the distance from the battery to the amplifier. Longer runs can cause voltage drops, so use a thick enough gauge wire to handle the current. If you’re unsure, a 4 or 8 gauge wire is usually a safe bet for most 4 channel amps.
Securing Ground Connection
The ground wire needs to connect to a clean, bare metal spot on your car’s chassis. Remove any paint or rust where you plan to attach the ground, so the connection is tight and free of corrosion. This helps maintain a stable electrical path and reduces unwanted noise in your sound system.
Use a ring terminal on the ground wire and bolt it securely to the chassis. If you can, choose a location close to the amplifier to minimize ground loop issues. Have you checked your grounding point recently? Sometimes, what looks like a solid spot might need a quick clean-up to work properly.
Connecting The Remote Turn-on Wire
Connecting the remote turn-on wire is a key part of installing a 4 channel car amplifier. This wire tells the amplifier when to turn on and off with the car’s stereo. Without it, the amp might stay on all the time or never turn on at all. Correct connection helps protect your car battery and gear. It also ensures your sound system works smoothly every time you use it.
Identifying The Remote Wire
Look for a thin blue wire coming from the head unit. This is usually the remote turn-on wire. It sends a small 12V signal when the stereo powers up. Check the stereo’s manual to confirm the wire color. Some systems use a blue with white stripe wire. Use a multimeter to verify the voltage before connecting. This avoids wrong connections that could damage the amp or stereo.
Proper Wiring Techniques
Strip about half an inch of insulation from the remote wire. Use a wire stripper to avoid cutting the wire strands. Connect the remote wire to the amplifier’s remote turn-on terminal. Ensure the connection is tight and secure. Use crimp connectors or solder the wire for a solid join. Wrap the connection with electrical tape to prevent shorts.
Keep the wire away from power cables and speaker wires. This reduces noise and interference in your audio system. Route the wire along existing harnesses for a clean look. Avoid running it near hot engine parts or sharp edges. Double-check all connections before powering the system on.
Credit: www.amazon.com
Wiring The Speakers To The Amplifier
Wiring the speakers to the amplifier is a key step in installing a 4 channel car amplifier. Proper wiring ensures clear sound and prevents damage to your equipment. It involves matching the right speakers to the amplifier channels and securing all connections correctly. Careful attention here improves sound quality and system reliability.
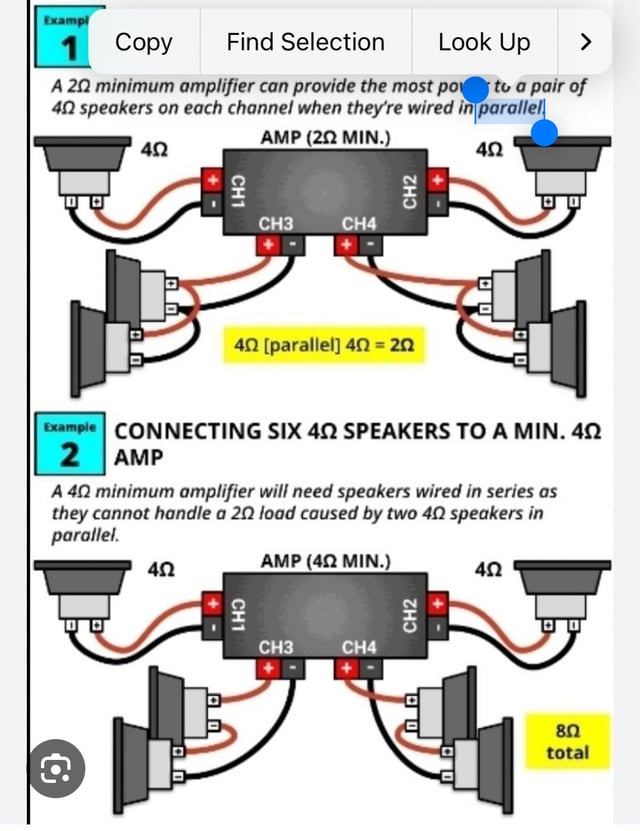
Matching Impedance And Channels
Check the impedance rating of your speakers. It should match the amplifier’s output. Common speaker impedances are 2, 4, or 8 ohms. Using the wrong impedance can cause distortion or damage.
Connect each speaker to its dedicated channel on the amplifier. A 4 channel amp supports four separate speakers. Keep the wiring consistent with positive and negative terminals. This avoids phase issues and sound problems.
Ensuring Secure Connections
Use quality speaker wire suitable for car audio. Strip the wire ends carefully to avoid shorts. Tighten the amplifier’s speaker terminals firmly around the wire.
- Twist wire strands tightly to prevent loose ends.
- Use insulated connectors if possible for safety.
- Double-check polarity: positive to positive, negative to negative.
Loose or poor connections cause sound dropouts and interference. Secure wiring also protects against vibrations from the car movement. Test each speaker after wiring to confirm clear, balanced sound.
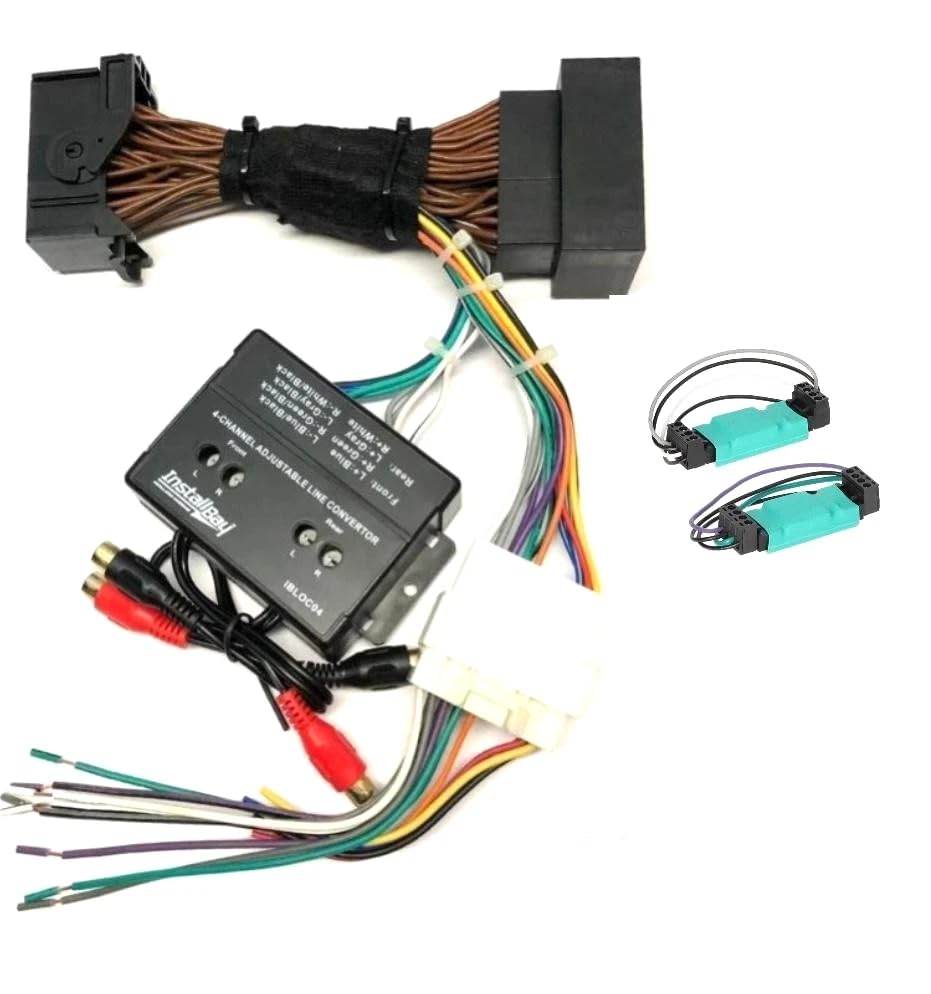
Making Rca And Signal Connections
Making RCA and signal connections is a key part of installing a 4 channel car amplifier. Proper connections ensure clear sound and avoid unwanted noise. This process involves linking the head unit to the amplifier using RCA cables and securing signal wires correctly.
Careful attention during this step improves audio quality. It also helps the amplifier perform at its best. Follow simple rules for clean, secure, and interference-free connections.
Connecting Rca Cables
Start by identifying the RCA output jacks on your car stereo or head unit. These usually have red and white or red and black connectors for right and left audio channels.
Match the colors on the RCA cables to the output jacks to avoid confusion. Insert the cables firmly into the correct ports on both the head unit and amplifier.
Keep RCA cables away from power wires to reduce noise. Use cables of good quality to maintain signal integrity. Avoid pulling or bending the cables sharply to prevent damage.
Avoiding Signal Interference
Signal interference can cause buzzing or humming sounds in your audio system. To prevent this, route RCA cables separately from power cables. Use cable ties or clips to keep them apart.
Ground loops create noise too. Ensure the amplifier and head unit share a common ground point. Check all connections for tightness and cleanliness.
Use shielded RCA cables for extra protection against interference. Twist the cables gently to reduce electromagnetic noise pickup.
Credit: www.ridgelineownersclub.com
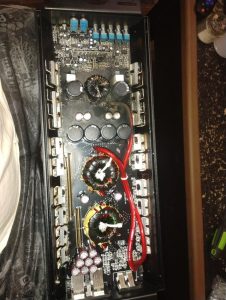
Mounting The Amplifier Securely
Mounting your 4 channel car amplifier securely is crucial for both performance and safety. A loosely mounted amplifier can vibrate excessively, causing unwanted noise and potential damage. Ensuring a solid, stable installation not only protects your equipment but also keeps your sound system running smoothly on every drive.
Choosing Mounting Hardware
Select hardware designed to withstand the vibrations and movements inside a vehicle. Use screws or bolts that fit snugly and are made of rust-resistant materials like stainless steel or coated alloys. Avoid relying on adhesive tapes or weak fasteners—they might hold briefly but won’t last under constant car motion.
Think about the weight of your amplifier; heavier units need stronger brackets or mounts. If you want extra security, consider using lock washers or thread-locking fluid to keep screws from loosening over time. Have you checked if your amplifier came with a specific mounting kit? Using the manufacturer’s recommended hardware can save you from future headaches.
Positioning For Accessibility
Place the amplifier where you can easily reach it for adjustments or troubleshooting. Many installers prefer mounting under the seat or in the trunk, but make sure it’s not buried under heavy items or obstructed by panels. Accessibility means you can quickly access controls or connections without dismantling parts of your car.
Consider airflow too—amplifiers generate heat, so avoid tight, enclosed spaces without ventilation. A spot near a vent or an open area helps keep the unit cool, preventing overheating. Have you thought about how often you’ll need to access the amplifier after installation? Choosing a practical location saves time and effort later on.
Adjusting Amplifier Settings
Adjusting amplifier settings is key to getting the best sound from your 4 channel car amplifier. Proper settings help balance power and clarity. They prevent distortion and protect your speakers. This step ensures your audio system performs at its peak.
Setting Gain And Crossover
Gain controls the input signal strength to the amplifier. Set it too high and sound distorts. Too low and audio becomes weak. Start with gain at a low level and increase slowly while playing music. Stop when sound is clear and loud without distortion.
The crossover divides audio frequencies between speakers. Use the low-pass filter for subwoofers to block high frequencies. Use the high-pass filter for tweeters to block low frequencies. Adjust the crossover frequency to match your speaker specs for better sound separation.
Testing Sound Quality
Test sound quality in your car by playing different music styles. Listen for clear highs, mids, and deep bass. Check for any buzzing or distortion. Adjust gain and crossover again if needed.
Drive around and listen to the system at various volumes. Make small changes for the best balance. Proper testing helps avoid damage and improves your listening experience.
Final Safety Checks
Before you power up your 4 channel car amplifier, performing final safety checks is crucial. These checks help prevent damage to your equipment and ensure everything functions smoothly. Skipping this step can lead to frustrating issues or even dangerous situations.
Inspecting All Connections
Take a close look at every wire and connection point. Are all cables firmly attached and properly insulated? Loose or exposed wires can cause shorts or signal loss, so tighten any connectors that feel wobbly.
Double-check the polarity of your speaker wires and the placement of the fuse. A quick visual scan can save you hours troubleshooting later. Have you ever experienced distortion or no sound at all after installation? Often, it’s a small connection problem.
Reconnecting The Battery
Once all connections are confirmed secure, reconnect your car battery. Before doing so, make sure your amplifier’s gain and bass settings are turned down to avoid sudden loud noises that can damage your speakers.
After reconnecting, turn on your system carefully and listen for any unusual sounds or smells. If something feels off, immediately power down and recheck your wiring. Your safety and your gear’s longevity depend on this cautious approach.

Credit: www.reddit.com
Frequently Asked Questions
How Do I Connect A 4 Channel Amplifier?
To connect a 4 channel amplifier, start by disconnecting the car battery. Connect the power wire to the battery and the ground wire to the car’s chassis. Use RCA cables for input connections and speaker wires for output connections. Ensure all connections are secure before testing the amplifier.
What Tools Are Needed For Installation?
To install a 4 channel car amplifier, you’ll need a wire stripper, crimping tool, screwdrivers, and a multimeter. An amplifier wiring kit is essential, which includes power and ground wires, RCA cables, and speaker wire. A drill may be required for securing the amplifier.
How Do I Tune A 4 Channel Amplifier?
Start by setting the gain control to its minimum. Adjust the crossover settings as required for your speakers. Use a test tone to set the gain and adjust the bass boost to your preference. Listen to the sound quality and make necessary adjustments for optimal performance.
Can I Install An Amplifier Myself?
Yes, you can install an amplifier yourself with basic tools and knowledge. Follow the manufacturer’s instructions carefully. Ensure all connections are secure and use quality wiring. If unsure, consult a professional to avoid potential damage to your vehicle’s electrical system.
Conclusion
Installing a 4 channel car amplifier is simple with the right steps. Take your time and follow each part carefully. Double-check all connections before powering on. This helps avoid problems and keeps your system safe. Enjoy better sound and clearer music in your car.
Practice makes perfect, so don’t rush the process. Soon, you will have a great audio setup to enjoy every drive.