How to Change Car Stereo Head Unit: Easy Steps for Beginners
Are you tired of your car’s old, outdated stereo? Changing your car stereo head unit might seem tricky, but it’s easier than you think—and it can completely transform your driving experience.
Imagine having clearer sound, Bluetooth connectivity, and all your favorite playlists at your fingertips. In this guide, you’ll discover simple, step-by-step instructions to replace your car stereo head unit quickly and safely. By the end, you’ll feel confident handling the upgrade yourself—and enjoy every drive like never before.
Ready to get started? Let’s dive in!
Tools Needed
Changing your car stereo head unit requires the right set of tools to make the process smooth and safe. Having everything ready before you start saves time and prevents frustration. Let’s break down the tools you’ll need, separating the essentials from the nice-to-haves.
Basic Tools
- Screwdrivers:A Phillips head and a flathead screwdriver are usually enough. They help remove screws holding the old stereo and the dash panels.
- Panel Removal Tool:Plastic trim tools prevent damage to your car’s dashboard when prying off panels. Metal tools might scratch or crack the plastic, so plastic is safer.
- Wire Strippers and Crimpers:These are crucial for connecting wires cleanly and securely. Messy connections can cause poor sound or electrical issues.
- Socket Wrench Set:Some vehicles use bolts instead of screws to secure the stereo. Having a basic socket set covers these variations.
- Electrical Tape:Wrap your connections to protect them from moisture and short circuits.
These tools are the foundation of any car stereo swap. Without them, you risk damaging your car or the new unit.
Optional Accessories
- Multimeter:Useful if you want to double-check wiring and voltage before hooking up the new stereo. It helps avoid connecting the wrong wires.
- Wiring Harness Adapter:This adapter matches the car’s wiring to the new stereo without cutting factory wires. It keeps your installation clean and reversible.
- Heat Shrink Tubing:An upgrade over electrical tape, it provides a more durable, professional insulation for your wire connections.
- Panel Removal Clip Tools:Some cars have stubborn clips that need specialized tools to remove without breaking.
- Zip Ties:Use these to bundle wires neatly behind the dash, preventing rattles and interference.
Think about your comfort level and the complexity of your car’s setup. Would investing in a wiring harness adapter save you time and headaches later? The right accessories make a big difference in the final result and how you feel about the project.
Choosing A New Head Unit
Choosing a new head unit is a key part of upgrading your car stereo. It affects sound quality, usability, and features. The right choice makes your drives more enjoyable. Consider your car’s setup and your needs carefully. This helps find the perfect match for your vehicle and lifestyle.
Compatibility
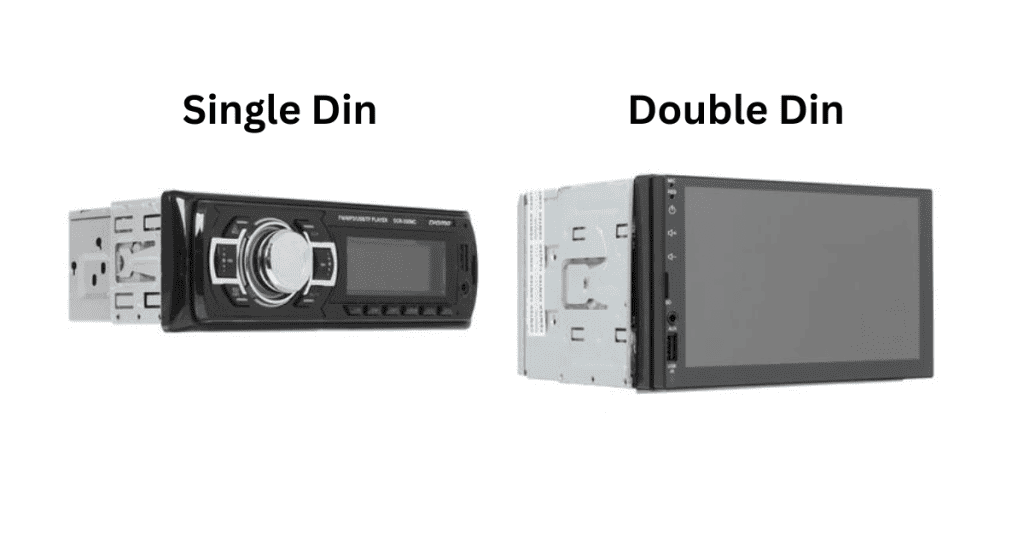
Check the size of your current head unit. Most cars use single-DIN or double-DIN sizes. The new unit must fit your dash space exactly. Also, verify wiring and connectors. Some vehicles need adapters for proper connection. Confirm if your car supports steering wheel controls. This keeps your driving safe and easy. Compatibility prevents installation problems and extra costs.
Features To Consider
Decide which features matter most for you. Common options include:
- Bluetooth for hands-free calls and music streaming
- Touchscreen displays for easy control
- Apple CarPlay or Android Auto for smartphone integration
- Built-in GPS navigation
- USB and AUX inputs
- Radio tuner with HD or satellite support
- Audio settings like equalizer and bass boost
Choose features that suit your daily use. Avoid paying for extras you won’t use. A simple unit can improve sound and control. A feature-rich model adds convenience and connectivity. Balance between cost and functionality is key.
Preparing Your Car
Getting your car ready before swapping out the stereo head unit can save you from a lot of headaches. Taking a few careful steps ensures safety and makes the process smoother. Are you curious about what simple preparations can make a big difference?
Disconnecting The Battery
Start by disconnecting your car’s battery to avoid any electrical shorts or shocks. Use a wrench to loosen the negative terminal first—this cuts power safely. If you skip this, you risk damaging your car’s electronics or even hurting yourself.
Once disconnected, double-check that all electrical components are off. This small act protects both you and your new stereo equipment. Think about how frustrating it would be to fry a circuit just before installation!
Removing Trim Panels
Next, remove the trim panels surrounding the stereo. These panels are often held by clips or screws, so gently pry them off with a plastic tool to avoid scratches. Rushing this step can break the panels or leave ugly marks on your dashboard.
Keep track of all screws and clips by placing them in a small container. This way, you won’t lose any pieces during reassembly. Have you ever struggled to find a tiny screw that’s crucial to putting everything back together?

Credit: www.youtube.com
Removing The Old Stereo
Removing the old stereo is the crucial first step before installing your new head unit. It requires careful handling to avoid damaging your car’s dashboard or the wiring behind the unit. Taking your time and knowing exactly what to do can save you from headaches later on.
Unscrewing The Unit
Start by locating the screws or bolts holding the stereo in place. These are usually found around the stereo’s frame or inside the dashboard panel. You might need a screwdriver or a socket wrench depending on your car model.
Sometimes, the stereo is locked in with clips instead of screws. Have a set of stereo removal tools ready—they make this process much easier. Never force the unit out; gentle wiggling can help loosen stuck clips.
Disconnecting Wires
Once the stereo is loose, carefully pull it out just enough to access the wiring at the back. Take a moment to observe how the wires are connected—you might want to take a photo for reference.
Unplug each connector by pressing the release tabs or gently pulling the plugs. Avoid yanking on the wires themselves to prevent damage. If you encounter any stuck connectors, wiggle them slightly while pulling.
Have you noticed any unusual wiring or aftermarket adapters that might complicate your installation? Identifying these early can help you plan for any extra steps needed to ensure a smooth upgrade.
Installing The New Stereo
Installing the new stereo head unit is the key part of upgrading your car’s audio system. This step requires careful attention to wiring and secure mounting. A proper installation ensures good sound quality and prevents electrical issues.
Follow each task with care. Avoid rushing to keep the system safe and functional.
Wiring Harness Connection
Start by connecting the wiring harness from your new stereo to the car’s wiring harness. This connection links power, speakers, and other controls.
- Match the wire colors from the stereo to the car’s wires.
- Use wire connectors or crimp tools to secure the connections.
- Double-check each wire to avoid mistakes.
- Insulate exposed wires with electrical tape.
Secure wiring prevents shorts and helps the stereo work correctly.
Mounting The Head Unit
After wiring, fit the head unit into the dashboard slot. The unit must sit firmly without movement.
- Slide the stereo into the mounting bracket or cage.
- Use screws or clips to lock it in place.
- Ensure the front panel lines up neatly with the dashboard.
- Test the fit to prevent rattling or loose parts.
Proper mounting protects the stereo and keeps it stable during drives.

Credit: www.youtube.com
Testing And Final Adjustments
Testing and final adjustments are key to ensure your new car stereo works perfectly. This step helps you spot any issues early. It also lets you fine-tune settings for the best sound quality and user experience.
Powering On
Start by turning on your car’s ignition. Watch the stereo display carefully. Make sure it powers on without error messages. Check the brightness and screen clarity. If the unit does not start, recheck all connections. Confirm the wiring harness is secure and the fuse is intact.
Sound And Function Check
Play some music or radio to test sound output. Listen for clear audio from all speakers. Adjust volume, bass, and treble to your liking. Test the radio tuner and Bluetooth connection. Try using the USB or auxiliary input as well. Make sure all buttons and touchscreen functions respond quickly.
- Check microphone for hands-free calls
- Test steering wheel control compatibility
- Verify clock and display settings
Reassembling Panels
Once all tests pass, carefully put the dashboard panels back. Align clips and screws properly to avoid damage. Press panels firmly until they snap into place. Double-check that no wires are pinched or loose. Clean the area to remove fingerprints and dust. Your car stereo replacement is now complete and ready to use.
Common Issues And Fixes
Changing your car stereo head unit can bring fresh features and better sound, but it sometimes leads to common issues that can be frustrating. Recognizing these problems early helps you fix them quickly and enjoy your new setup without delay. Let’s look at some typical issues and easy fixes that you can handle yourself.
No Power
If your new stereo doesn’t turn on, the first thing to check is the power connection. Make sure the wiring harness is properly connected, especially the red (accessory) and yellow (constant power) wires.
Sometimes a blown fuse in the car’s fuse box or the stereo’s fuse can cause this problem. Replace any blown fuses and test the unit again.
Have you tried turning the key to the “on” position without starting the engine? Some stereos won’t power up unless the ignition is on.
Sound Problems
Weak or no sound is a common headache after installation. Check that all speaker wires are connected correctly and none are loose or touching metal parts.
If the sound is distorted or unbalanced, inspect the speaker impedance and amplifier settings. Incorrect wiring or mismatched components can cause these issues.
Don’t forget to test the stereo with different audio sources to rule out problems with the media or Bluetooth connection.
Fitment Issues
Sometimes the new head unit doesn’t fit perfectly into the dashboard. This can happen if the stereo size doesn’t match the car’s dash opening.
Using a dash kit designed for your vehicle model can solve this problem by providing the right brackets and trim pieces.
Have you noticed gaps or loose mounting? Tighten screws carefully and use foam padding if needed to prevent vibrations and rattling.
Credit: www.santaclaritaautosound.com
Frequently Asked Questions
How Do I Remove The Old Car Stereo?
Start by disconnecting the car battery to ensure safety. Use a panel removal tool to gently pry off the trim. Unscrew the mounting brackets and carefully slide out the old stereo. Disconnect the wiring harness and antenna cable from the back of the unit.
What Tools Do I Need For Stereo Replacement?
You’ll need a panel removal tool, screwdriver set, and wire crimpers. A wiring harness adapter is also useful for connecting the new stereo. Having an antenna adapter and trim removal tools can make the job easier and more efficient.
Can I Install A Car Stereo Myself?
Yes, you can install a car stereo yourself with basic tools and guidance. Follow the installation manual that comes with the new stereo. Make sure to connect the wiring harness correctly for optimal performance.
Do I Need A Wiring Harness Adapter?
Yes, a wiring harness adapter simplifies connecting the new stereo to your car. It helps avoid cutting factory wires, making installation easier and cleaner. Ensure compatibility with your car model for a seamless connection.
Conclusion
Changing your car stereo head unit can improve your driving experience. Take your time and follow each step carefully. Use the right tools and double-check connections before finishing. A new stereo brings better sound and modern features. Enjoy your favorite music with clear sound on the road.
Stay safe and happy driving with your updated car stereo.