
Want to boost your car’s sound system and enjoy crystal-clear music on every drive? Installing a car stereo amplifier is the key to unlocking powerful, high-quality audio in your vehicle.
You might think it’s complicated or expensive, but with the right steps, you can do it yourself and save money. In this guide, you’ll learn exactly how to install a car stereo amplifier quickly and safely, even if you’re not a tech expert.
Ready to transform your driving experience? Let’s get started!
Choosing The Right Amplifier
Choosing the right amplifier is key to improving your car audio system. The amplifier powers your speakers and controls sound quality. Picking the correct type and size makes your music clear and loud without distortion.
Consider your car stereo setup and how you want to enjoy your music. Different amplifiers fit different needs. Understanding types, speaker matching, and power ratings helps you find the best amplifier.
Types Of Car Amplifiers
Car amplifiers come in several types. Each type serves a specific audio purpose and setup.
- Class A/B Amplifiers:Common and versatile. Provide good sound quality.
- Class D Amplifiers:Compact and efficient. Use less power and produce less heat.
- Mono Amplifiers:Designed for subwoofers. Deliver strong bass output.
- Multi-Channel Amplifiers:Power multiple speakers. Ideal for full car audio systems.
Matching Amplifier To Speaker
Speakers need the right amplifier to perform well. Match amplifier power output with speaker power rating.
- Check the speaker’s RMS power rating.
- Choose an amplifier with similar or slightly higher RMS power.
- Consider speaker impedance (ohms) and ensure the amplifier supports it.
Correct matching prevents damage and improves sound clarity.
Power Ratings And Compatibility
Power ratings show how much power the amplifier can deliver.
- RMS Power:Continuous power output. Most important for performance.
- Peak Power:Maximum power for short bursts. Less critical.
- Amplifier must match your car’s electrical system voltage.
- Check wiring and fuse requirements for safety and compatibility.
Understanding power ratings helps avoid overload and sound distortion.
Credit: www.diymobileaudio.com
Gathering Necessary Tools And Materials
Installing a car stereo amplifier requires more than just the device itself. Gathering the right tools and materials makes the job easier and safer. Preparing in advance saves time and prevents mistakes during installation.
Having all items ready helps maintain focus and ensures a clean, professional result. The list below covers essential tools and wiring components for a smooth process.
Essential Tools List
- Screwdrivers (flathead and Phillips) for panel removal and mounting
- Wire strippers to clean wire ends properly
- Crimping tool for secure connector attachment
- Multimeter to check voltage and continuity
- Socket wrench set for bolts and nuts
- Panel removal tools to avoid damaging car interior
- Electrical tape for insulation and protection
- Heat shrink tubing to secure wire connections
- Drill with bits, if mounting requires new holes
Required Wiring And Connectors
- Power cable (usually 8-gauge or 4-gauge) from battery to amplifier
- Ground wire of same gauge as power cable
- Remote turn-on wire to trigger amplifier
- RCA cables for audio signal from head unit to amplifier
- Speaker wires to connect amplifier output to speakers or subwoofers
- Fuse holder with appropriate fuse to protect power cable
- Ring terminals for battery and ground connections
- Butt connectors or solder for secure wire joins
Preparing Your Vehicle
Preparing your vehicle properly ensures a smooth and safe car stereo amplifier installation. This stage helps prevent electrical issues and protects your vehicle’s components. Take time to follow these basic but crucial steps before starting the installation.
Disconnecting The Battery
Start by disconnecting the car battery to avoid electric shock or short circuits. Use a wrench to loosen the negative terminal first. Remove the cable and keep it away from the battery. This step stops power flow and keeps you safe during the work. Never skip this important safety measure.
Accessing The Stereo System
Locate the stereo unit inside your dashboard. Use trim tools to carefully remove panels without damage. Identify screws or clips holding the stereo in place. Keep all removed parts organized for easy reassembly. Gently pull the stereo out to access wiring and connectors. Clear access makes amplifier installation easier and faster.
Mounting The Amplifier
Mounting the amplifier is a key part of installing a car stereo amplifier. Proper placement and secure attachment ensure the amplifier works well and lasts long. This section covers how to choose the right location and secure the amplifier safely inside your vehicle.
Choosing The Location
Select a spot with good ventilation to avoid overheating. Avoid places near heat sources like the engine or direct sunlight. The amplifier should be close to the battery and stereo system to reduce wire length. Common locations include under a seat, in the trunk, or behind panels. Make sure the spot is dry and free from dust or dirt. Check that there is enough space for wiring and future adjustments.
Securing The Amplifier
Use screws or brackets to fasten the amplifier firmly. Avoid loose mounting to prevent vibrations and noise. If mounting under a seat, ensure it does not interfere with seat movement. Use rubber pads or foam to reduce vibration damage. Keep wires organized with cable ties or clamps. Double-check that the amplifier does not block any safety features or airbags.
Wiring The Amplifier
Wiring the amplifier is a key part of installing a car stereo amplifier. Proper wiring ensures good sound and protects your car’s electrical system. This process involves several important connections. Each connection must be done carefully to avoid problems.
Running Power Cables
Power cables supply electricity from the car battery to the amplifier. Use a thick cable designed for car audio systems. Run the cable through the car’s firewall carefully. Avoid sharp edges and hot engine parts. Use a fuse holder close to the battery to protect the system. Secure the cable along the car frame to prevent movement.
Connecting Ground Wire
The ground wire completes the electrical circuit for the amplifier. Find a clean metal spot near the amplifier to attach the wire. Remove paint or rust to ensure good contact. Use a ring terminal to connect the wire to the car body. Keep the ground wire as short as possible for best performance.
Hooking Up Remote Turn-on Wire
The remote turn-on wire tells the amplifier to power on with the stereo. Connect this wire to the remote output on the car stereo. This connection allows the amplifier to switch on only when the stereo is playing. Use a small gauge wire and secure it to avoid disconnection.
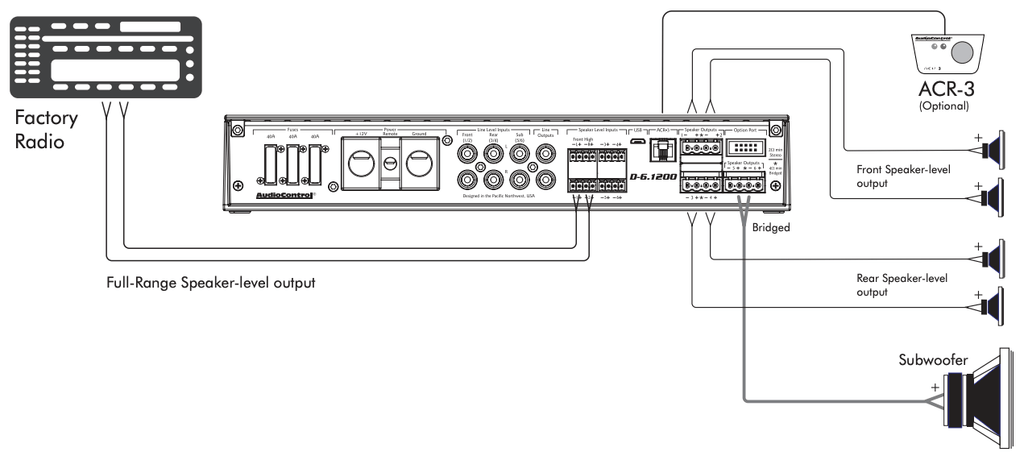
Linking Rca Cables And Speaker Wires
RCA cables carry the audio signal from the stereo to the amplifier. Connect the RCA cables to the amplifier’s input jacks. Match colors if possible to avoid confusion. Speaker wires carry amplified sound to the speakers. Connect speaker wires to the correct amplifier outputs. Check the polarity (+ and –) to prevent sound issues.
Configuring The Amplifier Settings
Configuring your car stereo amplifier settings is essential to get the best sound quality from your system. Proper adjustments can prevent distortion, protect your speakers, and tailor the audio to your personal taste. Let’s focus on two key areas: adjusting gain and crossovers, and setting bass boost and filters.
Adjusting Gain And Crossovers
Gain controls the amplifier’s input sensitivity. Setting it too high causes distortion; too low results in weak sound. Start by turning the gain down completely, then slowly increase it while playing your favorite track at a moderate volume until the sound is clear and powerful without distortion.
Crossovers decide which frequencies your amplifier sends to your speakers. Use the high-pass filter for smaller speakers to avoid low-frequency damage. Subwoofers benefit from the low-pass filter, focusing on deep bass sounds. Adjusting these filters helps your system play cleaner, sharper audio.
Setting Bass Boost And Filters
Bass boost adds extra punch to low frequencies but can easily overpower your system. Use it sparingly—too much bass boost can cause distortion or damage speakers. Find a balance where the bass feels full but doesn’t drown out other sounds.
Filters help shape your sound further by cutting unwanted frequencies. Experiment with different settings to find what suits your music style and car acoustics. Don’t hesitate to fine-tune these controls over time; your ears are the best judge.
Testing The System
Testing the system after installing your car stereo amplifier is crucial to ensure everything works smoothly. This phase lets you catch any wiring mistakes or sound issues before hitting the road. Taking your time here will save you from frustrating trips back to the garage.
Reconnecting The Battery
Before you test the sound, safely reconnect your car battery. Make sure the connections are tight and free of corrosion to avoid electrical shorts. Always reconnect the positive terminal first, then the negative, to minimize the risk of sparks.
Once reconnected, turn on your car’s ignition but don’t start the engine yet. This powers the stereo system and amplifier, allowing you to check if everything powers up correctly. If your amplifier has a power indicator light, watch for it to turn on—this confirms it’s receiving power.
Checking For Sound Quality
Play a variety of music tracks with different frequencies to test the full range of your new amplifier. Listen carefully for clear highs, solid mids, and deep bass without distortion. If the sound feels weak or muffled, it might indicate a wiring or speaker issue.
Adjust the amplifier’s gain and crossover settings slowly while listening. Tiny tweaks can make a big difference in sound quality. Have you noticed any buzzing, rattling, or unexpected noises? These clues help pinpoint problems early.
Troubleshooting Common Issues
If the amplifier doesn’t power on, double-check all ground and power connections. A loose ground wire is often the culprit behind a silent amp. Make sure your fuse hasn’t blown; replacing it might be a quick fix.
Humming or buzzing noises usually come from grounding problems or interference from other electronics. Try relocating the amplifier or running power and audio cables separately. If sound cuts out intermittently, inspect speaker wires for breaks or loose connectors.
Remember, patience is key. Testing and adjusting your system can take time, but the reward is a crystal-clear, powerful sound that makes every drive enjoyable.

Credit: www.youtube.com
Credit: www.diymobileaudio.com
Frequently Asked Questions
What Tools Are Needed To Install A Car Stereo Amplifier?
You need wire strippers, screwdrivers, a drill, a multimeter, and mounting hardware. These tools help with wiring, securing, and testing connections efficiently.
How Do I Connect The Amplifier To My Car Battery?
Use a power cable with an inline fuse. Connect it directly to the positive battery terminal to ensure a safe and strong power supply.
Where Should I Mount The Car Stereo Amplifier?
Mount the amplifier in a dry, ventilated area like the trunk or under a seat. Avoid damp or excessively hot spots to prevent damage.
How Do I Ground A Car Stereo Amplifier Properly?
Connect the amplifier’s ground wire to a clean metal surface on the car’s chassis. Ensure a solid, paint-free contact for optimal performance and safety.
Conclusion
Installing a car stereo amplifier can be simple. Follow the steps carefully. Ensure all connections are secure. Use quality cables for better sound. Always disconnect the battery before starting. Check your vehicle’s manual for specifics. Take your time with each step.
This avoids mistakes. After installation, test the system. Make sure everything works properly. Enjoy your improved sound quality. Share your experience with friends. They’ll appreciate the advice. A properly installed amplifier enhances driving pleasure. Sounds clearer, deeper, and more enjoyable.
Happy listening on your next drive!

