Wiring your car stereo speakers might seem tricky at first, but it’s easier than you think. When done right, you’ll hear every beat and note clearly, making your drives more enjoyable.
Imagine turning up your favorite song and feeling the sound come alive inside your car. In this guide, you’ll learn simple, step-by-step instructions to wire your car stereo speakers like a pro. Whether you’re upgrading your system or fixing a problem, this article will give you the confidence and know-how to get the job done quickly and safely.
Ready to make your car audio sound amazing? Let’s dive in!
Tools And Materials Needed
Wiring car stereo speakers requires specific tools and materials to ensure a smooth and safe installation. Having the right equipment helps prevent damage to your vehicle’s electrical system. It also guarantees better sound quality and long-lasting connections.
Below is a list of what you need before starting the wiring process. Gathering these items first will save time and reduce frustration.
Essential Tools
- Wire strippers for removing insulation cleanly
- Crimping tool to secure connectors firmly
- Multimeter to test electrical connections
- Screwdrivers for mounting speakers and panels
- Electrical tape for insulating wire joints
- Heat shrink tubing to protect and insulate wires
- Panel removal tool to avoid damaging trim
Speaker Wire Types
Choosing the right speaker wire is important for sound quality. The most common types include:
- Oxygen-free copper wire, which offers better conductivity
- Stranded wire, flexible and easy to route
- Gauge sizes from 16 to 12, depending on speaker power
Use thicker wire (lower gauge) for longer runs or higher power speakers.
Additional Accessories
- Wire connectors like butt connectors or quick-disconnects
- Fuse holders to protect the circuit from overloads
- Cable ties for neat and secure wiring
- Sound deadening material to reduce vibrations and noise
Credit: www.nissanmurano.org
Preparing Your Car Stereo System
Preparing your car stereo system is key for a smooth speaker wiring process. Proper preparation saves time and prevents damage to your car’s electrical parts. It also ensures a clean, professional audio setup.
Start by making the workspace safe and organized. Gather all tools and parts needed before beginning. A clear plan helps avoid mistakes and frustration during installation.
Disconnecting The Battery
Disconnect the car battery to avoid electric shocks and short circuits. Use a wrench to loosen the negative terminal first. Keep the cable away from the battery post to prevent accidental contact.
This step protects your vehicle’s electrical system and your safety. Never skip disconnecting the battery before working on speakers or wiring.
Removing Old Speakers
Remove the door panels or speaker covers carefully to access the old speakers. Use a screwdriver or panel remover tool to avoid damage. Take note of how speakers are mounted and wired.
Gently unplug the speaker wires and remove screws holding the speakers. Keep screws and parts organized for reuse or reference. Old speakers may be fragile, so handle with care.
Inspecting Wiring Harness
Check the wiring harness for damage or corrosion. Look for frayed wires, loose connections, or rusted terminals. Clean or replace damaged wires before installing new speakers.
Match the wire colors to the new speaker wires for correct connections. A good wiring harness ensures better sound and avoids future electrical problems.
Planning Your Speaker Wiring
Planning your speaker wiring is the first step to a clear and powerful car audio experience. It helps avoid mistakes and saves time during installation. Proper planning ensures wires fit well and connect safely without damage. Taking time to prepare wiring routes and wire types improves sound quality and system reliability.
Identifying Speaker Locations
Know where each speaker will go inside your car. Common spots include doors, rear deck, and dashboard. Check for factory speaker positions if you want to upgrade. Mark these places clearly. Consider space around speakers for wire paths and mounting. Accurate placement helps plan the wire length and connection points.
Choosing Wire Gauge
Wire gauge affects sound and safety. Thicker wires carry power better over longer distances. For most car speakers, 16 to 18 gauge wire works fine. Subwoofers and amplifiers may need thicker wire like 14 gauge. Use copper wire for good conductivity. Avoid thin wire to prevent power loss and overheating.
Mapping Wire Routes
Plan how wires will run from the stereo to each speaker. Look for existing channels or gaps under carpets and panels. Keep wires away from sharp edges and moving parts. Secure wires with clips or tape to stop movement. A neat route avoids interference and makes future repairs easier.

Credit: www.reddit.com
Connecting The Speakers
Connecting the speakers is a crucial part of wiring your car stereo. It’s not just about plugging wires together; it’s about making sure the connection is secure and the sound quality is at its best. If you rush this step or do it incorrectly, you might face issues like poor sound, shorts, or even damage to your stereo system.
Stripping And Twisting Wires
Start by carefully stripping about half an inch of insulation from the end of each speaker wire. Use a wire stripper to avoid damaging the copper strands inside. Once stripped, twist the exposed copper strands tightly to keep them from fraying.
I once skipped twisting the wires properly and ended up with a weak connection that caused crackling sounds. That simple twist made all the difference for a clean and stable audio signal.
Using Connectors Or Soldering
You can connect your wires using quick connectors or by soldering them together. Connectors like crimp caps or butt connectors are quick and easy, making future adjustments simpler.
Soldering, however, provides a more permanent and reliable connection. If you choose to solder, make sure you heat the wire and apply solder evenly to avoid cold joints. Remember to cover the joint with heat shrink tubing or electrical tape for insulation.
Ensuring Proper Polarity
Matching the positive and negative terminals between your stereo and speakers is vital. Incorrect polarity can cause your speakers to be out of phase, resulting in weak bass and muddy sound.
Most speaker wires have markings or color codes—red or a stripe usually means positive (+), and black or plain means negative (−). Double-check these before connecting. Have you ever noticed your music sounding off? It might be a polarity issue.
Testing And Troubleshooting
Testing and troubleshooting your car stereo speakers after wiring is crucial to ensure everything works perfectly. Sometimes, even a small connection error can cause big sound problems. Taking a systematic approach helps you identify and fix issues quickly, saving time and frustration.
Reconnecting The Battery
After wiring your speakers, reconnect the car battery carefully. Make sure the terminals are tight and clean to avoid any electrical issues. Remember, a loose battery connection can cause your stereo to malfunction or not power on at all.
Before you test the sound, double-check that you haven’t left any tools or wires loose under the dashboard. This simple step can prevent short circuits and other hazards.
Testing Sound Output
Turn on your car stereo and play music at a low volume first. Listen closely to each speaker to confirm it’s producing clear sound without distortion or crackling. If one speaker sounds off, focus your troubleshooting efforts there.
- Check if the speaker wires are connected to the correct terminals.
- Swap the wires between speakers to see if the problem moves with the wire or stays with the speaker.
- Use a multimeter to test wire continuity and ensure there are no breaks.
Have you ever noticed a speaker sounding quieter or distorted only at higher volumes? That often points to impedance issues or a poor connection that needs tightening.
Fixing Common Issues
If your stereo isn’t producing sound or sounds distorted, start by inspecting the wiring connections. Loose or reversed wires are the most common culprits.
Here are some practical fixes you can try:
| Issue | Possible Cause | Solution |
|---|---|---|
| No sound from speaker | Loose or disconnected wire | Reconnect and secure wire terminals |
| Distorted sound | Wrong polarity or damaged speaker | Check wire polarity and test with another speaker |
| Static or crackling noise | Interference or poor grounding | Ensure proper grounding and reroute wires away from power cables |
Sometimes, the problem isn’t the speaker wiring but the stereo head unit settings. Double-check balance, fade, and equalizer settings. Adjusting these can instantly improve your sound quality.
Have you tried testing your speakers with a different audio source? This quick test can help you figure out if the issue lies with your stereo or the speakers themselves.
Tips For Enhancing Sound Quality
Improving sound quality in your car stereo setup takes more than just wiring speakers. Small changes make a big difference in audio clarity and bass response. Focus on speaker placement, wire management, and component upgrades. These tips help create clear, rich sound for every drive.
Securing Speaker Placement
Speaker position affects sound direction and quality. Place speakers away from corners to reduce echo. Mount them securely to avoid vibrations that cause noise. Angle speakers toward the listener for better sound focus. Keep tweeters at ear level for crisp highs.
Reducing Wire Interference
Interference can cause static or humming sounds in speakers. Use high-quality, shielded wires to block noise. Keep power and audio wires separate to avoid electrical interference. Secure wires tightly with clips to prevent rubbing or damage. Avoid running wires near vehicle electronics that cause interference.
Upgrading Components
Better parts improve audio output and durability. Choose speakers with higher power handling and quality materials. Replace factory wiring with thicker gauge wire for better signal flow. Add a dedicated amplifier to boost speaker performance. Use capacitors or sound processors for clearer sound and deeper bass.

Credit: www.youtube.com
Frequently Asked Questions
How Do I Connect Car Stereo Speakers Properly?
To connect car stereo speakers properly, match the positive and negative wires from the stereo to the speakers. Use quality connectors and ensure a secure connection to avoid sound issues and damage.
What Tools Are Needed To Wire Car Stereo Speakers?
You need wire strippers, crimp connectors, electrical tape, a screwdriver, and a multimeter to wire car stereo speakers safely and efficiently.
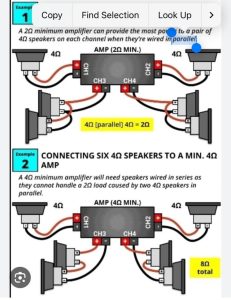
Can I Wire Multiple Speakers To One Car Stereo?
Yes, you can wire multiple speakers, but ensure the total impedance matches the stereo’s output to avoid damage or poor sound quality.
How To Avoid Noise When Wiring Car Stereo Speakers?
Use shielded cables, secure all connections tightly, and keep speaker wires away from power cables to minimize noise and interference.
Conclusion
Wiring car stereo speakers is simpler than it seems. Start with the right tools. Follow safety guidelines closely. Double-check connections to avoid issues. Quality sound depends on proper installation. Practice makes perfect, so take your time. Ask for help if unsure.
Enjoy the music from your car stereo. With these steps, you’re ready to enjoy your ride.