
Imagine cruising down the highway, your favorite playlist blasting through your car speakers, when suddenly a rattling sound disrupts your musical bliss. It’s annoying, right?
Rattling speakers can turn even the most peaceful drive into a frustrating experience. But don’t worry—you’re not alone in this. Many drivers face this common issue, and the good news is that it’s often easy to fix. You’ll discover simple, effective solutions to silence those pesky rattles and restore your car’s sound system to its full glory.
Ready to transform your car audio experience? Keep reading to find out how you can enjoy crystal-clear sound once again.
Common Causes Of Rattling Speakers
Rattling speakers in your car can quickly turn an enjoyable drive into a frustrating experience. Before rushing to replace your entire sound system, understanding the common causes of this annoying noise can save you time and money. Identifying the root of the problem helps you apply the right fix and restore crisp, clear sound.
Loose Speaker Mounts
Have you ever noticed a buzzing sound that changes with the volume or bass intensity? Loose speaker mounts are often the culprit. When speakers aren’t securely fastened, vibrations cause them to rattle against the car door or panel.
Check the screws and brackets holding your speakers in place. Tightening these can sometimes eliminate the noise entirely. Don’t overlook the mounting foam or clips, as worn-out materials can also contribute to looseness.
Worn Out Speaker Components
Speakers endure a lot over time—constant vibrations, temperature changes, and dust can wear down their components. Parts like the cone, voice coil, or spider might become damaged or less flexible, causing rattling sounds.
Inspect your speaker cones for tears or cracks. If the cone or coil is compromised, you might notice distortion along with the rattle. Replacing these components or the whole speaker could be necessary if you want to restore sound quality.
Faulty Wiring Connections
Sometimes, the issue isn’t the speaker itself but the wiring connected to it. Loose or corroded wires can cause intermittent contact, leading to popping or rattling noises.
Look behind the speaker for any disconnected or frayed wires. Secure connections and clean any corrosion you find. This simple fix might instantly improve your audio performance without any costly replacements.
Damaged Speaker Surrounds
The surround is the flexible ring around the speaker cone that helps it move properly. Over time, this surround can crack, dry out, or become brittle, which affects speaker performance and produces rattling sounds.
If you notice your speakers sounding hollow or rattly, check the surrounds closely. Repair kits are available if the damage is minor, but severe deterioration usually means replacing the speaker is the best option.
Credit: www.mazda3revolution.com
Tools And Materials Needed
Fixing rattling speakers in your car requires a clear set of tools and materials. Having the right items on hand saves time and reduces frustration. You’ll want to prepare carefully before you start poking around your vehicle’s audio system.
Basic Hand Tools
Start with a simple toolkit. You’ll need screwdrivers—both flathead and Phillips—to remove panels and speaker covers. A socket wrench set helps with bolts securing the speakers and mounts.
Don’t forget a trim removal tool; it prevents damage to your car’s interior when prying off panels. A flashlight or headlamp can also be a lifesaver in tight or dark spaces. Have a small brush or compressed air handy to clean dust from speaker areas.
Sound Deadening Materials
Rattling often comes from vibrations, so sound deadening materials can make a big difference. Butyl rubber sheets and foam tape are popular choices to dampen unwanted noise. These materials stick behind the speaker or on the door panel to absorb vibrations.
Think about how much noise reduction you want. You can combine layers for better results or focus on the most problematic areas. Do you know where the rattling is coming from? Targeting that spot with sound deadening will save you effort and money.
Replacement Parts
Sometimes the speaker or its mounting hardware is worn out or broken. Having replacement parts like speaker screws, mounting brackets, or even a new speaker is essential. Make sure the replacements match your car’s make and model to avoid fit issues.
Check the condition of wiring and connectors too. Loose or corroded connections can cause rattling or poor sound quality. Would you replace a speaker driver if it’s visibly damaged or just try to fix it? Having spares lets you decide on the spot.
Adhesives And Sealants
Adhesives can secure loose parts causing the noise. Double-sided automotive tape is handy for quick fixes without making a mess. For a stronger bond, use silicone sealant or specialized automotive glue to fix speaker mounts or panels.
Be cautious about using too much adhesive; it might damage surfaces or make future repairs harder. Have some rubbing alcohol nearby to clean surfaces before applying glue—this improves adhesion. What if a loose wire causes the rattle? A dab of adhesive might be all you need.
Step-by-step Fix For Loose Speakers
Loose speakers can turn your favorite road trip into a frustrating rattle-fest. Fixing them doesn’t require a professional mechanic or expensive tools. You can restore clear sound by carefully tightening and securing your car’s speakers with a few simple steps.
Removing The Speaker Panel
Start by gently prying off the speaker panel to access the speaker itself. Use a flathead screwdriver or a plastic trim removal tool to avoid scratching your car’s interior. Be patient—rushing this step can break clips or damage the panel.
Once the panel is off, inspect the speaker and surrounding area for any obvious damage or loose parts. Have you noticed any dirt or debris that might be causing the speaker to misalign? Cleaning this area before you proceed can save you trouble later.
Tightening Mounting Screws
Check all the screws holding the speaker in place. Loose screws are often the root cause of rattling sounds. Use a screwdriver to snug each one firmly, but avoid over-tightening as this can strip the threads or crack the speaker frame.
If any screws seem stripped or worn, replace them with slightly larger ones for a secure fit. Does your speaker frame feel stable now? If not, double-check for hidden screws that might have been missed initially.
Replacing Missing Clips
Clips are small but crucial for holding the speaker panel and speaker securely. Missing clips can cause vibrations and loosen the entire setup. Identify which clips are missing by comparing with intact sections or consulting your vehicle’s manual.
You can buy replacement clips at an auto parts store or online. Press new clips firmly into place; they should snap in without excessive force. Have you tested the speaker after clip replacement? A quick tap on the panel can reveal if rattling still occurs.

Credit: abcadvancedauto.com
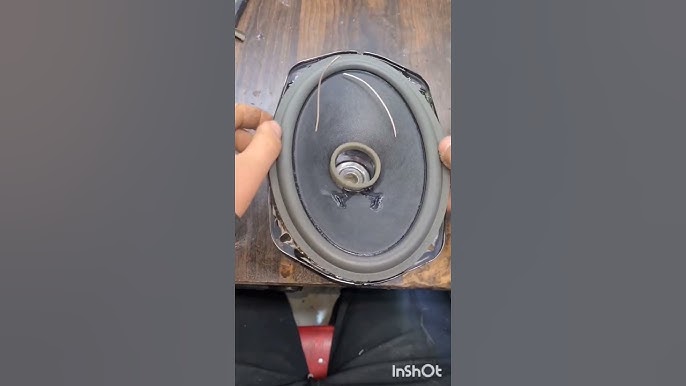
Repairing Speaker Components
Repairing speaker components is key to stopping that annoying rattling sound in your car. Often, the problem lies within the speaker’s cone or surround, which can wear out or tear over time. Fixing these parts can bring your sound back to life without the cost of a full replacement.
Inspecting The Cone And Surround
Start by carefully examining the speaker cone and surround for any visible damage. Look for tears, holes, or signs of wear that might cause vibrations or distortion. Gently press around the edges—if the surround feels brittle or loose, it’s likely the source of the rattle.
Have you noticed a specific spot where the sound changes or buzzes? That often points straight to a damaged cone or surround. Taking a close look helps you decide the right repair path.
Applying Repair Kits
Speaker repair kits are a practical option for minor damage. These kits typically include glue, new foam surrounds, and instructions tailored for your speaker size. Applying the kit requires patience—clean the damaged area first and let the glue dry completely for the best results.
Using a repair kit can save you money and time compared to buying a new speaker. But, if the damage is too extensive, this might only be a temporary fix.
Replacing Damaged Parts
Sometimes, repairing isn’t enough, and replacing the damaged components becomes necessary. You can order replacement cones or surrounds online or from specialty stores. Make sure you match the size and type exactly to avoid further issues.
Replacing parts involves some careful removal of the old components and precise installation of the new ones. If you’re comfortable with small repairs, this can be a rewarding DIY task that restores your audio quality effectively.
Improving Sound Insulation
Improving sound insulation is key to stopping rattling speakers in your car. Sound waves bounce around inside doors and panels. This causes vibrations and annoying noises. Better insulation reduces these vibrations. It makes your music clear and strong. Sound insulation also blocks outside noise. This helps you enjoy music without distractions.
Installing Foam Or Rubber Gaskets
Foam and rubber gaskets cushion the speaker frame. They prevent metal parts from touching each other. This stops vibrations that cause rattling sounds. Cut gaskets to fit around your speaker edges. Press them firmly in place before mounting the speaker. Soft materials absorb shocks and reduce noise. Foam and rubber are easy to install and cost-effective.
Using Sound Deadening Mats
Sound deadening mats are thick sheets that absorb noise. Place these mats inside door panels and near speakers. They reduce vibration by adding mass to thin metal surfaces. Mats also block outside road noise. Peel the backing and stick the mat on clean surfaces. Cover large areas for best results. Mats improve overall sound quality inside your car.
Sealing Gaps And Cracks
Gaps and cracks allow sound to escape and cause rattling. Use silicone or foam sealant to close these openings. Check around speaker mounts, door panels, and trim pieces. Smooth sealant into cracks for a tight fit. Sealing stops air leaks that reduce speaker performance. It also keeps water and dust out, protecting your car interior.
Fixing Wiring And Connection Issues
Wiring and connection problems often cause rattling speakers in cars. Loose or damaged wires can disrupt sound quality. Fixing these issues restores clear audio and stops the rattling noise. This section covers essential steps to check and repair speaker wiring.
Checking For Loose Wires
Begin by inspecting all speaker wires carefully. Look for any loose or disconnected cables. Gently wiggle wires near the speaker and amplifier to find weak connections. Check wire insulation for cuts or damage. Secure any loose wires using electrical tape or connectors. Make sure all plugs fit tightly in their sockets.
Soldering And Reconnecting
Broken or frayed wires need soldering for a strong connection. Strip small sections of wire insulation. Twist exposed wires together before soldering. Use a soldering iron to melt solder onto the wires. Avoid cold solder joints by heating wires evenly. After soldering, cover the joint with heat shrink tubing or electrical tape. Reconnect wires securely to speakers and amplifiers to prevent future rattling.
Testing Speaker Functionality
Test speakers after fixing wiring to confirm the problem is solved. Play audio at various volumes to check for rattles or distortions. Listen for clear, balanced sound from each speaker. Use a multimeter to verify proper electrical continuity in the wires. Reinspect connections if rattling persists. Proper wiring ensures crisp sound and a noise-free drive.
Preventive Tips To Avoid Future Rattling
Rattling speakers in your car can be more than just annoying—they can damage your audio system over time. Preventing future rattling saves you from costly repairs and keeps your music crisp. Paying attention to how you care for and install your speakers makes a big difference.
Regular Maintenance Checks
Regularly inspecting your speakers helps catch loose parts before they start rattling. Take a moment every few months to gently press around the speaker grille and frame. If you notice any looseness or unusual movement, tighten screws or fasteners immediately.
Also, keep the speaker area clean from dust and debris. Dirt buildup can interfere with the speaker’s components and create vibrations. Have you checked your speakers during your last car wash or oil change?
Upgrading Speaker Components
Cheap or old speaker parts tend to loosen or degrade faster, causing rattling. Investing in high-quality speaker surrounds, cones, and mounting hardware can reduce vibrations. Materials like rubber surrounds absorb shocks better than foam, which breaks down quickly.
Replacing worn-out components can be a simple DIY project that improves sound quality and longevity. Think about whether your current speakers are built to handle your car’s vibrations and driving style.
Proper Installation Techniques
Even the best speakers rattle if installed incorrectly. Use the right size screws and avoid over-tightening, which can damage the frame. Adding foam or rubber gaskets between the speaker and mounting surface creates a cushion that reduces vibration.
Make sure the speaker fits snugly in the door panel or dashboard opening without gaps. If you’re unsure, double-check the installation guide or ask a professional to avoid costly mistakes. Have you ever noticed how a small gap can turn into a big noise problem?

Credit: bossaudio.com
Frequently Asked Questions
Why Are My Car Speakers Rattling?
Car speakers rattle due to loose mounts, damaged cones, or poor wiring. Vibrations cause the rattle sound. Inspect speaker mounts and cones for damage. Tighten screws and replace broken parts to stop rattling.
How Can I Fix Rattling Car Speakers Myself?
Check for loose screws and tighten them. Add foam or sound deadening material around the speaker. Replace damaged speaker cones or surrounds. These steps reduce vibrations causing rattling and improve sound quality.
Can Poor Speaker Wiring Cause Rattling Noises?
Yes, faulty or loose wiring can cause speaker rattling. Loose connections create irregular vibrations. Inspect wiring for damage or loose terminals. Secure or replace wires to fix the rattling noise.
Does Upgrading Speaker Mounts Reduce Rattling?
Upgrading to sturdier speaker mounts minimizes vibrations. High-quality mounts hold speakers firmly in place. This reduces rattling caused by loose or weak mounts. Consider mounts made of durable materials for better stability.
Conclusion
Fixing rattling speakers in your car can greatly improve sound quality. Tighten loose screws and check speaker mounts carefully. Use foam or tape to reduce vibrations. Test the sound after each adjustment. Small efforts lead to big changes in audio clarity.
Enjoy your favorite music without annoying noise. Keep your car speakers secure for a better ride. Simple steps make a noticeable difference every time.

