Wiring your car stereo directly to the battery can boost your sound system’s performance and keep the music playing strong. But if you’re not sure how to do it safely and correctly, it might feel overwhelming.
Don’t worry—you’re about to learn a clear, step-by-step way to get it done right. By the end of this guide, you’ll have the confidence to power your stereo like a pro and enjoy crystal-clear sound every time you hit the road.
Ready to take your car audio to the next level? Let’s dive in.
Prepare Your Tools And Materials
Preparing your tools and materials is the first step to wire your car stereo directly to the battery. Having the right equipment ensures safety and makes the task easier. Gathering everything before starting saves time and avoids frustration.
Organize your workspace with all needed items within reach. Check each tool for good condition. This preparation helps you work smoothly and safely.
Essential Tools Needed
- Wire stripper and cutter for clean wire ends
- Crimping tool to secure connectors
- Multimeter to check voltage and continuity
- Screwdrivers for removing panels and securing connections
- Electrical tape for insulation
- Heat shrink tubing for added wire protection
- Socket wrench set for battery terminal removal
Choosing The Right Wire And Fuse
Select a wire gauge that matches your stereo’s power needs. Thicker wires handle more current and reduce voltage drop. Use 12 or 14 gauge wire for most car stereos.
Pick a fuse rated slightly above your stereo’s maximum current. The fuse protects your wiring and prevents electrical fires. Use a fuse holder close to the battery terminal.
| Wire Gauge | Max Current | Recommended Fuse |
|---|---|---|
| 14 AWG | 15 amps | 15 amp fuse |
| 12 AWG | 20 amps | 20 amp fuse |
Credit: www.diymobileaudio.com
Locate The Battery And Stereo Wiring
Before you start wiring your car stereo directly to the battery, you need to pinpoint exactly where both the battery and stereo wiring are located. This step is crucial because a clear understanding of these components helps prevent any electrical mishaps. Knowing what you’re working with also speeds up the installation process and keeps your car’s electrical system safe.
Finding The Car Battery
Car batteries are usually easy to find, but their location can vary depending on the vehicle model. Most often, you’ll find the battery under the hood, near one of the front corners. Sometimes, it’s tucked away under a plastic cover or even located in the trunk for some cars.
Look for a rectangular box with two thick cables attached to it—one marked with a plus (+) sign, which is the positive terminal, and the other with a minus (-) sign, the negative terminal. If you’re unsure, your owner’s manual will show the exact spot. Have you ever tried to find your battery only to discover it was hidden behind a panel? That’s why checking the manual saves time.
Identifying Stereo Power Wires
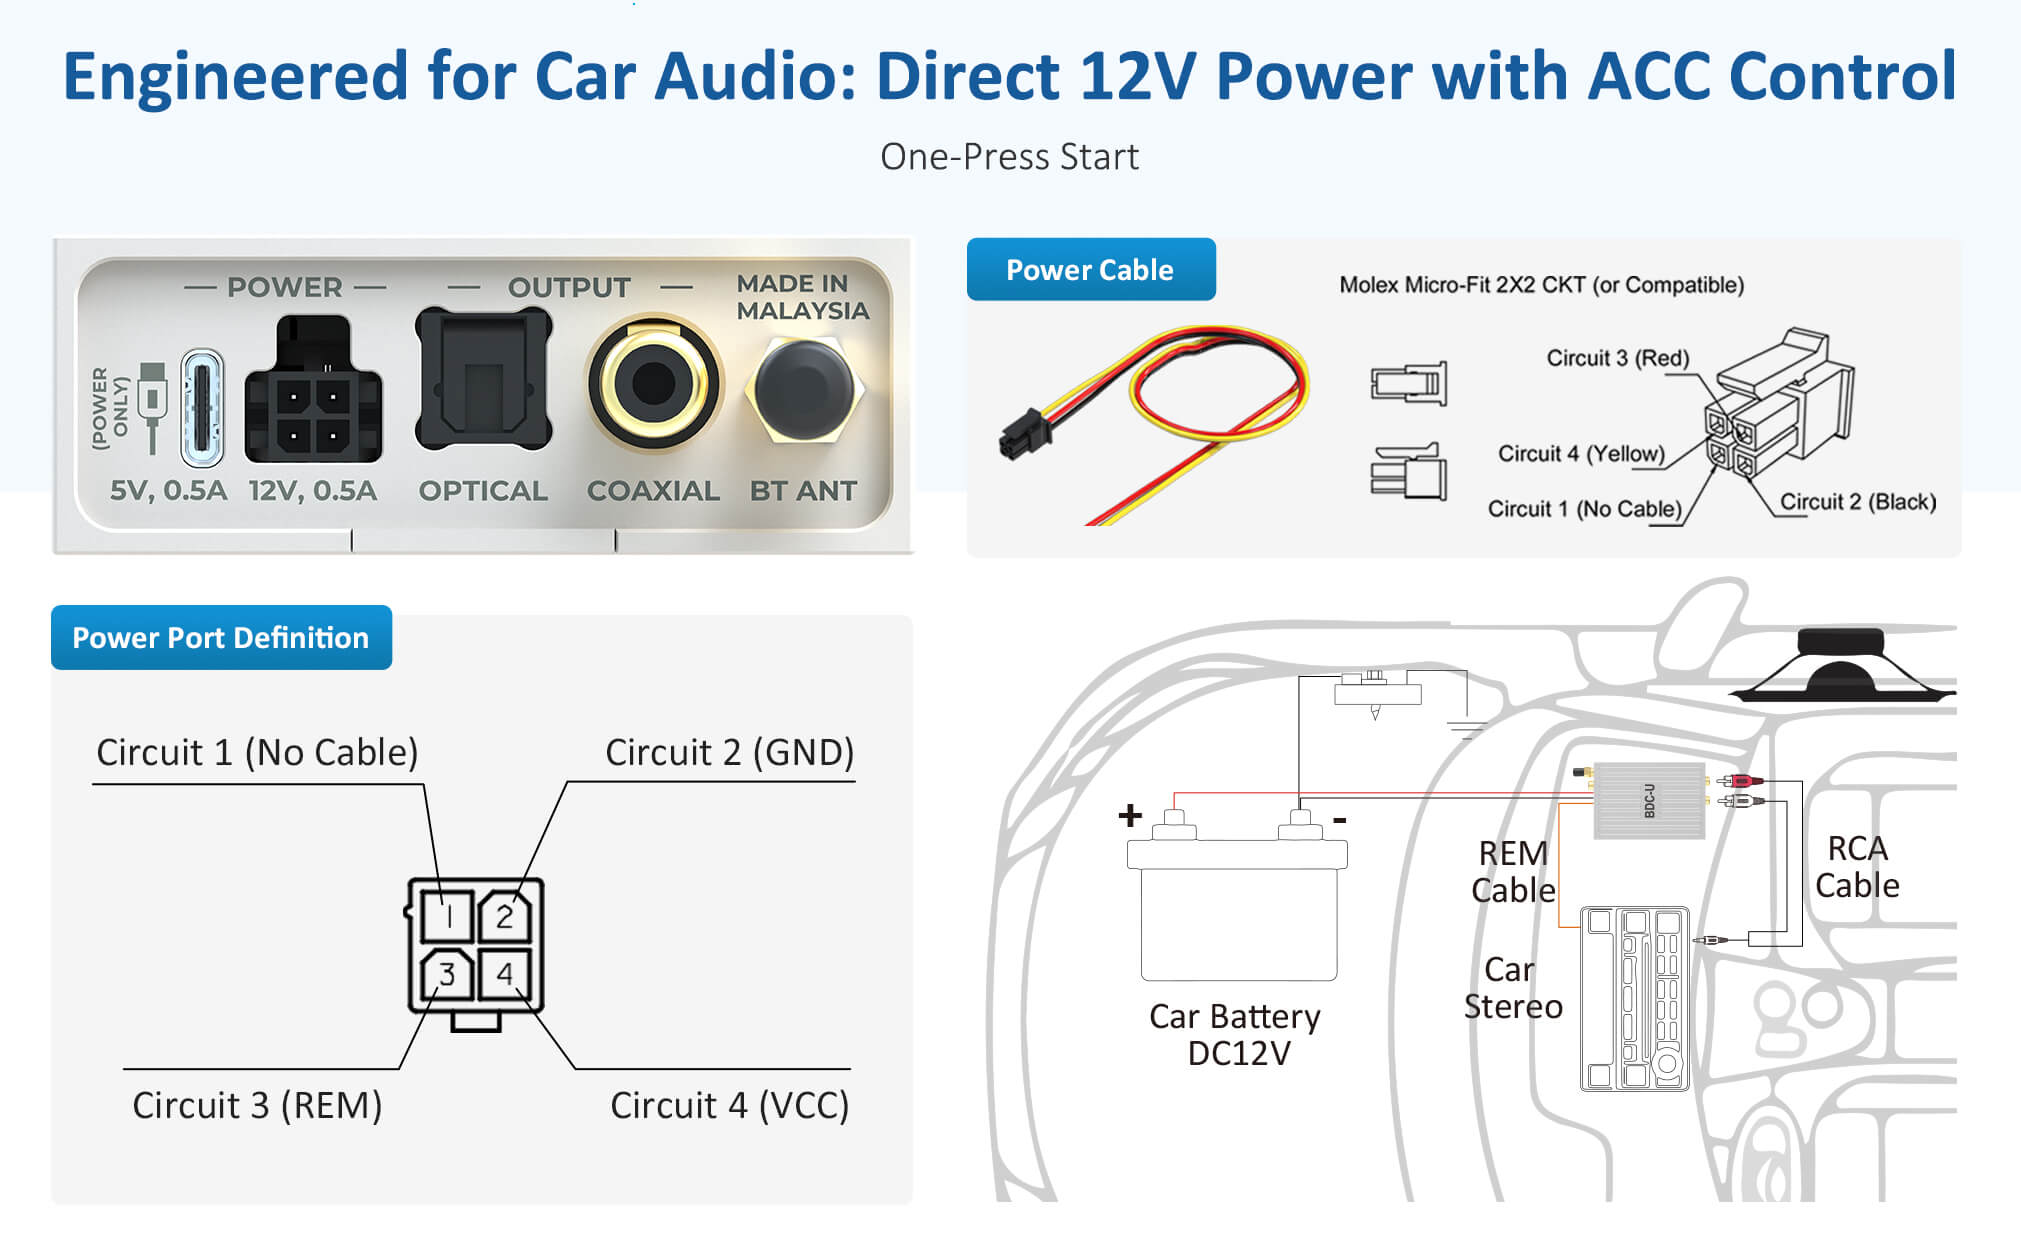
The stereo’s wiring harness usually hides behind the dashboard or inside the glove compartment. These wires power the stereo and connect it to the car’s electrical system and speakers. You need to identify three key wires:
- Constant Power Wire:This wire keeps the stereo’s memory alive, even when the car is off.
- Switched Power Wire:This wire powers the stereo only when the ignition is on.
- Ground Wire:This completes the electrical circuit, usually connected to the car’s metal frame.
Each wire usually has a specific color code, but these can differ by car make and model. Using a multimeter can help you confirm which wire is which. Have you checked your stereo wires with a multimeter before? It’s a simple step that can save you from connecting the wrong wires and causing damage.
Disconnect The Battery For Safety
Disconnecting the battery is a vital safety step before wiring your car stereo directly to the battery. It prevents electric shocks and short circuits. This simple action protects both you and your vehicle’s electrical system.
Always start by turning off the car’s ignition. Then, locate the negative terminal of the battery. Removing the negative cable first reduces the risk of sparks. Use a wrench to loosen the nut on the battery terminal clamp.
Keep the disconnected cable away from the battery terminal. This avoids accidental reconnection while working. Never touch the positive and negative terminals together. Doing so can cause serious damage or injury.
Taking these precautions helps create a safe workspace. It allows you to focus on wiring without worry. Safety first, always.
Locate The Battery And Identify Terminals
Find your car’s battery under the hood. Look for two terminals: positive (+) and negative (-). The negative terminal usually has a black cable. The positive terminal often has a red cable.
Use Proper Tools To Disconnect
Grab a wrench that fits the battery terminal nuts. Most cars need a 10mm wrench. Loosen the nut on the negative terminal clamp carefully. Pull the cable off and secure it away from the battery.
Check For Safety Before Proceeding
After disconnecting, double-check the cables. Make sure none touches the battery terminals. Look for any metal tools nearby. Remove them to prevent accidental shorts.
Credit: www.diymobileaudio.com
Run The Power Wire From Battery To Stereo
Running the power wire from your car’s battery to the stereo is a critical step in ensuring a reliable and safe audio setup. This wire carries the main current that powers your stereo system, so planning and protecting the wire properly is essential. Let’s break down how to route the wire efficiently and shield it from damage.
Planning The Wire Route
Start by choosing the shortest and safest path from the battery to your stereo. Avoid areas with sharp edges, moving parts, or extreme heat sources. A well-planned route reduces the risk of wire damage and signal interference.
Think about where the wire will pass through the firewall and under the dashboard. Does the path allow easy access for future maintenance? Also, consider how the wire will be secured to prevent it from hanging loose or getting caught.
Using A Grommet To Protect The Wire
When passing the power wire through the vehicle’s metal firewall, use a rubber grommet to protect it from sharp edges. Without this protection, the wire’s insulation can wear down quickly, leading to shorts or even fires.
Installing a grommet is simple but crucial. Just drill a hole slightly larger than the wire’s diameter, insert the grommet, and then feed the wire through it. This small step can save you from costly repairs and safety hazards.
Install The Fuse Near The Battery
Installing a fuse near the battery is essential when wiring a car stereo directly to the battery. It protects your vehicle’s electrical system from short circuits and overloads. Without a fuse, the wiring or components may get damaged, or worse, cause a fire.
Placing the fuse close to the battery ensures the circuit is protected from the very start. It stops excess current from traveling through the wiring. This simple step keeps your car and stereo safe.
Selecting Fuse Type And Rating
Choose a fuse that matches your stereo’s power needs. The most common types are blade fuses and glass tube fuses. Blade fuses are easy to find and replace.
Check your stereo’s manual for the recommended fuse rating. It usually ranges between 10 and 30 amps. Pick a fuse with the same or slightly higher amp rating than the stereo’s maximum current draw.
- A fuse rated too low will blow often.
- A fuse rated too high won’t protect the circuit properly.
Select a fuse designed for automotive use to handle voltage spikes and vibrations.
Proper Fuse Placement
Install the fuse holder as close to the battery’s positive terminal as possible. Ideally, the fuse should be within 12 inches of the battery connection.
This placement protects the entire wire length from the battery to the stereo. It prevents damage if the wire shorts anywhere along the route.
- Use a fuse holder rated for the fuse size.
- Secure the fuse holder firmly to avoid movement.
- Keep wiring neat and insulated to reduce risk.
Always disconnect the battery before installing the fuse to avoid sparks or shocks. Connect the fuse holder inline with the positive wire.
Connect The Ground Wire
Connecting the ground wire is a crucial part of wiring your car stereo directly to the battery. Without a proper ground, your stereo might not function correctly, or worse, you could risk electrical damage. Let’s focus on choosing the right grounding point and making a secure connection to keep your system stable and safe.
Choosing A Grounding Point
Pick a metal part of your car’s chassis that is free of paint, rust, and dirt. This ensures a solid metal-to-metal contact for the ground wire. Look for areas near the stereo or battery to keep wire length short and reduce resistance.
Have you ever noticed how some grounding points feel loose or flaky? Avoid those spots. A good grounding point should be sturdy and clean, such as a bolt attached directly to the frame or an unpainted metal bracket.
Securing The Ground Connection
Once you find the right spot, strip the ground wire’s end and attach a ring terminal. This makes the connection firm and prevents the wire from slipping off. Tighten the terminal to the grounding point bolt using a wrench or screwdriver.
To improve the connection, use sandpaper or a wire brush to remove any oxidation on the metal surface before securing the terminal. After tightening, give the wire a gentle tug to make sure it won’t come loose from vibrations while driving.
Would you trust a shaky connection to power your stereo? Taking a few extra minutes to secure the ground properly saves you from frustrating sound cutouts and electrical issues later on.
Attach The Power Wire To The Stereo
Attaching the power wire to your car stereo is a crucial step that ensures your audio system receives the energy it needs directly from the battery. This process demands accuracy and care to avoid electrical issues or damage to your stereo. Let’s focus on how to correctly identify the connection point and make a strong, lasting connection.
Identifying The Correct Terminal
Your car stereo will have several terminals, but the power wire must connect to the one labeled as “+12V” or “BATT.” This terminal is specifically designed to receive constant power from the battery.
Look carefully at the back of your stereo unit. The terminals might be small and close together, so use a flashlight if needed.
If you’re unsure, check the stereo’s manual or label—it usually clearly marks the power terminal. Connecting to the wrong terminal can cause the stereo not to power on or even blow a fuse.
Making A Secure Connection
Once you find the right terminal, strip a small section of the power wire’s insulation—about half an inch is enough.
Twist the exposed wire strands tightly to prevent fraying, then use a ring terminal or a crimp connector to attach the wire firmly.
Push the connector onto the stereo terminal and tighten any screws or clamps to hold it in place. A loose connection can cause intermittent power loss or noise in your speakers.
Remember, a secure connection isn’t just about holding the wire in place—it’s about ensuring safe and efficient power flow. Have you ever experienced your stereo cutting out while driving? That’s often caused by a poor connection here.
Credit: store.sure-electronics.com
Test The Stereo System
Testing your car stereo system after wiring it directly to the battery is essential to ensure everything works safely and as expected. This step confirms that the connections are secure and the stereo operates without issues. Skipping this phase can lead to damage or even safety hazards.
Reconnecting The Battery
Before you test the stereo, reconnect the car’s battery carefully. Make sure the battery terminals are clean and free of corrosion to avoid poor contact.
Use a wrench to tighten the terminals securely but avoid over-tightening, which can damage the battery posts. Once connected, give the system a moment to stabilize before turning on the stereo.
Checking For Proper Operation
Turn on your stereo and listen closely. Are all speakers producing sound? If any speaker is silent or distorted, double-check your wiring connections.
Next, test different functions like volume adjustment, bass and treble controls, and source switching. Is the display working correctly? Any flickering or error messages could point to wiring issues or power irregularities.
Don’t forget to monitor the stereo for a few minutes to catch any overheating or unusual noises. Would you want to drive around with a risky setup? Testing now can save you from bigger problems later.
Troubleshooting Common Issues
Troubleshooting is key when wiring a car stereo directly to the battery. Small mistakes or faults can stop the stereo from working. Identifying common problems saves time and effort. It helps ensure a smooth, safe installation.
No Power To Stereo
No power usually means a wiring issue or a bad connection. Check the battery connection first. The positive wire must connect securely to the battery terminal. Look for loose or corroded wires. The stereo’s ground wire should be attached to a clean metal surface. A poor ground can stop power flow.
Use a multimeter to test voltage at the stereo’s power wire. If no voltage is found, trace the wire back to the battery. Sometimes the wire may be cut or damaged. Check the stereo’s fuse holder for corrosion or loose contacts.
Blown Fuse Problems
A blown fuse often signals a short circuit or overload. Inspect the fuse near the battery connection. Replace it with the correct type and rating only. Using a higher rating fuse can damage your stereo or car wiring.
Look for causes of fuse failure:
- Pinched or frayed wires touching metal parts
- Wrong wire gauge used
- Incorrect fuse rating
- Faulty stereo or amplifier
Check the wiring carefully for damage or poor insulation. Repair any exposed wires before replacing the fuse. Test the stereo after fixing to ensure the fuse stays intact.
Frequently Asked Questions
How To Connect Car Stereo Directly To Battery?
To connect a car stereo directly to the battery, use a fuse inline with the positive wire. Connect the positive terminal of the stereo to the battery’s positive terminal. Ground the stereo’s negative wire to the car chassis. This ensures proper power and safety.
Why Use A Fuse When Wiring Stereo To Battery?
A fuse protects your car stereo and electrical system from power surges. It prevents damage by breaking the circuit during an overload. Always install a fuse close to the battery’s positive terminal for maximum protection and safety.
Can Wiring Stereo To Battery Drain Car Battery?
Yes, wiring a stereo directly to the battery can drain it if the stereo stays on when the car is off. Use a switch or a relay to control power and avoid draining your battery unnecessarily.
What Gauge Wire Is Best For Direct Battery Stereo Wiring?
Use a wire gauge between 8 and 14 AWG for direct battery stereo wiring. Thicker wires (lower gauge) handle higher current safely. Choose the gauge based on your stereo’s power requirements and wire length.
Conclusion
Wiring a car stereo directly to the battery can seem tricky. But with careful steps, it becomes manageable. Always gather the right tools first. Ensure connections are secure. This prevents potential issues later. Remember, safety is important. Disconnect the battery before starting.
Follow the steps patiently. Double-check each connection for reliability. Enjoy your new, enhanced audio experience. Proper setup means better sound quality. Now, you’re ready to enjoy your favorite tunes. Safe and happy driving with your new setup!