How to Connect Car Radio to Amplifier: Easy Step-by-Step Guide
Master Automotive Systems Engineer & Performance Vehicle Specialist at CarSpeedNest Automotive Testing Lab · ASE Certified Master Technician, Mobile Electronics Certified Professional (MECP Master), Certified Dyno Diagnostic Specialist · 14+ years in dyno testing, electronic sensor calibration, automotive wiring harnesses, and precision drivetrain maintenance
If you want to boost your car’s sound and feel every beat like never before, connecting your car radio to an amplifier is the key. But maybe you’re wondering how to do it without messing up your system or spending a fortune.
Don’t worry—this guide will walk you through simple, clear steps so you can get powerful, crisp sound fast. By the end, you’ll know exactly how to make your music come alive and enjoy every drive like a concert on wheels.
Ready to upgrade your ride’s audio? Let’s dive in!
Gather Required Tools
Gathering the right tools is the first step to connect your car radio to an amplifier. Using proper tools makes the process smooth and safe. It saves time and avoids damage to your equipment. Prepare everything before starting the installation. This section lists all essential tools and explains safety measures you must follow.
Essential Tools List
- Wire strippers – to remove insulation from wires cleanly
- Crimping tool – for secure wire connections
- Multimeter – to test voltage and continuity
- Screwdrivers – both flathead and Phillips for different screws
- Electrical tape – to insulate and protect wire joints
- RCA cables – to connect audio signals between radio and amplifier
- Power and ground wires – for amplifier power supply
- Fuse holder and fuse – to protect electrical circuits
- Zip ties – to organize wires neatly
Safety Precautions
Disconnect the car battery before starting any work. This prevents electric shock and short circuits.
Wear safety glasses to protect your eyes from wire ends and sparks.
Work in a well-lit area to see connections clearly.
Keep tools and wires away from moving car parts.
Follow manufacturer instructions for all equipment used.
Identify Car Radio Outputs
Identifying the outputs on your car radio is the first step to connect it to an amplifier. Knowing these outputs helps you match the right cables and avoid damage. Car radios usually have two main types of outputs: RCA and speaker wires. Each type sends audio signals differently.
Locate Rca Or Speaker Wires
Look at the back of your car radio for connectors or wires. RCA outputs are round and color-coded, often red and white. These cables carry low-level audio signals ideal for amplifiers.
If RCA outputs are missing, find the speaker wires. These wires usually come in pairs, with one positive and one negative wire per speaker. Speaker wires carry higher-level signals and may need adapters to connect to an amplifier.
Check Compatibility
Check if your amplifier accepts the type of output your radio has. Most amplifiers work best with RCA inputs. Using speaker wires may require a special adapter or line output converter.
Verify the voltage and signal type to avoid damage. A mismatch can cause poor sound or equipment failure. Reading the manuals for both the radio and amplifier helps confirm compatibility.
Prepare Amplifier Connections
Preparing your amplifier connections is a crucial step before you link your car radio to the amplifier. This stage ensures everything is set up safely and correctly, which helps you avoid damage and get the best sound quality. Taking time here makes the rest of the installation smoother and more reliable.
Locate Input Terminals
Start by finding the input terminals on your amplifier. These are usually labeled as RCA inputsor simply input. They receive the audio signal from your car radio.
Check your amplifier’s manual if you’re unsure where these terminals are. They are often color-coded—red for right audio and white or black for left audio. Identifying the correct inputs makes sure you connect the right cables and avoid sound issues.
Understand Power And Ground
Your amplifier needs a steady power supply and a solid ground connection to work properly. The power terminal connects to your car’s battery, providing the energy the amplifier requires.
The ground terminal must be attached to a clean, unpainted metal surface on your car’s chassis. This connection prevents electrical noise and protects your system from shorts or interference.
Have you checked the thickness of your power and ground wires? Using wires that are too thin can cause voltage drops and damage your amplifier. It’s worth investing in the right gauge cables for safety and performance.

Credit: stingersolutions.com
Connect Radio To Amplifier
Connecting your car radio to an amplifier is key to upgrading your sound system and getting clearer, more powerful audio. How you connect these two components affects the overall sound quality and system reliability. Choosing the right connection method ensures you get the best performance without unnecessary hassle.
Using Rca Cables
RCA cables are the most common and straightforward way to link your car radio to an amplifier. These cables carry low-level audio signals from the radio’s preamp outputs to the amplifier’s inputs.
Look for RCA outputs labeled as “Preamp Out” or “Line Out” on your car radio. If your radio has these, simply plug the RCA cables from the radio’s output to the amplifier’s input. Make sure you match the colors—usually red for right and white or black for left—to maintain proper stereo sound.
One advantage of RCA cables is that they minimize noise and interference, giving you cleaner sound. However, if your radio lacks RCA outputs, you may need to explore other options.
Using Speaker Wire Adapters
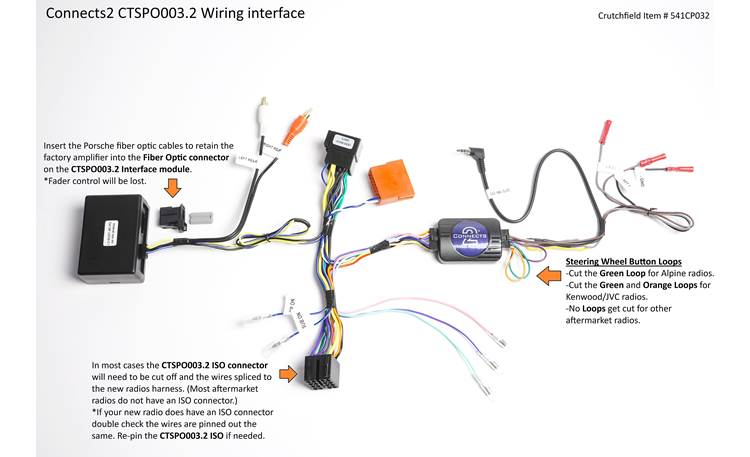
If your car radio doesn’t have RCA outputs, speaker wire adapters offer a practical alternative. These adapters convert the speaker-level output from your radio into a low-level signal that your amplifier can handle.
To use this method, connect the speaker wires from your radio to the adapter, then link the adapter’s RCA outputs to your amplifier. This setup lets you add an amplifier without replacing your head unit.
Remember, speaker wire adapters often include built-in resistors to protect your amplifier from high voltage. Check the adapter’s specifications to ensure it matches your system’s power requirements. Have you checked whether your amplifier can handle speaker-level inputs directly? That could simplify your setup further.
Wire Power And Ground
Wiring power and ground correctly is the backbone of connecting your car radio to an amplifier. Without a solid power connection and proper grounding, your amplifier won’t perform well and could even cause electrical issues in your car. Paying close attention here saves you from frustrating problems like noise interference or power loss.
Running Power Wire
Start by choosing the right gauge wire for your amplifier’s power needs; thicker wires carry more current safely. Run the power wire directly from your car battery to the amplifier, avoiding sharp edges or hot areas that could damage the wire over time.
Use a fuse holder close to the battery to protect your system from electrical surges. Have you checked how far your amplifier is from the battery? The longer the distance, the thicker the wire should be to prevent voltage drop.
Grounding The Amplifier
Grounding is just as important as running power. Connect the amplifier’s ground wire to a clean, unpainted metal part of your car’s chassis. If the surface is dirty or rusty, sand it down to bare metal to ensure a strong connection.
Keep the ground wire as short as possible—ideally less than 18 inches—to minimize electrical resistance. If your amplifier buzzes or hums, a poor ground is often the culprit. Have you tried tightening or relocating your ground point yet?
Connecting Remote Turn-on Wire
The remote turn-on wire tells your amplifier when to power up. Usually, you connect this wire to the car radio’s remote turn-on lead, which sends a 12V signal when the radio is on.
This wire is thin and easy to run alongside your power and ground wires. Don’t forget to secure it well to avoid loose connections that could cause your amp to cut out unexpectedly.
Test The System
Testing the system is a crucial step after connecting your car radio to the amplifier. It helps ensure everything works correctly and sounds great. A proper test avoids damage and improves audio quality.
Power On And Initial Checks
Turn on your car radio and amplifier carefully. Listen for any strange noises or distortions. Check if the amplifier’s power light is on. Ensure all speakers produce sound clearly. Confirm that the volume is at a low level before increasing.
Look for any loose wires or connections that might cause problems. If you hear humming or buzzing, check the ground wire. Make sure the amplifier is not overheating during this phase.
Adjust Amplifier Settings
Start adjusting the amplifier settings for the best sound. Set the gain control to a moderate level to avoid distortion. Use the bass and treble controls to balance the sound. Adjust the crossover settings according to your speaker type.
Test the system at different volume levels to ensure clarity. Make small changes and listen carefully to the effect. Stop adjusting once the sound is clear and balanced. Proper tuning helps protect your speakers and improves listening experience.
Secure And Tidy Wiring
Keeping the wiring secure and tidy is essential when connecting your car radio to an amplifier. Proper wiring prevents damage and ensures consistent sound quality. A neat setup also makes future maintenance easier. Organize cables carefully to avoid tangles and stress on connections.
Use Cable Ties
Cable ties hold wires firmly in place. They prevent cables from moving around while driving. Use small ties to bundle wires together neatly. Avoid tightening them too much to protect the wires. Space the ties evenly along the cable length for better support.
Avoid Interference
Keep power and audio cables apart to reduce interference. Run speaker wires separately from power wires. Cross cables at right angles if they must intersect. Shielded cables help block unwanted noise. Check that wires do not touch metal parts that cause grounding issues.
Credit: www.tccoa.com
Credit: www.crutchfield.ca
Frequently Asked Questions
How Do I Connect A Car Radio To An Amplifier?
To connect a car radio to an amplifier, use RCA cables from the radio’s output to the amplifier’s input. Ensure the amplifier is powered and grounded properly. Adjust the settings for optimal sound quality once connected.
What Tools Are Needed To Connect A Car Radio And Amplifier?
You will need RCA cables, wire strippers, electrical tape, a screwdriver, and a wiring harness adapter. These tools help ensure a secure and efficient connection between the car radio and amplifier.
Can Any Car Radio Connect To Any Amplifier?
Most car radios can connect to most amplifiers using RCA cables or speaker-level inputs. However, check compatibility, especially with newer radios, to ensure proper connection and sound quality.
Why Use Rca Cables To Connect A Car Radio To An Amplifier?
RCA cables transmit a clean, low-level audio signal from the radio to the amplifier. This reduces noise and interference, improving overall sound clarity and amplifier performance.
Conclusion
Connecting a car radio to an amplifier enhances sound quality. The process is simple with the right tools and steps. Always ensure your connections are secure. Double-check wire colors and connections. Avoid shortcuts to prevent damage. Enjoy clearer and more powerful audio.
Troubleshoot if sound issues arise. Consult a professional if needed. Remember, safety comes first. Take your time with the installation. Your efforts will pay off with better music experiences. Now, turn up the volume and enjoy the ride!

Similar Posts