How to Install 2 Channel Car Amplifier: Easy Step-by-Step Guide
Are you ready to take your car audio to the next level? Installing a 2 channel car amplifier can boost your sound quality and bring out the best in your speakers.
But if you’ve never done it before, the process might feel a bit overwhelming. Don’t worry – this guide breaks down every step in simple terms, so you can do it yourself with confidence. By the end, you’ll know exactly how to set up your amplifier for powerful, clear sound that makes every drive more enjoyable.
Let’s get started!
Choosing The Right Amplifier
Choosing the right 2 channel car amplifier is important for sound quality and system performance. The right amplifier matches your audio needs and speaker setup. It ensures clear, strong sound without distortion or damage.
Understanding amplifier types, speaker compatibility, and power needs helps in making a good choice. This guide breaks down these key points to help you pick the best amplifier for your car.
Types Of 2 Channel Amplifiers
Two main types of 2 channel amplifiers exist. Class AB amplifiers offer balanced sound and good efficiency. Class D amplifiers are smaller, cooler, and more efficient but can have slight distortion.
Some amplifiers include built-in crossovers to control frequencies sent to speakers. This feature helps improve sound clarity and speaker protection.
Matching Amplifier To Speakers
Amplifiers must match speaker impedance and power capacity. Most car speakers use 4-ohm impedance. Check your speaker specs before buying an amplifier.
Using an amplifier that matches speaker impedance avoids damage and sound problems. Also, match amplifier channels to speaker setup: stereo speakers need two channels.
Power Requirements
Check the amplifier’s power output in watts RMS. It should be close to your speaker’s power handling rating. Too low power causes distortion. Too high power risks speaker damage.
Consider your car’s electrical system capacity. Higher power amplifiers need better wiring and batteries. Balance power needs with your car’s setup for safe performance.
Gathering Required Tools
Gathering the right tools is crucial before installing a 2 channel car amplifier. Proper preparation saves time and prevents damage. It ensures a smooth and safe installation process.
Having everything ready helps avoid interruptions and frustration. Knowing what tools and materials to use makes the job easier. Below is a clear guide to what you need.
Basic Tools List
- Screwdrivers (Phillips and flathead)
- Wire stripper and cutter
- Socket wrench set
- Crimping tool
- Multimeter for checking voltage and continuity
- Electrical tape
- Panel removal tool
Safety Equipment
- Safety glasses to protect eyes
- Insulated gloves for electrical safety
- Work light or flashlight for visibility
- Fire extinguisher nearby for emergencies
Additional Materials
- Amplifier wiring kit (power, ground, remote cables)
- Fuse holder and appropriate fuse
- Heat shrink tubing to cover wire connections
- Cable ties for organizing wires
- Mounting screws or brackets for the amplifier
Preparing Your Vehicle
Preparing your vehicle is a crucial step before installing a 2 channel car amplifier. It sets the foundation for a smooth and safe installation process. Taking the time to get your vehicle ready can save you from unexpected issues and ensure your amplifier performs at its best.
Disconnecting The Battery
Start by disconnecting your car’s battery to avoid any electrical shocks or short circuits. Always remove the negative terminal first to reduce the risk of sparks. This simple safety step protects both you and your vehicle’s electrical system during the installation.
Have you ever underestimated how much power flows through your car’s electrical system? Disconnecting the battery reminds you how important it is to handle the wiring carefully.
Selecting Installation Location
Choose a location for your amplifier that is dry, secure, and well-ventilated. Common spots include under the seat, in the trunk, or mounted on the side panels. Consider how easily you can access the amplifier later for adjustments or maintenance.
Think about the cables you’ll need to run. Placing the amplifier near your head unit or subwoofer can reduce cable clutter and improve signal quality. Have you checked if your chosen spot allows for proper cooling? Overheating can reduce your amp’s lifespan.
Clearing Space For Installation
Clear out any items around the installation area to give yourself enough room to work comfortably. Remove floor mats, panels, or any cargo that might get in the way. This also helps prevent accidental damage to your car’s interior during the setup.
Imagine trying to install your amplifier in a cramped space. Wouldn’t it be frustrating and risky? Taking a few extra minutes to organize your workspace leads to a cleaner and faster installation.
Credit: www.roadglide.org
Wiring Setup
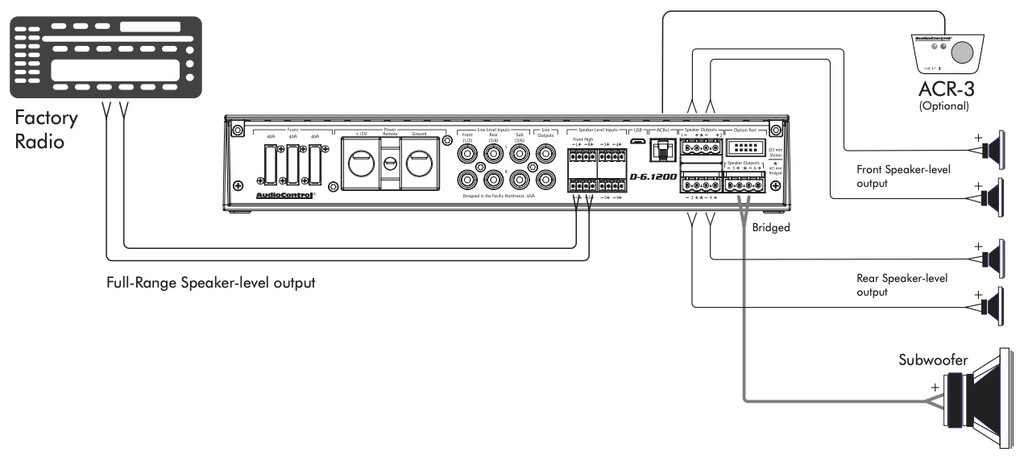
Setting up the wiring for a 2 channel car amplifier requires careful attention. Proper wiring ensures the amplifier works efficiently and safely. Each wire has a specific role in the system. Correct routing and connections prevent electrical problems and signal loss. Follow the steps below to handle the wiring setup correctly.
Routing Power Wire
Use a thick power wire rated for your amplifier’s current. Run the wire from the car battery to the amplifier location. Avoid sharp edges or hot engine parts to prevent damage. Secure the wire with clips or ties along the route. Install an inline fuse near the battery to protect the system.
Connecting Ground Wire
Find a clean, bare metal spot near the amplifier for grounding. The ground wire should be the same thickness as the power wire. Attach it firmly to avoid loose connections. Proper grounding reduces noise and improves amplifier performance. Check the connection regularly for corrosion or looseness.
Installing Remote Turn-on Wire
This wire tells the amplifier to turn on with the car stereo. Connect the remote wire from the stereo’s remote turn-on lead to the amplifier. Use a thin wire designed for this signal. Keep it away from power wires to avoid interference. Test the connection by turning the stereo on and off.
Running Rca Cables
RCA cables carry audio signals from the stereo to the amplifier. Choose high-quality, shielded RCA cables to reduce noise. Run them separately from power wires to avoid interference. Use cable ties to keep them neat and secure. Connect the cables firmly to both the stereo and amplifier inputs.
Mounting The Amplifier
Mounting your 2 channel car amplifier correctly is crucial for both performance and safety. Where and how you place the amplifier can affect sound quality, heat management, and even the lifespan of your equipment. Taking the time to mount it properly ensures you get the best from your setup without risking damage.
Securing The Amplifier
Make sure the amplifier is fixed firmly to a stable surface. Use screws or bolts that fit well into the mounting holes to prevent any movement while driving. Avoid loose installations, as vibrations can cause wiring to disconnect or damage the amplifier itself.
Think about locations like under the seat, inside the trunk, or behind panels where the amp won’t get bumped or exposed to dirt. You want a spot that keeps the amplifier accessible but protected. Have you checked if your mounting spot allows for easy wiring access?
Ensuring Proper Ventilation
Amplifiers generate heat, so ventilation is key to prevent overheating. Leave enough space around the unit—at least a couple of inches on all sides—to allow air to flow freely. Avoid mounting it in tight, enclosed spaces without airflow.
Consider adding cooling fans if your car tends to get hot or if you plan on long, heavy use of the amplifier. A cool amplifier runs more efficiently and lasts longer. Have you noticed your amp getting warm during extended drives? Proper ventilation can be the difference between smooth sound and sudden shutdowns.
Connecting The Speakers
Connecting the speakers to your 2 channel car amplifier is a critical step that ensures you get clear and powerful sound. Proper connections avoid signal loss and protect your equipment from damage. Pay attention to details during this phase to enjoy the full potential of your audio system.
Speaker Wire Preparation
Start by selecting the right gauge of speaker wire; 16 or 14 gauge works well for most car audio setups. Strip about half an inch of insulation off the wire ends to expose the copper strands. Twist the strands tightly to prevent fraying and ensure a solid connection.
Label your wires if needed, especially if you have multiple speakers. This simple step saved me hours of troubleshooting when I accidentally mixed up left and right channels during my first install.
Wiring Channels Correctly
Identify the positive (+) and negative (-) terminals on both the amplifier and the speakers. Connect the positive wire from the amp’s left channel to the positive terminal on the left speaker, and repeat the process for the right channel.
A loose or reversed connection can result in poor sound quality or even damage. Double-check that wires are firmly attached and polarity matches to avoid phase issues that make your music sound hollow.
Testing Connections
Before securing everything, turn on your system at low volume and play audio to test the connections. Listen for clear sound without distortion or buzzing.
If you hear any issues, switch off immediately and recheck your wiring. Testing early helps catch mistakes before they become costly or frustrating to fix.
Adjusting Amplifier Settings
Adjusting the settings on your 2 channel car amplifier is crucial for achieving the best sound quality. It’s not just about turning knobs randomly; each adjustment affects how your music sounds inside your car. Taking the time to fine-tune the amplifier settings ensures a balanced and powerful audio experience tailored to your preferences.
Setting Gain Levels
Gain controls the input sensitivity of your amplifier, so setting it correctly prevents distortion while maximizing volume. Start with your car stereo volume at about 75% and the amplifier gain turned all the way down. Slowly increase the gain until you hear slight distortion, then back off a bit to keep the sound clean.
Have you noticed how a poorly set gain can make your music either too quiet or harsh? Proper gain adjustment helps you avoid these issues by matching the output of your head unit to the amplifier’s input.
Adjusting Crossover Frequencies
The crossover frequency decides which sounds your amplifier sends to your speakers or subwoofers. For a 2 channel amp driving door speakers, set the high-pass filter around 80-100 Hz to protect your speakers from low bass that can cause damage.
Low-pass filters for subwoofers usually sit between 60-120 Hz, letting only bass frequencies pass. Experiment with these settings while playing your favorite tracks—can you hear clearer mids and tighter bass? If not, adjusting the crossover might solve it.
Fine-tuning Bass Boost
Bass boost enhances low-frequency sounds but too much can cause distortion or overpower your music. Use it sparingly—start at zero and increase in small steps, listening carefully for any muddiness or distortion in the bass.
Ask yourself: does the bass feel punchy without overwhelming the rest of the sound? If the answer is yes, your bass boost is dialed in perfectly. This tweak can make a big difference, especially for bass-heavy genres like hip-hop or EDM.

Credit: www.youtube.com
Testing The System
Testing the system is a crucial part of installing a 2 channel car amplifier. It ensures all components work together properly. This step confirms the amplifier delivers clean power to your speakers. Testing helps spot any wiring or connection issues early. Always test the system carefully to protect your equipment and ears.
Powering On Safely
Before turning on the amplifier, double-check all connections. Make sure the power wire, ground wire, and remote turn-on lead are secure. Keep the volume at the lowest setting. Turn on the car’s ignition to power the amplifier. Listen for any unusual noises or smells. If anything seems wrong, turn off the system immediately.
Listening For Sound Quality
Play music with a clear and balanced sound. Pay attention to bass, mids, and highs. The sound should be clean without distortion or crackling. Adjust the amplifier’s gain control slowly to avoid sudden loud sounds. Check both channels to confirm balanced output. Good sound quality means your installation is successful.
Troubleshooting Common Issues
Some common problems may arise during testing. No sound could mean a loose wire or blown fuse. Distorted sound often points to incorrect gain settings. Overheating may indicate poor ventilation or a wiring fault. Use a multimeter to check voltage at the amplifier. Fix these problems before driving to avoid damage.
Credit: www.diymobileaudio.com
Frequently Asked Questions
What Tools Do I Need To Install A 2 Channel Car Amplifier?
You need wire cutters, screwdrivers, a drill, crimp connectors, and a wiring kit. These tools ensure a smooth and safe installation.
How Do I Connect The Amplifier To The Car Battery?
Use a power cable with an inline fuse. Connect it directly to the positive battery terminal for optimal power.
Where Should I Mount The 2 Channel Amplifier In My Car?
Mount the amplifier in a dry, ventilated area like under a seat or trunk. Avoid moisture and heat exposure.
How Do I Wire The Amplifier To The Car Speakers?
Connect the amplifier’s speaker outputs to your speakers’ positive and negative terminals. Use quality speaker wire for clear sound.
Conclusion
Installing a 2 channel car amplifier can boost your music experience. Follow the steps carefully. Take your time and ensure each connection is secure. Double-check your wiring before powering it up. This prevents damage to your car’s audio system. Once installed, enjoy the clear and powerful sound.
Troubleshoot if needed, adjusting settings for best performance. Keep your tools handy for any tweaks. Regular maintenance ensures lasting quality. With practice, installation becomes easier. Share your success with fellow car audio enthusiasts. They might need your advice someday. Enjoy the enhanced tunes on your next drive!