How to Replace Car Stereo Head Unit: Easy Step-by-Step Guide
Master Automotive Systems Engineer & Performance Vehicle Specialist at CarSpeedNest Automotive Testing Lab · ASE Certified Master Technician, Mobile Electronics Certified Professional (MECP Master), Certified Dyno Diagnostic Specialist · 14+ years in dyno testing, electronic sensor calibration, automotive wiring harnesses, and precision drivetrain maintenance
Are you tired of your old car stereo that barely works or lacks the features you want? Replacing your car stereo head unit might seem tricky, but it’s easier than you think.
Imagine having clearer sound, Bluetooth connectivity, or even a touchscreen right in your dashboard. This guide will walk you through every step, making sure you feel confident and ready to upgrade your ride’s audio system. Keep reading, and by the end, you’ll know exactly how to replace your car stereo head unit without any stress or confusion.
Tools And Materials Needed
Replacing your car stereo head unit can be a rewarding project, but having the right tools and materials makes all the difference. Without proper equipment, you risk damaging your vehicle or ending up with a poor installation. Getting familiar with what you need beforehand saves time and frustration.
Essential Tools
Start with a basic toolkit that includes screwdrivers—both Phillips and flathead—since car panels often use different types of screws. A panel removal tool is a game changer; it helps you pry off trims without scratching or breaking them.
Wire strippers and crimpers are crucial for connecting wires safely and securely. You’ll also want electrical tape or heat shrink tubing to insulate those wire connections. Don’t forget a multimeter to test voltage and ensure your wiring is correct before powering up the system.
Some cars require special removal keys or socket wrenches for the factory stereo. It’s worth checking your car model online or in the manual to find out if you need these. Having these tools ready means no last-minute trips to the store.
Choosing The Right Head Unit
Picking the right head unit isn’t just about looks or price. Consider what features you really want, like Bluetooth connectivity, touchscreen displays, or compatibility with steering wheel controls. Think about how you use your car—do you need navigation, or is music streaming your priority?
Size matters too. Head units come in single DIN and double DIN sizes, so measure your dashboard opening carefully. Don’t assume your old stereo’s size will fit the new one without checking. Sometimes, you might need an installation kit to fill gaps or secure the new unit properly.
Also, compatibility with your car’s electrical system is key. Look for units designed for your vehicle’s make and model or ones that can integrate with factory features. Have you checked if your new stereo supports your phone and audio devices seamlessly?

Credit: www.youtube.com
Preparing Your Vehicle
Before you dive into replacing your car stereo head unit, getting your vehicle ready is essential. Proper preparation prevents damage and ensures a smooth installation process. Taking the time to set up your workspace and safely disconnect power can save you headaches later.
Disconnecting The Battery
Start by locating your car’s battery, usually found under the hood. Disconnect the negative terminal first to cut off electrical power safely. This step is crucial to avoid short circuits or accidental shocks while working on your stereo system.
Wear gloves to protect your hands and use a wrench to loosen the terminal clamp. Once disconnected, secure the cable away from the battery to prevent it from touching the terminal again. Have you ever tried working on electronics without cutting the power? It’s risky and can damage both your car and your new stereo.
Removing Trim Panels
Next, focus on the trim panels surrounding your current head unit. These panels hide screws and clips holding the stereo in place. Carefully pry them off using a plastic trim removal tool to avoid scratching your dashboard.
Take note of where each clip and screw goes by laying them out in order. Some vehicles have hidden fasteners—check for small covers or slots. If you encounter resistance, double-check for missed screws rather than forcing the panel off. How often do you realize a hidden screw was the problem only after breaking a panel?
With the trim panels removed, you’ll have clear access to the mounting screws securing the stereo. This clean workspace makes the replacement faster and less frustrating.
Removing The Old Head Unit
Removing the old head unit is a crucial part of upgrading your car’s stereo system. It’s not just about pulling out an old device; you need to carefully detach it without damaging the wiring or dashboard. Taking your time here saves a lot of hassle later.
Unscrewing And Detaching
Start by locating the screws or bolts holding the head unit in place. These are usually found around the trim or behind the faceplate. If your car has a trim panel, gently pry it off using a plastic trim removal tool to avoid scratches.
After removing the screws, carefully pull the head unit out. It might feel stuck, but don’t force it. Sometimes, clips or additional fasteners hold it tight. Check again if you feel resistance.
Handling Wiring Connections
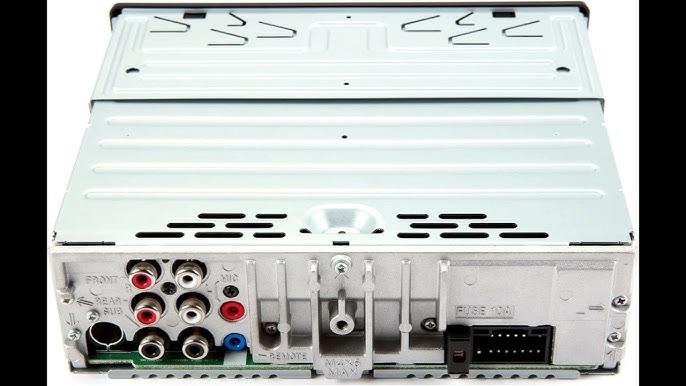
Once the head unit is loose, you’ll see several wiring harnesses and antenna plugs connected at the back. Before unplugging anything, take a clear photo or make notes. This makes reconnecting the new unit much easier.
Press the release tabs on each connector and gently pull them out. Avoid yanking on wires directly to prevent damage. If any connectors seem stuck, wiggle them slightly while applying steady pressure.
Have you noticed how many different wires are involved? This is why keeping track of each connection is essential. Being methodical here keeps your upgrade smooth and stress-free.

Credit: www.youtube.com
Installing The New Head Unit
Installing the new head unit is an important step in replacing your car stereo. Proper installation ensures the unit works correctly and stays secure during drives. This process involves connecting wires carefully and fixing the unit firmly in place. Pay attention to each detail for a smooth setup.
Connecting Wires Properly
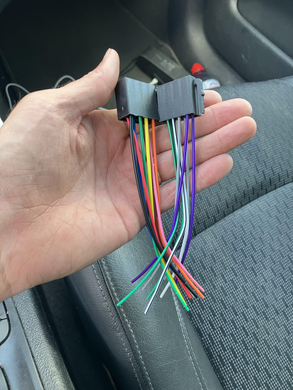
Start by matching the wires from the car to the new head unit. Each wire has a specific color and function. Use the wiring diagram from the unit’s manual for guidance. Connect the power, ground, speaker, and antenna wires correctly.
- Strip a small section of wire insulation.
- Twist matching wires together tightly.
- Use wire connectors or electrical tape to secure connections.
- Double-check connections for tightness and accuracy.
Incorrect wiring can cause malfunctions or damage. Take your time and follow the instructions carefully.
Securing The Head Unit
After wiring, place the new head unit into the mounting bracket. Align it so it fits snugly without forcing. Use the screws or clips provided to secure the unit firmly.
- Check that the unit does not move or wiggle.
- Ensure all screws are tight but avoid overtightening.
- Replace any trim or panels removed earlier.
A secure head unit prevents noise and damage from vibrations during driving. Proper installation keeps your stereo safe and functioning well.
Testing The New Stereo
Once you have installed your new car stereo head unit, testing it thoroughly is crucial before finalizing the setup. This step ensures everything functions as expected and prevents surprises on the road. Let’s dive into how to properly test your new stereo to enjoy clear sound and smooth operation.
Powering On And Function Check
Start by turning on your car’s ignition and powering up the stereo. Does the display light up immediately? If it stays dark or shows error messages, double-check your wiring connections.
Listen carefully for any static, crackling, or unusual noises from the speakers. Try switching between radio, Bluetooth, USB, or any other input sources your unit supports. Each should load quickly and play without interruption.
Don’t forget to test the volume controls and mute button. Are they responsive? A common mistake is loose wiring causing intermittent sound loss, which you can catch during this stage.
Adjusting Settings
Once the basic functions work, spend time customizing the settings to your preference. Adjust the bass, treble, and balance to find the sound that suits your driving style.
Check if the equalizer presets are working and try different modes like rock, jazz, or classical. Do these changes reflect immediately in the sound output?
Take a moment to pair your phone or other devices via Bluetooth, testing call quality and music streaming. Does the microphone pick up your voice clearly during calls?
Have you explored the display settings? Brightness and contrast adjustments can make a big difference during day and night driving.
Final Touches
After carefully installing your new car stereo head unit, it’s time to focus on the final touches that make everything look seamless and function perfectly. These steps might seem small, but they ensure your installation feels like it was done by a pro. Let’s dive into how you can put everything back together safely and neatly.
Reattaching Trim Panels
Before snapping the trim panels back into place, double-check that all wires are tucked away and not pinched. This prevents damage and keeps the dashboard looking clean.
Press the panels gently but firmly, starting from one side and moving across. You should hear clicks when they lock in securely.
If any panel feels loose or uneven, don’t force it. Remove and realign to avoid cracks or broken clips. Have you noticed any tricky spots where the trim doesn’t sit right? Take your time to adjust—it’s worth it for a flawless finish.
Reconnecting The Battery
Reconnecting your car battery is the last step before testing your new stereo. Make sure the ignition is off to avoid any electrical issues.
Attach the positive terminal first, then the negative. Tighten the connectors to prevent any sparks or loose connections.
Once connected, turn on your stereo and test all functions—radio, Bluetooth, volume controls. Does the sound come through clearly? If not, double-check the wiring before you finish.
Troubleshooting Tips
Troubleshooting is key when replacing a car stereo head unit. Small problems can stop your new stereo from working. Knowing common issues helps save time and effort. This section covers typical installation problems and quick fixes to get your stereo running smoothly.
Common Installation Issues
- No power to the stereo after installation
- Sound cuts out or no sound at all
- Stereo does not fit properly in the dash
- Buttons or touchscreen unresponsive
- Bluetooth or other features not connecting
- Interference or static noise in the audio
- Fuses blowing after installing the new unit
Quick Fixes
- Check all wiring connections are tight and correct
- Verify the fuse is not blown; replace if needed
- Use a wiring harness adapter for proper fit
- Reset the stereo by disconnecting and reconnecting the battery
- Consult the stereo’s manual for specific troubleshooting tips
- Test speakers individually to find wiring issues
- Ensure the stereo is compatible with your vehicle model

Credit: www.youtube.com
Frequently Asked Questions
How Do I Choose The Right Car Stereo Head Unit?
Choose a head unit compatible with your car’s make and model. Consider features like Bluetooth, touchscreen, and audio quality. Check size standards (single or double DIN). Read reviews and compare prices to find the best fit for your needs and budget.
What Tools Are Needed To Replace A Car Stereo?
You typically need a screwdriver set, panel removal tools, wire strippers, and electrical tape. A wiring harness adapter and dash kit may be required for specific vehicles. Having these tools ensures a smooth and damage-free installation process.
How Long Does It Take To Replace A Car Stereo Head Unit?
Replacing a car stereo usually takes 30 minutes to 1 hour. Time varies depending on your vehicle’s complexity and your experience. Following a step-by-step guide can speed up the process and avoid mistakes.
Can I Keep My Car’s Original Speakers With A New Head Unit?
Yes, you can keep original speakers if they are compatible with the new head unit. Make sure the new stereo supports your speakers’ impedance and power ratings. Using adapters or amplifiers may improve sound quality.
Conclusion
Replacing a car stereo head unit can be straightforward. Follow the steps carefully, and you’ll enjoy new features in no time. Always ensure you have the right tools before starting. Take your time to avoid mistakes. A new stereo can enhance your driving experience.
Better sound, more options, and a modern touch. Remember to check your connections before finishing. Regularly updating your car’s tech keeps it current. Enjoy your new setup and drive safely.

Similar Posts