How to Set an Amplifier for Car: Ultimate Step-by-Step Guide
Are you ready to take your car’s sound system to the next level? Setting an amplifier correctly can transform your driving experience, delivering clear, powerful music that fills every corner of your vehicle.
But if you’re unsure where to start, it can feel confusing and overwhelming. Don’t worry—you’re about to learn simple, step-by-step tips that anyone can follow. By the end of this guide, you’ll know exactly how to set your car amplifier for the best sound quality and performance.
Keep reading, and get ready to enjoy your music like never before!

Credit: trailgridpro.com
Choosing The Right Amplifier
Choosing the right amplifier for your car audio system is essential to get the sound quality and power you want. It’s not just about picking the most powerful amp; you need to consider the type, power needs, and how well it works with your speakers. Making the right choice ensures your music sounds clear and powerful without damaging your equipment.
Types Of Car Amplifiers
There are several types of car amplifiers designed for different purposes. The most common ones include:
- Class A/B Amplifiers:These offer a good balance of sound quality and efficiency. They work well for full-range sound systems.
- Class D Amplifiers:Known for their efficiency and compact size, these are great for powering subwoofers.
- Mono Amplifiers:Designed specifically for subwoofers, they provide strong bass output.
- Multi-channel Amplifiers:These can power multiple speakers and subs, simplifying your setup.
Choosing the right type depends on what you want to power and the space you have available in your car.
Power Requirements
Understanding power requirements is crucial. Your amplifier should match the power handling capacity of your speakers to avoid distortion or damage.
Look at the RMS (continuous power) rating of both the amplifier and speakers. The amplifier’s RMS power should be close to the speaker’s RMS rating for the best performance.
Don’t just go for the highest wattage. More power than your speakers can handle will cause distortion and may damage them. Are you aiming for clean volume or just louder sound?
Matching Amplifier To Speakers
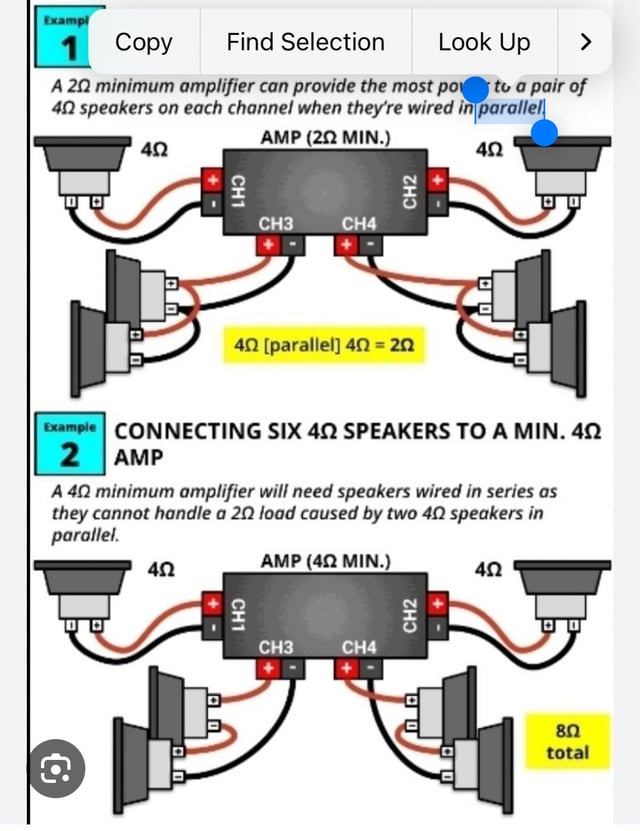
Speakers have different impedance ratings, usually 2, 4, or 8 ohms. Your amplifier needs to support the impedance of your speakers to deliver the right power without overheating.
Pay attention to the number of channels on the amplifier. If you have four speakers, a 4-channel amp simplifies wiring and tuning.
Think about your speaker types too. Component speakers with separate tweeters and woofers may require a different amplifier setup than coaxial speakers. Have you checked your speaker specs before buying the amp?
Gathering Necessary Tools
Before you start setting up your car amplifier, it’s crucial to gather all the necessary tools. Having everything ready not only speeds up the process but also helps you avoid frustrating interruptions. Missing even one essential tool can turn a simple task into a complicated challenge.
Basic Installation Tools
Start with the basics. You’ll need a set of screwdrivers—both flathead and Phillips—to handle various screws. A wire stripper and crimper are essential for preparing and securing your cables properly.
Don’t forget a socket wrench set to tighten bolts and connectors without damaging them. A multimeter will help you check voltage and continuity, making sure your connections are safe and effective. These tools form the backbone of any amplifier installation.
Safety Gear
Working with electrical components in your car can be risky. Wearing safety gloves protects your hands from sharp edges and accidental shocks. Eye protection is just as important to shield your eyes from sparks or debris.
Consider wearing long sleeves to prevent scratches and burns. Safety gear might seem like an extra step, but it’s a small price to pay for avoiding injuries and ensuring a smooth installation.
Additional Accessories
Beyond the basics, some accessories can make your job easier. Electrical tape and heat shrink tubing help insulate and protect wire connections. Cable ties keep your wiring organized and prevent tangling or accidental disconnections.
Fuse holders and spare fuses are vital to protect your amplifier and car’s electrical system from power surges. Have these accessories on hand to avoid last-minute trips to the store and keep your setup safe and tidy.
Preparing Your Car
Getting your car ready before installing an amplifier is crucial to ensure a smooth setup and avoid any damage. Preparation helps you work efficiently and safely while giving your audio system the best chance to perform well. Let’s focus on the key steps to prepare your car so your amplifier installation goes without a hitch.
Disconnecting The Battery
Start by disconnecting your car’s battery, specifically the negative terminal. This simple step protects you from electric shocks and prevents short circuits during installation.
Even if you’re careful, electrical components can be sensitive. Unplugging the battery stops accidental sparks that could fry your amplifier or other electronics.
Have you ever faced unexpected power surges while working on your car? Disconnecting the battery is a quick way to avoid that headache.
Selecting Amplifier Location
Choosing the right spot for your amplifier affects both sound quality and safety. Look for a location with good ventilation to prevent overheating.
Common places include under a seat, in the trunk, or mounted on the back of a seat. Make sure the area is dry and easily accessible for wiring and future adjustments.
Ask yourself: will this spot keep the amplifier away from heavy foot traffic or cargo that could damage it? Also, think about how close it is to your speakers and power source to minimize cable length.
Clearing Installation Area
Clear out any clutter or loose items from the area where you plan to install the amplifier. This gives you enough room to work and reduces the risk of damaging wires or the amp itself.
Remove floor mats, personal items, and any debris that might get in the way. A clean workspace helps you focus and avoid mistakes.
Have a flashlight handy to spot hidden obstacles. Sometimes small screws or clips tucked under carpets can cause trouble if overlooked.
Wiring The Amplifier
Wiring the amplifier is a key part of setting up your car audio system. It ensures the amplifier gets power and connects properly to other components. Proper wiring prevents sound issues and keeps your system safe.
Running Power Cable
Use a thick power cable to carry electricity from the battery to the amplifier. Choose a cable with the right gauge for your amplifier’s power needs. Route the cable through the car’s firewall carefully to avoid damage.
Keep the power cable away from audio cables to prevent noise. Use a fuse holder near the battery to protect the system from power surges.
Grounding The Amplifier
Ground the amplifier by connecting it to a clean, bare metal spot on the car’s body. The ground wire should be as short as possible. This helps reduce electrical noise and improves sound quality.
Check that the metal surface is free from paint and rust before attaching the ground wire. Tighten the connection securely.
Connecting Remote Turn-on Wire
The remote turn-on wire signals the amplifier to turn on with the car stereo. Connect this wire from the stereo’s remote output to the amplifier’s remote terminal. This prevents the amplifier from draining the battery when the stereo is off.
Use a thin wire for this connection. Secure the wire to avoid loose contacts.
Installing Rca Cables
RCA cables carry audio signals from the head unit to the amplifier. Choose high-quality, shielded RCA cables for clear sound. Connect the cables to the output jacks on the stereo and the input jacks on the amplifier.
Route RCA cables away from power cables to reduce interference. Use cable ties to keep them organized and secure.
Mounting The Amplifier
Mounting the amplifier in your car is a key step to ensure it works well and lasts long. A solid mount keeps the amplifier safe from damage and stops it from moving while driving. Proper mounting also helps keep the amplifier cool, which is important for good sound and performance.
Securing The Amplifier
Choose a strong, flat surface to place the amplifier. Common spots include under a seat or in the trunk. Use screws or bolts to fasten the amplifier firmly. Avoid using tape or glue, as they do not hold well over time.
Check that the amplifier does not move or shake. Movement can cause wires to disconnect or damage internal parts. Use brackets or mounting kits made for car amplifiers for the best fit and security.
Ensuring Proper Ventilation
Amplifiers generate heat when working. Good airflow prevents overheating and helps the amplifier run smoothly. Leave space around the amplifier for air to flow freely.
Avoid placing the amplifier near heat sources or inside closed boxes. Use cooling fans if your amplifier gets very hot. Proper ventilation extends the life of your amplifier and keeps sound clear.
Configuring Amplifier Settings
Configuring your car amplifier settings is essential to achieve the best sound quality and protect your equipment. Proper adjustments make a huge difference, turning a good audio system into a great one. You’ll want to focus on gain control, crossover frequencies, bass boost, and channel balancing to tailor the sound exactly to your preferences and your car’s acoustics.
Adjusting Gain Control
Gain control isn’t about volume; it sets how much input signal the amplifier receives. Too high, and you risk distortion or damaging your speakers. Too low, and the sound will be weak and noisy.
Start by turning the gain all the way down, then slowly increase it while playing music at your typical listening volume. Stop once you notice any distortion or harshness. This ensures your amplifier is matched well to your head unit’s output and your speakers’ capacity.
Setting Crossover Frequencies
The crossover determines which frequencies go to which speakers. Setting it right improves clarity and protects your speakers from sounds they can’t handle.
- Use a low-pass filter for subwoofers, typically between 80Hz and 120Hz.
- For midrange or full-range speakers, set a high-pass filter to block low frequencies below 60Hz to avoid distortion.
Think about your speaker setup. Are you using component speakers or just a subwoofer? Adjust the crossover to match and prevent frequency overlap.
Tuning Bass Boost
Bass boost adds extra punch to low frequencies but can easily overdo it. Too much bass boost can muddy your sound or damage your subwoofer.
Start with bass boost off or at the lowest setting. Increase it gradually while listening for tight, clear bass without distortion. Your goal is a powerful bass that doesn’t overpower the rest of your music.
Balancing Channel Levels
Each speaker channel should be balanced so the soundstage feels natural and centered. Unequal volume across channels makes the music feel lopsided.
Use a test tone or familiar song. Adjust each channel’s level until all speakers sound equally loud from your usual listening position. This step often gets overlooked but is key to an immersive listening experience.
Testing The Setup
Testing your amplifier setup is crucial to ensure everything works smoothly and your car audio sounds its best. It’s not just about turning it on; you need to carefully check various aspects to avoid damage and get optimal performance. Let’s break down how you can safely power on, evaluate sound quality, and fix common issues.
Powering On Safely
Before you switch on the amplifier, double-check all your wiring connections. Loose or incorrect wiring can cause shorts or damage your equipment.
Turn your car’s ignition to the accessory position to provide power without starting the engine. Then, power on the amplifier and listen for any unusual noises or signs of electrical problems.
If you hear clicking or notice the amp shutting off, immediately turn it off and revisit your wiring. Safety first—never rush this step.
Checking Sound Quality
Play a variety of music tracks that you know well. Pay attention to clarity, bass response, and distortion levels.
Adjust the gain and crossover settings gradually. Too high gain can cause distortion; too low might make the sound weak.
Ask yourself: Is the bass punchy without overpowering the mids and highs? Does the sound remain clear at higher volumes? These questions help you fine-tune your setup.
Troubleshooting Common Issues
If the amplifier won’t power on, check the fuse and ensure your remote turn-on wire is correctly connected.
Distorted sound often means gain is set too high or your speaker wiring is off. Try lowering the gain and inspecting speaker connections.
Another common problem is overheating. Make sure your amp has enough ventilation and isn’t placed near heat sources.
Remember, small adjustments can make a big difference. Don’t hesitate to test and tweak until you get the sound just right.

Credit: www.reddit.com
Maintaining Your Amplifier
Keeping your car amplifier in top shape is essential for consistent sound quality and long-term performance. Neglecting maintenance can lead to unexpected failures or reduced output, which nobody wants. A few simple habits can make a big difference in preserving your amplifier’s health.
Regular Cleaning
Dust and dirt buildup can clog the vents and cause your amplifier to run hotter than it should. Wipe the exterior with a dry microfiber cloth every couple of weeks to keep dust at bay. If you spot stubborn grime, use a slightly damp cloth but avoid getting moisture inside the unit.
Have you checked the vents lately? Keeping them clear helps your amplifier breathe and prevents overheating, which can damage internal components.
Inspecting Wiring
Loose or frayed wires can cause static, distortion, or complete signal loss. Take time every month to examine all connections, including power, ground, and speaker wires. Make sure wires are tight, insulated, and free from corrosion or damage.
Think about how many times your car jolts over bumps—wires can loosen easily. Securing them with zip ties or clamps prevents sudden disconnects that ruin your listening experience.
Preventing Overheating
Amplifiers generate heat, especially during extended use at high volumes. Place your amp in a well-ventilated area inside your car to avoid heat buildup. Adding a cooling fan or heat sink can also help maintain a stable temperature.
Ever noticed your amp shutting down unexpectedly? This is often a thermal protection kicking in due to overheating. Monitoring temperature and providing proper airflow saves you from costly repairs and downtime.
Credit: www.diymobileaudio.com
Frequently Asked Questions
How Do I Set The Gain On My Car Amplifier?
Set the gain by matching the amplifier input to your head unit’s output. Start low, increase until sound distortion appears, then reduce slightly for clear audio.
What Is The Best Crossover Setting For Car Amplifiers?
Use a low-pass filter around 80-100 Hz for subwoofers and high-pass filters above 60 Hz for speakers. This improves sound clarity and protects your speakers.
How To Adjust Bass Boost On A Car Amplifier?
Increase bass boost gradually to enhance low frequencies without distortion. Avoid high levels to prevent speaker damage and maintain balanced sound quality.
Where Should I Install My Car Amplifier?
Install the amplifier in a dry, ventilated area like under a seat or trunk corner. Ensure easy access for adjustments and proper heat dissipation.
Conclusion
Setting an amplifier for your car can feel complex. But with practice, it gets easier. Start by ensuring all connections are secure. Adjust the gain to match your speakers. Fine-tune the bass and treble to your liking. Listen carefully to each setting change.
This helps create the perfect audio experience. Remember, patience is key. Take your time to get it right. A well-set amplifier enhances your driving experience. Enjoy rich, clear sound while on the road. Keep experimenting until it sounds just right.
Happy driving and listening!