How to Hook Up an Amp to a Car Stereo: Easy Step-by-Step Guide
Master Automotive Systems Engineer & Performance Vehicle Specialist at CarSpeedNest Automotive Testing Lab · ASE Certified Master Technician, Mobile Electronics Certified Professional (MECP Master), Certified Dyno Diagnostic Specialist · 14+ years in dyno testing, electronic sensor calibration, automotive wiring harnesses, and precision drivetrain maintenance
Are you ready to take your car’s sound system to the next level? Hooking up an amp to your car stereo can transform your music experience with richer, louder, and clearer sound.
But if you’ve never done it before, the process might seem tricky or confusing. Don’t worry—you’re in the right place. This guide will walk you through each step, making it simple for you to boost your car’s audio power like a pro.
Keep reading, and soon you’ll enjoy the full potential of your favorite tunes on every drive.

Credit: www.youtube.com
Preparing Your Tools And Equipment
Preparing your tools and equipment is the first key to a smooth amp installation. Having the right items on hand saves time and prevents frustration. It also ensures safety during the setup. This section guides you through what you need before starting.
Essential Tools Needed
Gathering the correct tools is crucial for a clean and secure connection. Basic tools include:
- Screwdrivers (flathead and Phillips)
- Wire strippers and cutters
- Socket wrench set
- Crimping tool
- Multimeter for checking voltages
- Electrical tape or heat shrink tubing
- Panel removal tools to avoid damage
These tools help you work efficiently and safely on your car stereo system.
Choosing The Right Amplifier
Select an amplifier that matches your car stereo and speakers. Check the wattage output to suit your sound needs. Too weak an amp delivers poor sound. Too powerful may damage your speakers. Look for amps with good reviews and warranty. Consider the size to fit your vehicle space easily.
Selecting Quality Wiring Kits
Wiring kits connect your amp to power and speakers. Choose kits with thick gauge wires for better current flow. A 4-gauge wire is standard for most amps. Ensure the kit has a fuse holder to protect your system. Look for kits with strong connectors and insulated wires. Good wiring prevents signal loss and overheating.
Locating The Right Installation Spot
Choosing the right spot for your amp installation matters a lot. A good location keeps the amp safe, cool, and working well. It also helps to keep your car neat and organized. Take time to find a place that fits the size of your amp and allows easy wiring. Avoid places that may cause damage or make the sound worse.
Finding Space In Your Vehicle
Look for a flat and stable area that can hold the amp’s weight. Common spots include under seats, in the trunk, or behind panels. Make sure the spot has enough room for the amp and wiring. Avoid tight spaces that can squeeze or damage the amp. Measure twice before drilling or screwing anything.
Avoiding Heat And Moisture
Keep the amp away from engine heat or direct sunlight. High temperatures can harm the amp’s parts and reduce its life. Avoid areas near the car’s exhaust or heater vents. Moisture can cause rust and short circuits. Do not place the amp where water can drip or collect, like near doors or windows.
Ensuring Proper Ventilation
The amp needs air to stay cool during use. Choose a spot with good airflow around all sides of the amp. Leave some space between the amp and walls or other objects. Avoid covering the amp with clothes, mats, or other items. Proper ventilation helps prevent overheating and keeps sound quality high.
Disconnecting The Car Battery
Disconnecting the car battery is a crucial safety step before hooking up an amplifier to your car stereo. It prevents any electrical shorts or shocks while you’re working with the wiring. Skipping this step can lead to blown fuses or even damage to your vehicle’s electrical system.
Locate The Car Battery
Open your car’s hood and find the battery. It’s usually near the front of the engine bay but sometimes can be in the trunk or under a seat. Identify the positive (+) and negative (–) terminals clearly before proceeding.
Gather Necessary Tools
You’ll need a wrench or socket set to loosen the battery terminals. Make sure your tools are insulated to avoid accidental short circuits. Having gloves can also protect your hands from battery acid or dirt.
Disconnect The Negative Terminal First
Always start by loosening the negative terminal (usually marked with a minus sign or black cover). Removing this cable first helps prevent accidental grounding and sparks. Once loose, carefully lift the cable off the terminal and set it aside.
Remove The Positive Terminal
Next, loosen and remove the positive terminal (marked with a plus sign or red cover). Handle it carefully to avoid contact with any metal parts of the car. Keep the cables away from the battery to ensure safety while you work on the stereo.
Secure The Cables Away From The Battery
After disconnecting, tuck the cables away from the battery terminals. You can use electrical tape or a non-conductive material to prevent accidental reconnection. This extra precaution helps avoid sparks or shorts when you move around the engine bay.
Why Is Disconnecting The Battery Essential?
Have you ever wondered what happens if you don’t disconnect the battery first? Even a small slip can cause a surge that damages your amp or stereo. Protecting your car’s electrical system isn’t just about safety; it saves you time and money in the long run.
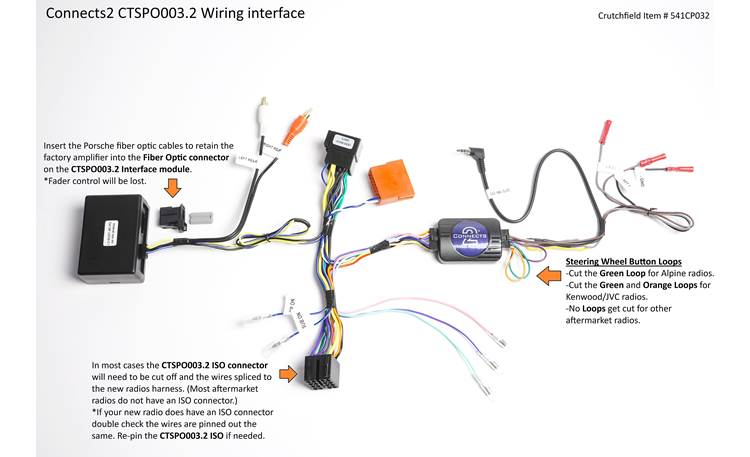
Credit: www.crutchfield.ca
Running Power And Ground Wires
Running power and ground wires is a key step to connect an amplifier to a car stereo. These wires carry the electricity needed to power the amp and ensure it works properly. Proper wiring prevents electrical problems and protects your car’s audio system. Careful attention during this step will improve sound quality and keep your setup safe.
Routing The Power Wire Safely
Choose a clear path from the battery to the amplifier. Avoid sharp edges and moving parts that can damage the wire.
- Use a wire loom or conduit for protection.
- Keep the power wire away from speaker wires to reduce noise.
- Pass the wire through a firewall grommet to prevent cuts.
- Secure the wire with zip ties to stop it from moving.
Run the power wire directly to the positive battery terminal. Always install an inline fuse close to the battery. This fuse protects your car from electrical shorts.
Securing A Reliable Ground Connection
The ground wire completes the electrical circuit. It connects the amplifier to the car’s metal chassis. A strong ground prevents noise and power loss.
- Find a clean, unpainted metal surface near the amplifier.
- Sand the area to remove paint and rust.
- Use a ring terminal to attach the wire securely.
- Tighten the ground wire bolt firmly to ensure contact.
Keep the ground wire as short as possible. A good ground helps your amp run smoothly and reduces interference.
Connecting The Remote Turn-on Wire
Connecting the remote turn-on wire is essential for powering your amplifier safely and efficiently. This wire signals the amp to turn on only when the car stereo is active. It prevents battery drain by ensuring the amplifier stays off when the stereo is off.
Correct wiring guarantees a smooth connection and protects your equipment. Focus on finding the right wire on your stereo and attaching it properly to the amplifier.
Locating The Remote Wire On The Stereo
Look for a thin blue or blue-white wire coming from the stereo harness. This wire is the remote turn-on lead. Check your stereo’s manual for exact wire colors and locations. Use a multimeter to test the wire voltage. The remote wire usually shows 12 volts when the stereo is on and 0 volts when off. Avoid confusing this wire with speaker or power wires.
Properly Attaching The Wire To The Amp
Strip a small section of insulation from the remote wire. Use a crimp connector or solder for a secure connection. Attach the wire to the amplifier’s remote turn-on terminal. Make sure the connection is tight to avoid signal loss. Use electrical tape or heat shrink tubing to cover exposed wires. Route the wire away from power cables to reduce interference. Test the setup by turning the stereo on and off. The amplifier should power up only when the stereo is active.
Wiring The Rca Cables
Wiring the RCA cables correctly is crucial to ensure your amplifier and car stereo work seamlessly together. These cables carry the audio signal from your head unit to the amp, so poor connections or interference can ruin your sound quality. Paying attention to the right RCA outputs and routing them properly can make a noticeable difference in your car audio experience.
Choosing The Correct Rca Outputs
Not all RCA outputs on your car stereo are created equal. Look for the preamp outputs labeled “Front,” “Rear,” or “Subwoofer” depending on what type of amp you’re hooking up. Using the correct output ensures your amplifier receives the proper signal level and frequency range.
If your stereo only has one pair of RCA outputs, it’s usually a full-range signal suitable for most amplifiers. But if you have separate outputs, matching them to the amp’s channel helps avoid sound distortion or imbalance. Double-check your stereo’s manual if you’re unsure which outputs to use.
Routing Rca Cables To Avoid Interference
RCA cables are sensitive to electrical noise, which can cause annoying buzzing or humming in your sound system. To prevent this, route your RCA cables away from power wires and other high-current cables.
- Run the RCA cables on the opposite side of the vehicle from the power cable.
- Use grommets when passing cables through metal panels to avoid damage.
- Keep the cables as short as possible without straining them.
In my experience, separating signal cables from power cables by at least a few inches drastically reduces interference. Have you noticed unexplained noise after installing an amp? Check your RCA cable routing first—it’s often the simple fix that’s overlooked.
Connecting The Speaker Wires
Connecting the speaker wires is a key step in hooking up an amp to a car stereo. Proper wiring ensures clear sound and prevents damage to your equipment. It involves identifying the correct wire polarity and running the wires neatly from the amplifier to the speakers.
Correct connections help your system perform well and avoid short circuits. Take time to check each wire and make sure it fits securely. Organized wiring also makes future maintenance easier and safer.
Identifying Speaker Wire Polarity
Speaker wire polarity means matching positive and negative terminals. Usually, the wires have a marking on one side. This marking shows the positive (+) wire. The other wire is negative (-).
Check the wire colors too. Often, red or a stripe indicates positive. Black or plain wire usually means negative. Connect the positive wire from the amp to the speaker’s positive terminal. Do the same for the negative wires.
Wrong polarity causes poor sound quality and weak bass. Your speakers may sound out of phase or distorted. Always double-check the polarity before finalizing the connection.
Running Wires From Amp To Speakers
Plan the wire path carefully. Avoid sharp edges and moving parts that can damage wires. Use wire loom or protective tubing for extra safety.
Keep the wires away from power cables to reduce noise interference. Secure the wires with zip ties or clips to prevent them from moving around.
- Measure the distance between amp and speakers accurately.
- Cut speaker wire to the needed length.
- Strip the ends of the wire for better contact.
- Connect wires firmly to speaker terminals and amp output.
- Test the system before finalizing the setup.
Credit: www.iq-forums.com
Double-checking All Connections
Double-checking all connections is a crucial part of hooking up an amp to your car stereo. Skipping this step can lead to poor sound quality or even damage to your equipment. Taking a few extra minutes to verify everything will save you headaches and ensure your system performs at its best.
Inspecting Wire Tightness
Loose wires can cause intermittent sound or complete signal loss. Make sure each wire is firmly secured in its terminal or connector. Give them a gentle tug to confirm they won’t come loose during driving vibrations.
Pay special attention to the power and ground wires. These carry the most current and must have solid contact to avoid voltage drops or shorts. If you notice any frayed strands, trim and re-strip the wire for a clean connection.
Verifying Proper Wire Routing
How you route your wires affects both safety and sound quality. Keep power cables separated from signal wires to minimize interference noise. Running them on opposite sides of the vehicle or using protective sleeves can help.
Check that no wires are pinched or stretched under panels or seats. Avoid sharp bends or contact with hot engine parts. Proper routing not only protects your cables but also makes future troubleshooting easier.
Reconnecting The Battery And Testing
After installing your amplifier, reconnecting the car battery is the next essential step. This action powers up the entire audio system. Careful testing follows to ensure everything works correctly and safely. Proper testing helps avoid damage and improves sound quality.
Powering Up The System
Start by securely attaching the battery terminals. Tighten the clamps to avoid loose connections. Turn on your car’s ignition without starting the engine. Listen for any unusual sounds or smells.
Check that the amplifier’s power indicator lights up. If it does not, recheck your wiring connections. Make sure all ground wires are firmly connected. A faulty ground can cause noise and system failure.
Adjusting Amplifier Settings
Begin with all amplifier settings at their lowest levels. Slowly increase the gain control to match your head unit’s output. Avoid setting gain too high to prevent distortion. Adjust the bass boost and crossover settings for better sound balance.
Use music you know well for testing. This helps you identify any sound issues quickly. Fine-tune the settings until the audio is clear and distortion-free. Proper adjustment ensures the best listening experience and protects your speakers.
Troubleshooting Common Issues
Troubleshooting common issues while hooking up an amp to your car stereo can save you time and frustration. Many problems have simple fixes, and understanding what to check first can make all the difference. Let’s dive into some frequent challenges and how you can tackle them effectively.
No Power To Amplifier
If your amplifier isn’t powering on, start by checking the fuse on the power wire. A blown fuse is a common culprit and easy to replace.
Next, ensure the ground wire is securely connected to a clean, unpainted metal surface on your car’s chassis. A poor ground can prevent the amp from turning on or cause intermittent power issues.
Also, verify the remote turn-on wire is connected properly. This wire signals the amp to power up when the stereo is on. Missing this connection means your amp won’t know when to start.
Distorted Or No Sound
Distorted sound often points to incorrect gain settings. If your amp’s gain is too high, it can cause clipping and distortion. Try lowering the gain gradually to find a clear sound.
Check speaker wiring for loose connections or damaged cables. Even a small wiring issue can result in no sound or poor audio quality.
Sometimes, the problem lies in the RCA cables. Cheap or damaged RCA cables can introduce noise or cut out the signal. Upgrading to shielded, high-quality cables might be the fix you need.
Overheating Problems
If your amplifier heats up quickly or shuts down, poor ventilation could be the issue. Make sure the amp is mounted in a spot with good airflow.
Another cause could be wiring that’s too thin for the amp’s power draw. Thin wires can cause excessive resistance and heat buildup. Use the recommended gauge wire for your amplifier’s power requirements.
Are you driving your amp at max volume for long periods? This can strain the unit and cause overheating. Try reducing volume or adding a cooling fan if the problem persists.
Frequently Asked Questions
How Do I Connect An Amp To A Car Stereo?
To connect an amp to a car stereo, first disconnect the battery. Then, connect RCA cables from the stereo to the amp. Use a power wire to connect the amp to the battery. Ground the amp securely. Finally, connect the speaker wires from the amp to your car speakers.
What Tools Are Needed To Install A Car Amp?
You’ll need basic tools like screwdrivers, wire strippers, and crimpers. Additionally, get RCA cables, a power wire, a ground wire, and speaker wires. An amp wiring kit often includes everything required. Ensure you have the right tools for a safe and efficient installation.
Can I Install An Amp Myself?
Yes, you can install an amp yourself with the right tools and instructions. Follow a detailed guide and ensure all connections are secure. It requires patience and attention to detail. If unsure, consult a professional to avoid potential damage to your car’s audio system.
Why Is My Car Amp Not Turning On?
If your amp isn’t turning on, check the power and ground connections first. Ensure the remote turn-on wire is properly connected. Verify that the fuse isn’t blown. If all connections are correct, the amp might be faulty. Consulting a professional may be necessary.
Conclusion
Hooking up an amp to your car stereo can boost your sound quality a lot. Use the right tools and follow each step carefully. Check all connections twice before turning on the system. Keep wires neat to avoid any shorts or noise.
Take your time and enjoy the clearer, louder music. This simple upgrade makes every drive more fun. Remember, safety first and enjoy your new sound!

Similar Posts