How to Connect Car Subwoofer to Amplifier: Easy Step-by-Step Guide
Are you ready to feel every beat and bass drop in your car like never before? Connecting your subwoofer to an amplifier is the key to unlocking powerful, deep sound that transforms your driving experience.
But if you’re unsure where to start or worried about making mistakes, don’t worry—you’re in the right place. This guide will walk you through simple, clear steps to connect your car subwoofer to your amplifier correctly and safely. By the end, you’ll know exactly how to get the most from your sound system and enjoy music the way it was meant to be heard.
Keep reading to take your car audio to the next level!
Choosing The Right Subwoofer And Amplifier
Choosing the right subwoofer and amplifier is key to great car audio. The right match improves sound quality and prevents damage. Understanding power, impedance, and size helps pick the best pair.
Matching Power Ratings
Check the subwoofer’s RMS power rating. It shows the continuous power the subwoofer can handle. Match this with the amplifier’s RMS output power at the same impedance. Avoid underpowering, which causes distortion. Overpowering risks blowing the subwoofer. Aim for close power levels for smooth performance.
Selecting Compatible Impedance
Subwoofers and amplifiers have impedance ratings in ohms. Common values are 2 ohms, 4 ohms, and 8 ohms. Match the subwoofer’s impedance with the amplifier’s stable output impedance. Mismatched impedance can overheat the amplifier or reduce power. Check if the amplifier supports multiple subwoofer wiring setups.
Considering Subwoofer Size And Enclosure
Subwoofer size affects bass depth and volume. Larger subwoofers (12” or more) deliver deep bass but need more space. Smaller ones (8”-10”) fit tight spaces and offer tighter bass. The enclosure type also matters:
- Sealed boxesprovide tight, accurate bass.
- Ported boxesboost volume and low-end response.
- Bandpass boxesmaximize loudness but reduce clarity.
Choose a size and box type that fit your car and sound preferences.
Gathering Necessary Tools And Materials
Before you start connecting your car subwoofer to an amplifier, gathering the right tools and materials is crucial. Having everything ready prevents interruptions and ensures a smooth installation. It also helps you avoid mistakes that could damage your equipment or reduce sound quality.
Essential Wiring Components
You need specific wiring components to connect your subwoofer properly. Start with a quality power wireto supply electricity from the battery to the amplifier. A good gauge size, like 8 or 4 AWG, is important to handle the amplifier’s power without voltage drops.
Also, get a ground wireof the same gauge as your power wire. This completes the electrical circuit and prevents unwanted noise. Don’t forget the remote turn-on wirethat signals your amplifier to power up when your stereo turns on.
For audio signals, you’ll need RCA cablesto connect the head unit to the amplifier. Finally, use speaker wireto link the amplifier output to your subwoofer. Make sure the wire length is enough to reach without stretching.
Recommended Tools For Installation
Having the right tools makes your job easier and safer. A wire stripperhelps remove insulation cleanly without damaging the wire strands. Pair it with a crimping toolto attach connectors firmly and ensure a solid electrical connection.
A multimeteris invaluable for checking voltage, continuity, and correct wiring. It helps you avoid mistakes that could blow fuses or damage components. You’ll also want a set of screwdriversfor securing terminals and mounting hardware.
Don’t forget electrical tapeor heat shrink tubingto insulate connections and protect them from moisture. A cable tiespack will keep your wiring neat and prevent rattling or shorts. Have you ever struggled with tangled cables while driving? Keeping wires organized makes a big difference.
Preparing The Vehicle And Components
Preparing your vehicle and components is essential before connecting a subwoofer to an amplifier. Proper preparation ensures safety and helps achieve the best sound quality. Take time to organize your workspace and gather all necessary tools. Clear the area around the battery, amplifier, and subwoofer for easy access. Understanding these initial steps makes the installation smoother and reduces errors.
Disconnecting The Battery
Start by disconnecting the negative terminal of your car battery. This step prevents electrical shorts and shocks. Use a wrench to loosen the bolt on the battery clamp. Remove the clamp carefully and set it aside. Avoid touching both battery terminals at the same time. This simple action protects you and your vehicle’s electrical system during installation.
Locating The Amplifier And Subwoofer Placement
Find a secure and ventilated spot for the amplifier. Common locations include under a seat or inside the trunk. Ensure the area has enough space for wiring and cooling. Choose a spot for the subwoofer that fits well and maximizes sound. Popular places are the trunk or rear side panels. Proper placement improves sound quality and keeps components safe from damage.

Credit: www.youtube.com
Running Power And Ground Wires
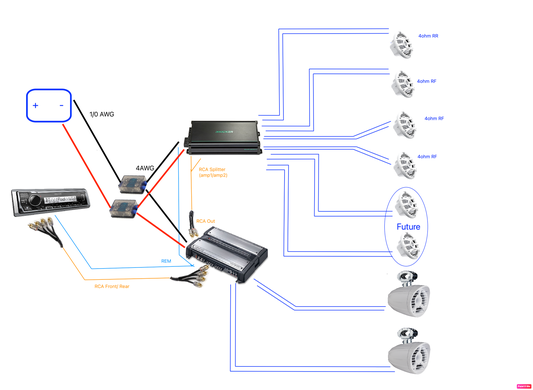
Running power and ground wires is essential when connecting a car subwoofer to an amplifier. These wires deliver the electrical current needed for the amplifier to work correctly. Proper installation ensures strong performance and prevents electrical issues. Careful attention to routing and grounding will keep the system safe and stable.
Routing The Power Cable
Choose a path for the power cable that avoids sharp edges and hot parts. Run the wire from the battery to the amplifier without crossing data or signal cables. Use a grommet when passing through the firewall to prevent damage. Secure the cable with zip ties or clamps to stop movement and wear.
- Keep the wire away from moving parts
- Use a fuse near the battery for protection
- Measure the wire length to avoid excess slack
Securing A Proper Ground Connection
A strong ground connection is vital for stable amplifier operation. Find a clean, unpainted metal surface close to the amplifier. Sand or scrape the area to remove paint and rust before attaching the ground wire. Use a ring terminal and a bolt to connect firmly. Make sure the wire length is short to reduce resistance.
- Check the ground point for tightness regularly
- Use the same wire gauge as the power cable
- A poor ground can cause noise or power loss
Connecting The Remote Turn-on Wire
The remote turn-on wire is key for powering your car amplifier. It sends a small signal to the amp, telling it to turn on with the car’s ignition. Without this wire connected, the amplifier won’t switch on properly, and your subwoofer won’t work.
Connecting this wire is simple but important. It ensures your amplifier only runs when the car is on, preventing battery drain. The remote turn-on wire usually comes with the amplifier and is often blue or blue with a white stripe.
Locate The Remote Turn-on Wire On The Amplifier
Find the blue remote turn-on terminal on your amplifier. It is often labeled as “REM” or “Remote.” This is where the remote turn-on wire attaches. Make sure the amplifier is off while connecting the wire.
Identify The Remote Turn-on Wire From The Head Unit
Check the back of your car stereo or head unit. Look for a blue or blue/white wire labeled “Remote” or “Antenna.” This wire sends the signal to the amplifier to turn on. Use a wiring diagram if unsure.
Connect The Remote Turn-on Wire To The Amplifier
- Strip a small section of insulation from both wires.
- Twist the exposed wires together or use a connector.
- Secure the connection with electrical tape or a wire nut.
- Ensure the connection is tight to avoid power loss.
Test The Connection
Turn on your car stereo. The amplifier should power up along with it. Listen for any hum or noise, which could mean a loose connection. If all sounds clear, your remote turn-on wire is working perfectly.

Credit: www.amazon.ca
Wiring The Rca Cables
Wiring the RCA cables is a crucial step to ensure your subwoofer and amplifier communicate clearly and deliver powerful bass. This connection carries the audio signal from the amplifier to the subwoofer, so choosing and handling the RCA cables properly makes a big difference in sound quality. Let’s break down how to pick the right inputs and avoid common issues like interference and noise.
Choosing The Correct Rca Inputs
Your amplifier may have multiple RCA outputs, but not all are meant for the subwoofer. Look specifically for the port labeled “Sub Out”or “LFE”. This output is designed to send low-frequency signals, perfect for your subwoofer.
If your amplifier only has stereo RCA outputs, connect the subwoofer to either the left or right output, depending on the subwoofer’s input options. Some subwoofers offer a mono inputthat sums both channels, which is ideal for consistent bass response.
Double-check the cable quality too. Cheap RCA cables can degrade signal quality. Invest in shielded cables with solid connectors to maintain a clean and strong connection.
Avoiding Interference And Noise
Have you ever noticed a buzzing or humming sound from your subwoofer? That’s often caused by interference picked up by poorly routed RCA cables. Keep your RCA cables away from power wires and other electronics to reduce this noise.
Use cable ties or clips to separate RCA cables from speaker wires and power cables. Running RCA cables on one side of your vehicle and power cables on the opposite side can also help minimize interference.
If noise persists, try using an RCA ground loop isolator. It’s a simple device that can eliminate ground loop noise without altering your setup. Remember, clean wiring leads to clean sound, so take the time to route your cables thoughtfully.
Hooking Up The Subwoofer To The Amplifier
Hooking up your subwoofer to the amplifier is a crucial step that directly impacts the quality of your car audio system. It’s not just about plugging in wires; it’s about ensuring the connections are secure and configured correctly for optimal sound performance. Getting this right can turn a good audio setup into an immersive, earth-shaking experience.
Connecting Speaker Wires
Start by identifying the positive and negative terminals on both your subwoofer and amplifier. Speaker wires usually have a marking or color difference to help you match them correctly. Always connect the positive terminal on the amplifier to the positive terminal on the subwoofer, and the same for the negative terminals.
Use quality speaker wire with enough thickness to handle the power your amplifier produces. Thin wires can cause signal loss or even damage your equipment. Twist the wire ends tightly and insert them fully into the terminal clamps or use banana plugs for a cleaner connection.
Configuring Series Or Parallel Wiring
Understanding how to wire your subwoofers in series or parallel affects the total impedance load on your amplifier. This is important because it determines how much power your amplifier can safely deliver without overheating or shutting down.
In a series connection, you link the positive terminal of one subwoofer to the negative terminal of the next. This adds the impedance of each subwoofer together. For example, two 4-ohm subs wired in series create an 8-ohm load.
In a parallel connection, you connect all the positive terminals together and all the negative terminals together. This reduces the overall impedance. Two 4-ohm subs in parallel will present a 2-ohm load to your amplifier, drawing more power but requiring a more stable amp.
Ask yourself: does your amplifier support lower impedance loads, or should you opt for series wiring to protect your gear? Checking your amplifier’s manual for recommended impedance ranges can save you from costly mistakes.
Adjusting Amplifier Settings
Adjusting the amplifier settings is crucial to get the best sound quality from your car subwoofer. It’s not just about turning the volume up; you need to balance gain and crossover settings to match your audio system. Getting these right ensures your subwoofer blends perfectly with your other speakers without distortion or weak bass.
Setting Gain And Crossover
Start by setting the gain control on your amplifier. This controls how much power the subwoofer receives. Set it too high, and you risk distortion; too low, and the bass will be weak.
Next, adjust the crossover frequency. This setting determines the highest frequency your subwoofer will play. Generally, set the crossover between 80Hz and 120Hz, but this depends on your main speakers’ capabilities.
Think about your speaker setup: Are your door speakers handling midrange and highs well? If yes, set the crossover lower to avoid overlap. If not, a higher crossover might help fill in the sound.
Testing And Fine-tuning Sound
After initial adjustments, test the sound with a variety of music genres. Listen for clear, punchy bass without distortion or muddiness. If the bass sounds too boomy, lower the gain or adjust the crossover frequency.
Try changing the amplifier’s phase setting if your subwoofer sounds disconnected from the rest of the audio. This simple tweak can make the bass feel more natural and tighter.
Don’t hesitate to spend time fine-tuning. Small changes can make a big difference. What sounds perfect in one car might not work in another, so trust your ears and adjust until the bass feels right to you.
Safety Checks And Final Steps
Before powering your car audio system, perform key safety checks. This prevents damage and ensures everything works well. Follow the final steps carefully for a strong, lasting connection.
Inspecting Connections
Check all wires for tight and secure connections. Make sure no cables are loose or frayed. Confirm that the subwoofer wires connect properly to the amplifier terminals. Look for any exposed wires that might cause shorts. Use a multimeter to test for correct voltage and continuity. This helps avoid electrical problems later.
Reconnecting The Battery
Reconnect the car battery only after all wiring checks. Turn off the ignition before reconnecting the battery cable. Attach the positive terminal first, then the negative. Tighten the battery clamps firmly to avoid sparks. Once connected, keep the car off while you finalize the system setup. This step prevents accidental shorts or shocks.
Securing All Components
Fix the amplifier and subwoofer in place using brackets or screws. Avoid loose parts that can vibrate or shift while driving. Use zip ties to bundle and organize wires neatly. Keep cables away from sharp edges or hot engine parts. Properly secured parts improve sound quality and system durability. Double-check all mounts before testing the system.

Credit: www.reddit.com
Frequently Asked Questions
How Do I Connect A Subwoofer To An Amplifier?
To connect a subwoofer, use RCA cables from the amplifier’s subwoofer output to the subwoofer’s input. Ensure proper polarity by matching positive and negative terminals. Secure all connections tightly to avoid signal loss or noise interference.
What Type Of Wire Is Best For Subwoofer Connection?
Use a high-quality speaker wire, preferably 12 to 16 gauge. Thicker wires reduce resistance and improve sound quality. Ensure the wire length is appropriate to avoid signal loss and keep connections secure and insulated.
Can I Use Any Amplifier For My Car Subwoofer?
Not all amplifiers suit subwoofers. Choose an amplifier with enough power to match your subwoofer’s RMS rating. A dedicated mono or multi-channel amplifier designed for low frequencies ensures optimal performance and prevents damage.
How Do I Adjust Amplifier Settings For Subwoofer?
Set the amplifier’s gain control to match your head unit output. Adjust the low-pass filter to cut frequencies above 80-120 Hz. Fine-tune the bass boost and phase settings for clearer, deeper bass without distortion.
Conclusion
Connecting a car subwoofer to an amplifier boosts sound quality. Follow the steps carefully to ensure a successful setup. Double-check connections for any loose wires. Proper installation brings better bass and clarity. Enjoy your music with enhanced sound. Experiment with settings for optimal performance.
Take time to adjust your amplifier for the best results. A well-connected system makes every drive enjoyable. Remember, patience is key in setting up your audio system. Happy listening and safe driving!