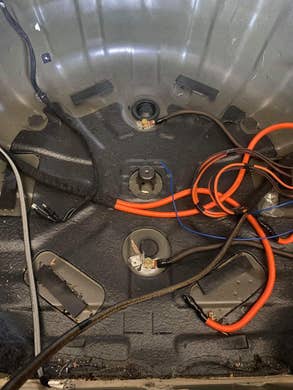
How to Install a Car Amplifier Diagram Pdf: Easy Step-by-Step Guide
Are you ready to boost your car’s sound system but feel unsure about where to start? Installing a car amplifier can seem tricky, especially if you don’t have a clear guide.
That’s where a car amplifier diagram PDF becomes your best friend. It shows you exactly how to connect every wire and component, making the process simple and stress-free. You’ll discover step-by-step instructions and tips to help you install your car amplifier with confidence.
Keep reading, and soon you’ll be enjoying powerful, crystal-clear sound on every drive.
Choosing The Right Amplifier
Choosing the right amplifier is key to getting the sound quality you want from your car audio system. The right amplifier not only powers your speakers properly but also enhances the overall listening experience. Before you start the installation, understanding the types, matching needs, and power ratings will save you time and frustration.
Types Of Car Amplifiers
Car amplifiers come in several types, each designed for specific audio needs. The main categories are:
- Class A/B Amplifiers:Popular for their balance of sound quality and efficiency. They work well with full-range speakers.
- Class D Amplifiers:Highly efficient and compact, perfect for subwoofers and bass-heavy setups.
- Mono Amplifiers:Designed for powering a single subwoofer channel with high power output.
- Multi-channel Amplifiers:Support multiple speakers or speaker sets, ideal for full car audio upgrades.
Choosing the right type depends on your speakers and what kind of sound you want to achieve. Have you decided if you want more bass or clearer highs?
Matching Amplifier To Car Audio System
Not all amplifiers suit every car audio setup. You need to match the amplifier’s features with your existing speakers and head unit.
- Check speaker impedance (ohms) and ensure the amplifier supports it.
- Consider the number of channels based on how many speakers you want to power.
- Look at the input options to confirm compatibility with your head unit.
One time, I picked a 4-channel amplifier for a 2-speaker setup, thinking it would be future-proof. Instead, it complicated my wiring and wasted power. Your setup should fit your current needs first, with room to grow if necessary.
Power Ratings And Specifications
Understanding power ratings helps avoid underpowering or overpowering your system. Amplifiers list power output in watts RMS, which is the continuous power they can deliver.
| Specification | What It Means | Why It Matters |
|---|---|---|
| RMS Power | Continuous power output | Ensures consistent sound without distortion |
| Peak Power | Maximum short bursts of power | Less important for steady sound quality |
| Impedance (Ohms) | Resistance load the amp can handle | Must match speaker specs to avoid damage |
Have you checked if the amplifier’s RMS power matches your speakers’ power handling? Too little power causes distortion, while too much can damage your speakers.
Essential Tools And Materials
Installing a car amplifier requires the right tools and materials. These ensure a smooth setup and clear sound. Missing any essential item can cause delays or poor performance. Preparing everything before starting saves time and effort.
Wiring Kits And Connectors
Wiring kits include power cables, ground wires, and RCA cables. These connect the amplifier to the car’s battery and audio system. Choose wires with the right gauge for your amplifier’s power. Connectors like ring terminals and spade connectors ensure secure joins. Use fuse holders to protect the electrical circuit from damage.
Safety Equipment
Safety is key during installation. Wear insulated gloves to prevent electric shocks. Use safety glasses to protect eyes from sparks or debris. Have a fire extinguisher nearby in case of electrical fires. Disconnect the car battery before starting work to avoid short circuits.
Additional Accessories
Additional tools make installation easier and cleaner. Wire strippers help remove insulation without damage. Crimping tools secure connectors tightly on wires. Electrical tape and heat shrink tubing insulate and protect connections. Mounting brackets and screws keep the amplifier stable inside the car.
Preparing Your Vehicle
Preparing your vehicle is a crucial stage before installing a car amplifier. Skipping or rushing through this step can lead to poor connections or even damage to your car’s electrical system. Taking time to properly prepare ensures a smooth and safe installation process.
Disconnecting The Battery
Start by disconnecting the negative terminal of your car battery. This prevents any electrical shorts or shocks while working on your vehicle’s wiring.
Use a wrench to loosen the terminal clamp, then carefully remove it. Keep the terminal away from the battery to avoid accidental contact.
Have you noticed how many people overlook this simple safety step? It’s often the cause of frustrating setbacks during installation.
Accessing The Installation Area
Locate the ideal spot where you want to mount your amplifier. Common places include under seats, in the trunk, or behind panels.
Remove any trim or covers gently to avoid breaking clips or scratching surfaces. Keep screws and small parts organized for reassembly.
Think about how easy it will be to reach the amplifier later for adjustments or troubleshooting. Accessibility matters as much as space.
Clearing Space For The Amplifier
Clear out any items or debris from the installation area. This prevents interference with wiring and ensures good airflow to keep the amplifier cool.
If the space is tight, consider moving seats or repositioning items to create enough room. Measure the amplifier dimensions beforehand to avoid surprises.
Remember, a cramped amplifier can overheat quickly, reducing its performance and lifespan. Would you want your sound system to fail on a hot day?

Credit: manuals.plus
Reading The Amplifier Diagram Pdf
Reading the amplifier diagram PDF is a crucial skill that makes installing your car amplifier much easier. This document is like a map that guides you through each wire and connection point. Understanding it well can save you time and prevent costly mistakes.
Key Symbols And Labels
The first thing to notice are the symbols and labels on the diagram. These usually include icons for power, ground, speakers, and input sources. Each symbol represents a component or a function, so knowing what they mean is essential.
Look for labels such as “GND” for ground, “REM” for remote turn-on, and “BATT” for battery power. These abbreviations tell you exactly where to connect wires. If you miss these, your amplifier might not turn on or could even get damaged.
Interpreting Wiring Paths
Wiring paths show how electricity flows through the system. The lines connecting symbols indicate where wires should run. Pay attention to whether lines are solid, dashed, or have arrows, as these details often signal different types of connections or directions of current.
Trace each path carefully from the power source to the amplifier and then to the speakers. This helps you understand the sequence and avoid crossing wires. Have you ever connected something only to realize later it was linked incorrectly? Following these paths closely can prevent that.
Identifying Connection Points
Connection points are spots where wires physically join the amplifier or other components. They are often marked with dots or small circles on the diagram. Knowing these points helps you prepare the correct wire length and connector type before starting.
Sometimes, connection points are grouped together, like multiple speaker terminals or power inputs. Double-check these groups to ensure each wire goes to its right place. Missing or mixing connection points can cause poor sound quality or system failure.
Running Power And Ground Wires
Running power and ground wires is a crucial part of installing a car amplifier. These wires carry the electricity needed to power the amplifier and ensure it runs smoothly. Proper wiring prevents electrical problems and keeps your system safe. Focus on choosing the right wire size, routing cables carefully, and making a solid ground connection.
Choosing Wire Gauge
Pick a wire gauge that matches your amplifier’s power needs. Thicker wires carry more current and reduce voltage drop. A common choice is 4 or 8 gauge wire for most car amplifiers.
Check the amplifier’s manual for recommended wire size. Use a wire gauge chart to match the power and length of the cable. Avoid using wires that are too thin; they can overheat and cause damage.
Routing Power Cable
Run the power cable from the battery to the amplifier carefully. Avoid sharp edges and moving parts that could cut the wire. Use existing wire channels or run the cable along the car’s frame.
Keep the power wire away from audio cables to reduce noise interference. Use cable ties or clips to keep wires secure and organized. Place a fuse near the battery to protect your system from short circuits.
Securing Ground Connection
Find a clean, bare metal spot close to the amplifier for grounding. Remove paint and rust to ensure good contact. Use a ring terminal and a bolt to attach the ground wire firmly.
Check the connection for tightness and no corrosion. A bad ground connection can cause noise and poor amplifier performance. Ground wires should be as short as possible for the best results.
Connecting The Remote Turn-on Wire
Connecting the remote turn-on wire is a key step in installing a car amplifier. This wire tells the amplifier to power on when the car stereo is on. Proper connection ensures the amplifier works safely and efficiently. Let’s explore how to handle this wire carefully for the best results.
Locating Remote Turn-on Source
The remote turn-on wire usually comes from the head unit or car stereo. It is often a blue or blue with white stripe wire. Check the car stereo’s wiring diagram or manual to find it. Sometimes, it is labeled as “remote,” “amp turn-on,” or “power antenna.”
Use a multimeter to confirm if the wire has 12 volts when the stereo is on. This step avoids wrong connections and protects your amplifier.
Proper Wire Routing
Route the remote turn-on wire separately from power cables. Keep it away from speaker wires to avoid noise. Use wire loom or split tubing to protect the wire from damage.
- Run the wire along the car’s interior panels
- Avoid sharp edges and moving parts
- Secure the wire with zip ties or clips
Proper routing prevents shorts and signal interference. It also makes the installation neat and safe.
Testing The Connection
Before finalizing, test the remote wire connection. Turn on the car stereo and check if the amplifier powers up. Use a test light or multimeter to verify the 12 volts at the amplifier’s remote terminal.
If the amplifier does not turn on, recheck the wire and connections. Correct issues before securing the wire permanently.
Hooking Up The Audio Inputs And Outputs
Hooking up the audio inputs and outputs is key to a clear sound from your car amplifier. Proper connections ensure the best audio quality and avoid damage to your equipment. Understanding how to connect RCA cables and speaker wires will help you set up the system right.
Connecting Rca Cables
RCA cables carry the audio signal from the head unit to the amplifier. Use quality RCA cables to reduce noise and interference. Connect the RCA plugs to the correct input jacks on the amplifier, matching colors usually red and white. Make sure the connections are snug to prevent signal loss. Keep RCA cables away from power wires to avoid noise.
Speaker Wire Connections
Speaker wires carry amplified sound to the speakers. Use the correct gauge wire for your system’s power needs. Strip the wire ends carefully and twist the strands before connecting. Attach wires to the amplifier’s speaker terminals, ensuring positive and negative are matched. Tighten the terminal screws securely to avoid loose connections. Route wires neatly to prevent damage or shorts.
Avoiding Signal Interference
Signal interference causes noise and distortion in your audio. Separate RCA cables from power cables by at least a few inches. Use shielded RCA cables to block electromagnetic interference. Avoid running wires near the car’s engine or other electronic devices. Secure cables with clips or ties to prevent movement and rubbing. Proper layout keeps your sound clean and clear.
Mounting The Amplifier
Mounting the amplifier is a key step in installing your car audio system. A solid mount keeps the amplifier safe and working well. It also helps avoid damage from movement or heat. Follow these tips to mount the amplifier correctly and keep your sound clear and strong.
Choosing A Secure Location
Pick a spot that does not move or shake during driving. Common locations include under seats or in the trunk. Avoid places near heat sources or where water can reach. The location should allow easy access for wiring and future maintenance.
Fixing The Amplifier In Place
Use screws or brackets to hold the amplifier firmly. Make sure the mounting surface is clean and flat. Secure the amplifier tightly to stop vibrations. Double-check that it does not shift or slide when the car moves.
Ensuring Proper Ventilation
Amplifiers generate heat while running. Leave enough space around it for air to flow. Avoid covering vents with objects or wires. Good ventilation prevents overheating and extends amplifier life.
Final Checks And Testing
Before you hit the road with your newly installed car amplifier, it’s crucial to perform final checks and testing. This ensures everything works smoothly and prevents potential damage to your audio system or vehicle. Taking a few moments now can save you from costly fixes later.
Reconnecting The Battery
After completing the amplifier installation, carefully reconnect your car’s battery. Make sure the terminals are clean and tightly secured to avoid any loose connections. A loose battery connection can cause intermittent power loss or electrical shorts, which might harm your amplifier.
Once reconnected, double-check that all wires are properly insulated and away from moving parts. Have you noticed any unusual smells or sparks? If so, disconnect immediately and inspect your wiring.
Powering On The System
Turn on your car’s ignition and then power up the amplifier. Listen for any unusual noises such as buzzing, humming, or distortion. These sounds often indicate grounding issues or wiring mistakes that need correction before playing music.
Keep the volume low initially to avoid sudden loud bursts that could damage your speakers. Observing how your system responds at startup can reveal if your installation was done right or if tweaks are necessary.
Adjusting Amplifier Settings
Now, fine-tune the amplifier’s settings to match your speakers and listening preferences. Start with gain controls set low and gradually increase until the sound is clear without distortion. Adjust bass boost and crossover frequencies carefully to avoid overpowering your system.
Remember, the goal is balanced sound, not maximum volume. Have you tried different settings to find what truly enhances your music? Experimenting here can transform your audio experience dramatically.

Credit: manuals.plus
Credit: www.diymobileaudio.com
Frequently Asked Questions
What Is A Car Amplifier Installation Diagram Pdf?
A car amplifier installation diagram PDF is a detailed guide. It shows wiring connections and component placement. This helps users install amplifiers correctly and safely. The PDF format allows easy access and printing for reference during installation.
How Do I Read A Car Amplifier Diagram Pdf?
To read the diagram PDF, identify key symbols and labels. Follow the wiring paths step-by-step. Check the power, ground, speaker, and signal wire connections. Understanding these details ensures proper setup and avoids errors or damage.
Can I Install A Car Amplifier Without A Diagram Pdf?
Installing without a diagram is possible but risky. A diagram ensures correct wiring and component placement. Without it, you might cause electrical faults or damage. Using a diagram PDF improves installation accuracy and safety.
Where Can I Find A Reliable Car Amplifier Diagram Pdf?
Reliable diagrams are available on car audio forums, manufacturer websites, and tutorial blogs. Always download from trusted sources to ensure accuracy. Verified PDFs help avoid installation mistakes and ensure optimal amplifier performance.
Conclusion
Installing a car amplifier can boost your audio experience. Follow the diagram PDF for clear guidance. Gather your tools and materials before starting. Carefully connect all wires according to the diagram. Double-check each connection for safety. Test the amplifier to ensure everything works.
Troubleshooting tips can help resolve common issues. Patience is key during the installation process. Enjoy improved sound quality from your car’s audio system. Share your experience with friends and fellow car enthusiasts. A well-installed amplifier enhances every drive. Keep learning and exploring more about car audio systems.