How to Connect a Car Stereo to a Wall Outlet: Easy DIY Guide
Have you ever wanted to enjoy your car stereo’s powerful sound right at home? Connecting a car stereo to a wall outlet might sound tricky, but it’s easier than you think.
Imagine playing your favorite tunes with that crisp, clear audio without needing your car. In this guide, you’ll discover simple steps to make it happen safely and effectively. Keep reading, and you’ll be blasting your music through your car stereo in no time!
Required Tools And Materials
Connecting a car stereo to a wall outlet needs specific tools and materials. Having the right items makes the process safer and easier. Prepare all before starting to avoid interruptions and mistakes.
Car Stereo Unit
Choose a car stereo unit that fits your needs. Check its voltage and power requirements. Most car stereos run on 12 volts DC. The unit should have proper connectors and controls for easy use.
12v Power Supply Adapter
A 12V power supply adapter converts wall outlet power to the stereo’s needs. Ensure it provides enough current for your stereo. Look for an adapter with stable voltage output. A reliable adapter protects your stereo from damage.
Wiring Harness
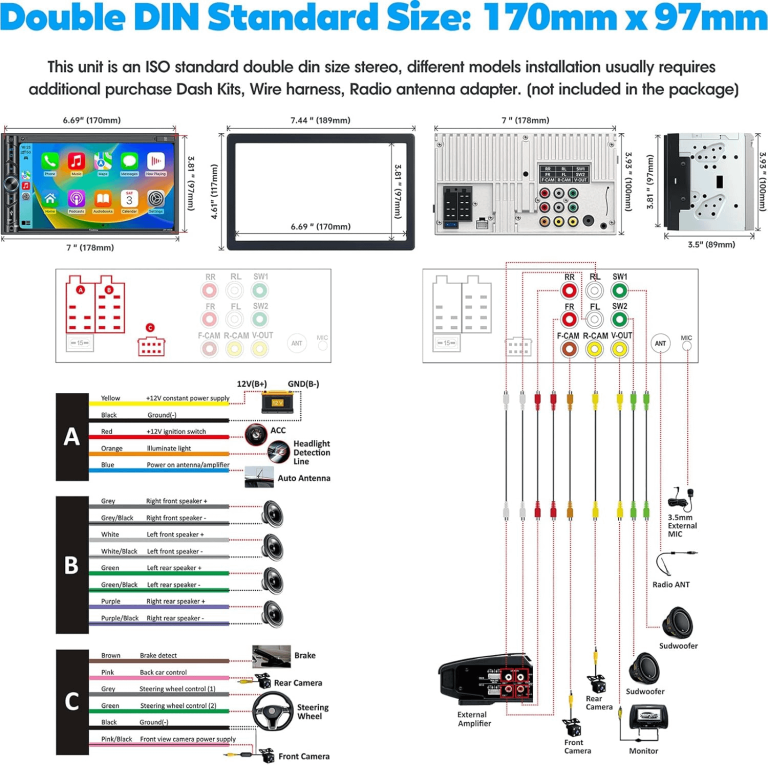
The wiring harness connects the stereo to the power supply and speakers. Use a harness made for your stereo model. It simplifies wiring and reduces errors. Proper color-coded wires help identify connections quickly.
Basic Tools
- Screwdrivers to open the stereo casing or mount it.
- Wire strippers to prepare wire ends for connections.
- Electrical tape or heat shrink tubes for insulation.
- Multimeter to check voltage and wiring continuity.
- Crimping tool for secure wire connections.

Credit: www.reddit.com
Safety Precautions
Ensuring safety is crucial when connecting a car stereo to a wall outlet. Ignoring safety precautions can lead to electrical hazards, damage to your equipment, or even personal injury. Let’s look at key safety checks to keep your setup secure and functional.
Check Voltage Compatibility
Your car stereo is designed to run on 12 volts DC, but wall outlets supply much higher voltage, usually 120 or 240 volts AC depending on your location. Using the wrong voltage can fry your stereo instantly. Always verify the power adapter or transformer you use converts the wall outlet voltage to 12 volts DC.
I once overlooked this and plugged a stereo directly into a wall socket—resulting in a burnt-out unit. Don’t let this happen to you. Double-check the voltage ratings on both your stereo and power supply before connecting.
Avoid Overloading Circuits
Wall outlets can only handle a limited amount of electrical load. Plugging in too many devices or using an inadequate power adapter can cause circuit breakers to trip or worse, start a fire. Use a power supply with a sufficient amperage rating that matches or exceeds your stereo’s current needs.
Think about what else is plugged into the same outlet. Is your stereo the only device, or are there others drawing power simultaneously? If you’re unsure, use a dedicated circuit or power strip with built-in overload protection for added safety.
Use Proper Insulation
Exposed wires or poorly insulated connections increase the risk of electrical shock and short circuits. Always use insulated connectors, electrical tape, or heat shrink tubing to cover any bare wires. Make sure your wiring is neat, secure, and away from any metal surfaces.
One time, a frayed wire caused a short that shut down the entire room’s power. Prevent this by regularly inspecting your setup and replacing damaged cables immediately. Proper insulation isn’t just about safety—it also prolongs the life of your stereo system.
Identifying Stereo Connections
Before you connect your car stereo to a wall outlet, you need to understand the different stereo connections. Identifying these connections correctly can save you from damaging your equipment or causing electrical issues. Let’s break down the main wires and connectors you’ll encounter on your stereo.
Power Wires
The power wires are crucial because they supply electricity to the stereo. Look for a red wire, which usually carries the switched 12V power from the ignition. This wire turns the stereo on and off with your car’s key.
You’ll also find a yellow wire that provides constant 12V power to maintain settings like clock and presets. When connecting to a wall outlet, you’ll need a 12V DC power supply that matches the stereo’s requirements. Double-check the voltage and amperage to avoid frying your unit.
Speaker Wires
Speaker wires carry audio signals from the stereo to your speakers. They come in pairs: a positive and a negative wire for each speaker. These wires are often color-coded; for instance, white and white with a stripe might be the front left speaker.
It’s important to connect these wires correctly to get the best sound quality and avoid shorts. If you’re testing the stereo on a bench setup, you can use small speakers or a dummy load to simulate real speakers safely.
Ground Wire
The ground wire is your stereo’s safety net. It’s usually black and connects to the car’s chassis to prevent electrical noise and provide a return path for current. Without a proper ground, the stereo may hum or fail to operate correctly.
When powering the stereo from a wall outlet, connect the ground wire securely to the negative terminal of your power supply or to a grounded metal surface. This simple step can save you hours of troubleshooting hum or buzzing noises.
Antenna Connection
The antenna connection brings in radio signals to your stereo. This is typically a single metal plug or socket. Car antennas may not work well indoors, so you might need an external radio antenna or a signal booster.
Consider how you plan to use your stereo: Do you want to listen to FM/AM radio, or will you rely on Bluetooth and auxiliary inputs? Your antenna setup depends on your listening preferences and location.

Credit: www.youtube.com
Choosing The Right Power Supply
Choosing the right power supply is crucial when connecting a car stereo to a wall outlet. The power supply must match the stereo’s needs for safe and steady operation. Using the wrong adapter can damage the stereo or create safety hazards. Understanding key electrical terms and selecting the correct equipment ensures a smooth setup.
Understanding Voltage And Amperage
Voltage is the electric force that powers your stereo. Most car stereos need 12 volts DC. Using a power supply with a different voltage can harm the device.
Amperage shows how much current the stereo needs. The power supply must provide enough amps for the stereo to work well. Check the stereo’s manual for the required amperage.
Both voltage and amperage must match the stereo’s specifications. Too little amperage causes poor performance. Too much voltage risks damage.
Selecting A Wall Adapter
Choose a wall adapter that converts AC from your outlet to 12V DC. The adapter should have a power rating equal to or higher than your stereo’s needs.
- Look for adapters labeled “12V DC output.”
- Check the amperage rating on the adapter label.
- Pick an adapter with the right plug size and polarity.
Using an adapter with the wrong polarity or plug size can prevent the stereo from working or cause damage.
Using A Regulated Power Supply
A regulated power supply keeps voltage steady. This protects your stereo from voltage spikes or drops.
Regulated supplies are ideal for sensitive electronics like car stereos. They ensure clean, safe power all the time.
Choose a regulated adapter with the correct voltage and amperage. This setup offers the best performance and safety for your stereo.
Wiring The Stereo To The Adapter
Wiring your car stereo to an adapter requires careful attention to detail to ensure it functions safely and efficiently from a wall outlet. This process involves connecting power and ground wires properly, attaching speaker wires, and securing all connections to avoid shorts or loose contacts. Understanding each step helps you avoid common pitfalls and keeps your stereo working smoothly outside its usual environment.
Connecting Power And Ground
The power wire, usually red, must connect to the positive terminal of your 12V DC adapter. Make sure your adapter can supply enough current for the stereo’s needs—check the stereo’s manual for its amperage rating.
The ground wire, typically black, should attach firmly to the adapter’s negative terminal. A poor ground connection can cause buzzing sounds or the stereo to malfunction.
Have you checked that your adapter has built-in protection like a fuse? This can save your stereo from damage if there’s a power surge.
Hooking Up Speaker Wires
Speaker wires carry the audio signals from the stereo to the speakers. Match the positive and negative terminals on the stereo to the corresponding wires on the speakers.
Use wire strippers to expose about half an inch of copper before twisting the wires together. Twisting ensures a solid connection and prevents signal loss.
If you’re using multiple speakers, label the wires to avoid confusion and ensure proper speaker placement. Have you ever tried playing your favorite song only to find one speaker silent? Proper wiring prevents that frustration.
Securing Connections
Loose connections can cause intermittent sound or even damage your equipment. Use electrical tape or heat shrink tubing to cover exposed wires and avoid shorts.
Consider using wire nuts or terminal blocks for a more secure and professional finish. These tools keep wires firmly connected and reduce the risk of accidental disconnections.
Before powering on, gently tug each wire to confirm it’s tight. Would you want your setup to fail mid-playlist? Securing connections keeps your stereo reliable and your music uninterrupted.
Testing The Setup
Testing the setup is essential to ensure your car stereo works well with a wall outlet. It helps find problems early and confirms the connection is safe. Take time to check each part carefully before regular use.
Powering On The Stereo
First, switch on the power source. Then, press the stereo’s power button. Watch for lights or sounds that show it is on. A steady light usually means the stereo is ready to use. If nothing happens, double-check the power connection and outlet.
Checking Sound Output
Play a radio station or a music track. Listen carefully to the speakers. Sound should be clear and steady without static or cutouts. Adjust the volume slowly to avoid sudden loud noise. Check all speaker outputs if your stereo has multiple channels.
Troubleshooting Common Issues
Sometimes, problems occur during testing. Use this checklist to solve common issues:
- No power: Verify all cables are connected securely.
- No sound: Confirm the stereo is not muted or on pause.
- Distorted sound: Check speaker connections and lower volume.
- Overheating: Turn off the stereo and let it cool down.
If issues continue, review your wiring and power supply. Reconnect any loose parts carefully.
Additional Tips
Connecting a car stereo to a wall outlet can be straightforward, but a few extra precautions help ensure safety and optimal performance. These additional tips can protect your equipment and improve your listening experience. Let’s look at some important considerations that often get overlooked.
Using A Fuse For Protection
Adding a fuse between the power source and your stereo is a smart safety move. It prevents damage from power surges or accidental short circuits.
Choose a fuse with the correct rating for your stereo’s power needs. For example, if your stereo draws 10 amps, use a fuse rated slightly above that, like 15 amps.
Without a fuse, a sudden electrical spike could fry your stereo or even cause a fire. Have you ever experienced a blown fuse saving your gear? It’s a small investment with big peace of mind.
Mounting The Stereo Safely
Where and how you place your stereo matters. Mount it on a stable surface away from moisture, dust, and extreme temperatures.
Use brackets or a sturdy shelf to keep it secure. This prevents accidental falls or vibrations that could damage internal components over time.
Think about accessibility too. Can you easily reach the controls? Ensuring your stereo is both safe and user-friendly makes your setup more enjoyable.
Avoiding Interference
Car stereos often deal with interference from power supplies or nearby electronics. The same applies when using them indoors.
Keep your stereo’s wiring away from other power cables and devices that emit electromagnetic signals. Using shielded cables can also reduce unwanted noise.
If you hear buzzing or static, try moving cords or devices around. Have you noticed how small adjustments can dramatically improve sound quality?
Credit: www.coloradofans.com
Frequently Asked Questions
Can I Connect A Car Stereo Directly To A Wall Outlet?
No, connecting a car stereo directly to a wall outlet is dangerous. Car stereos operate on 12 volts DC, while wall outlets provide 120 volts AC. To connect safely, use a power supply that converts AC to 12 volts DC.
This ensures the stereo receives the correct voltage and avoids damage.
What Power Supply Do I Need For A Car Stereo?
You’ll need a 12-volt DC power supply with sufficient amperage. Most car stereos require around 5 to 10 amps. Check your stereo’s manual for exact requirements. Ensure the power supply can handle the stereo’s power needs to avoid overheating or damage.
How Can I Safely Connect A Car Stereo At Home?
Use a 12-volt DC power supply to safely connect your car stereo at home. Connect the stereo’s red and yellow wires to the power supply’s positive terminal. Connect the black wire to the negative terminal. Ensure connections are secure to prevent electrical shorts or damage.
What Are The Risks Of Improper Connection?
Improper connection risks include electrical shorts, fire hazards, and damage to the stereo. Using incorrect voltage can fry the internal components. Always ensure proper voltage and secure connections to avoid these risks. Use a reliable power supply and follow the stereo’s manual instructions for safe operation.
Conclusion
Connecting a car stereo to a wall outlet can be simple and safe. Use the right power adapter and check all connections twice. Keep the wires neat and avoid touching live parts. This setup lets you enjoy your car stereo at home easily.
Always follow safety steps to prevent damage or injury. Now, you can play your favorite music anytime indoors without trouble.