What Size Crimp Caps for Car Stereo: Ultimate Guide for Perfect Fit
Master Automotive Systems Engineer & Performance Vehicle Specialist at CarSpeedNest Automotive Testing Lab · ASE Certified Master Technician, Mobile Electronics Certified Professional (MECP Master), Certified Dyno Diagnostic Specialist · 14+ years in dyno testing, electronic sensor calibration, automotive wiring harnesses, and precision drivetrain maintenance
Choosing the right crimp caps for your car stereo can make all the difference in sound quality and connection durability. If you’ve ever struggled with loose wires or poor audio performance, you know how frustrating it can be.
But don’t worry—getting the correct size crimp caps is simpler than you think. You’ll discover exactly what size crimp caps you need, why it matters, and how to pick the best ones for your setup. Keep reading, and you’ll soon have a secure, professional-looking installation that keeps your music playing perfectly.
Crimp Caps Basics
Crimp caps play a vital role in car stereo installations. They secure wire connections and ensure stable signals. Choosing the right size and material can affect audio quality and safety. Understanding crimp caps basics helps in making the best choice for your setup.
Purpose Of Crimp Caps
Crimp caps connect two or more wires securely. They prevent wires from coming loose or shorting. These caps also protect connections from moisture and dirt. This protection reduces the risk of electrical problems in your car stereo system. Using crimp caps ensures a clean, professional wiring job.
Common Materials Used
Crimp caps come in different materials based on use and durability. The most common materials include:
- Copper:Offers excellent conductivity for clear signal transmission.
- Aluminum:Lightweight but less conductive than copper.
- Tinned Metal:Prevents corrosion and improves longevity.
- Plastic Insulation:Covers the metal part to prevent shorts and provide grip.
Choosing the right material ensures a long-lasting and reliable connection in your car stereo system.
Car Stereo Wiring Essentials
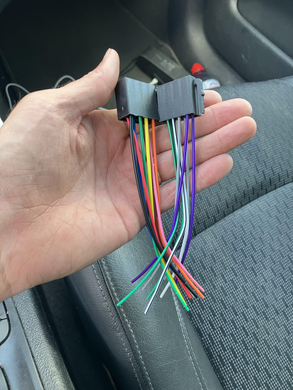
Getting your car stereo wiring right is crucial for both sound quality and safety. The right connections prevent issues like static, power loss, or even damage to your equipment. Understanding the essentials of car stereo wiring helps you choose the correct crimp caps and wire sizes for a secure, lasting setup.
Types Of Car Stereo Wires
Car stereo wiring includes several types, each with a specific role in your audio system. Knowing these helps you match the right crimp caps and ensure proper connections.
- Power Wires:These carry electricity from your car’s battery to the stereo. They usually have a thicker gauge to handle higher current.
- Ground Wires:Ground wires complete the electrical circuit and prevent interference. They often share the same gauge as power wires.
- Speaker Wires:These connect the stereo to your car speakers. They vary in thickness depending on speaker power and distance.
- Remote Turn-On Wire:This thin wire signals an amplifier to power on when the stereo is active.
Have you checked which wires your car stereo kit includes? Using the wrong wire type can cause connection problems or even damage your system.
Wire Gauge And Its Importance
Wire gauge measures wire thickness and affects how much current it can carry safely. Thicker wires (lower gauge number) handle more power and reduce voltage drop.
| Wire Gauge (AWG) | Typical Use | Max Current Capacity (Amps) |
|---|---|---|
| 10-12 | Power and Ground Wires | 20-30 |
| 14-16 | Speaker Wires | 10-15 |
| 18-20 | Remote Turn-On Wire | 1-5 |
Using a crimp cap that fits your wire gauge ensures a solid connection. If the cap is too small, it won’t hold the wire properly; too large, and it won’t crimp tightly. Have you measured your wires before picking crimp caps? It’s a small step that makes a big difference.
Choosing The Right Crimp Cap Size
Choosing the right crimp cap size ensures a secure connection in your car stereo wiring. A proper fit prevents loose connections and signal loss. It also protects the wires from damage and corrosion. Selecting the correct size helps maintain sound quality and safety during use.
Matching Cap Size To Wire Gauge
Wire gauge measures the thickness of the wire. Crimp caps come in sizes that match common wire gauges. Using the right size crimp cap creates a tight fit around the wire. A loose cap can cause poor connection or wire slip.
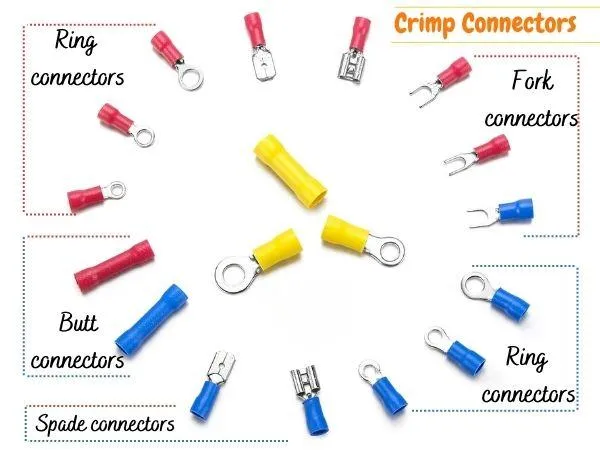
- 18-22 gauge wires typically use small crimp caps.
- 14-16 gauge wires require medium-sized caps.
- 10-12 gauge wires need larger crimp caps.
Check your wire gauge before buying crimp caps. This step ensures compatibility and reliability of your stereo connections.
Color Coding For Easy Identification
Crimp caps often use color codes to identify size quickly. These colors help you find the right cap without measuring each time. It simplifies the installation process and reduces mistakes.
| Color | Wire Gauge Range | Typical Use |
|---|---|---|
| Red | 18-22 AWG | Small wires, signal connections |
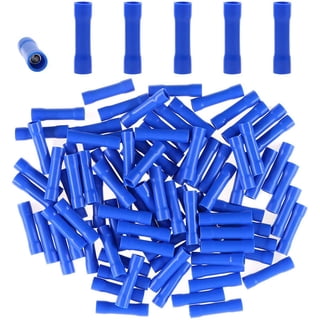
| Blue | 14-16 AWG | Medium wires, power lines |
| Yellow | 10-12 AWG | Large wires, main power |
Using color-coded crimp caps saves time and prevents wiring errors. It is a simple way to keep your car stereo wiring organized and safe.
Tools For Crimping
Choosing the right tools for crimping ensures a strong and secure connection in your car stereo setup. Using proper equipment helps avoid loose wires and weak contacts. It also saves time and frustration during installation. The right tools make crimping easier, cleaner, and more reliable.
Crimping Pliers And Their Features
Crimping pliers are designed specifically for attaching crimp caps to wires. They provide consistent pressure for a tight fit. Look for pliers with these features:
- Adjustable jaw sizes to fit different cap dimensions
- Comfortable handles for easy grip and control
- Built-in wire cutters for convenience
- Durable metal construction for long-lasting use
These pliers help create secure connections, reducing the risk of electrical issues.
Additional Tools For Perfect Fit
Besides crimping pliers, some extra tools improve the crimping process. These include:
- Wire strippers for clean wire ends
- Heat shrink tubing to protect connections
- Multimeter to test electrical continuity
- Small screwdrivers for adjusting terminals
Using these tools together ensures a neat and reliable car stereo installation.
Step-by-step Crimping Process
Crimping your car stereo wires correctly ensures a strong, reliable connection that can handle vibrations and temperature changes inside your vehicle. The process isn’t complicated, but attention to detail makes a big difference. Let’s break down the crimping process into clear, manageable actions that you can follow with confidence.
Preparing The Wire
Start by stripping the wire insulation carefully, exposing about 1/4 inch of the bare wire. Avoid nicking or cutting the strands, as this weakens the connection. Twist the wire strands tightly to keep them neat and compact.
Check the wire gauge to choose the right crimp cap size. Using a cap too large or too small can cause poor contact or damage. Do you have the correct wire gauge on hand? It’s essential before moving on.
Selecting And Installing The Crimp Cap
Pick a crimp cap that matches your wire gauge—usually, wire sizes are printed on the packaging. Slide the cap over the twisted wire ends, ensuring the metal tube inside the cap fits snugly around all strands.
Use a reliable crimping tool designed for your cap size. Squeeze firmly until you feel the cap compress tightly around the wire. If you’ve ever tried crimping by hand, you know how much easier a proper tool makes this step.
Testing The Connection
After crimping, gently tug the wire to check if it stays secure. A solid crimp won’t let the wire slip out. Then, test continuity with a multimeter to ensure a good electrical connection.
If your car stereo fails to work properly, the problem might be a loose crimp. Would you risk your equipment on a shaky connection? Taking time to test now saves frustration later.
Credit: tejte.com
Common Mistakes To Avoid
Choosing the right size crimp caps for your car stereo is crucial, but even more important is avoiding common mistakes that can undermine the connection’s reliability. Small errors during installation can lead to poor performance, signal loss, or even damage to your equipment. Understanding these pitfalls helps you secure your wiring properly and ensures your stereo system works smoothly.
Using Incorrect Cap Size
Using a crimp cap that doesn’t match your wire gauge is a frequent error. If the cap is too small, it won’t fit over the wire, causing frustration and potential damage to the wire strands. A cap that’s too large can result in a loose connection, increasing the risk of signal drops or shorts.
Think about the last time you struggled to fit a connector; chances are you were using the wrong size. Always check the wire gauge and select a crimp cap designed for that size to create a secure and lasting connection.
Insufficient Crimping Pressure
Applying too little pressure during crimping is another mistake that many make. The connection may seem stable at first but can loosen over time due to vibrations from your car or temperature changes. This can cause intermittent sound issues or complete failure of the stereo connection.
Invest in a good-quality crimping tool and apply firm, even pressure. You want the cap to grip the wire tightly without crushing it. Ask yourself: is the connection strong enough to withstand daily driving bumps?
Ignoring Wire Stripping Length
Stripping too much or too little insulation from the wire before crimping can weaken the joint. If you strip too little, the wire won’t fully contact the metal inside the cap. Strip too much, and exposed wire can short circuit or cause corrosion.
Measure carefully and strip just enough insulation so the wire fits snugly inside the cap without exposing unnecessary length. This small step can save you headaches and improve the durability of your stereo wiring.
Tips For Durable Connections
Ensuring durable connections in your car stereo setup is key to avoiding frustrating issues like crackling sound or sudden signal loss. A strong connection keeps your audio crisp and prevents costly repairs down the road. Small steps you take now can save you from headaches later.
Using Heat Shrink Tubing
Heat shrink tubing adds an extra layer of protection to your crimped connections. After crimping the wire with the cap, slide the tubing over the joint. Use a heat gun to shrink it tightly around the connection.
This prevents moisture, dust, and vibrations from weakening the connection. I’ve seen setups last years longer just by adding this simple step. It also gives your work a neat, professional look.
Regular Inspection And Maintenance
Even the best connections can degrade over time due to temperature changes and road vibrations. Make it a habit to check your crimp caps every few months. Look for any signs of corrosion, looseness, or discoloration.
If you spot any issues, re-crimp or replace the caps immediately. This small effort keeps your stereo performing at its best and avoids unexpected audio cutouts. How often do you check the wiring in your car?
Credit: www.walmart.com

Credit: www.ebay.com
Frequently Asked Questions
What Size Crimp Caps Fit Car Stereo Wires?
Car stereo wires typically require crimp caps sized for 16 to 20 gauge wires. Always check your wire gauge before selecting caps. Using the correct size ensures a secure connection and prevents signal loss or damage to your stereo system.
How To Choose The Right Crimp Caps For Car Stereos?
Choose crimp caps based on wire gauge and insulation type. Match the cap size with wire thickness. Opt for insulated caps to avoid shorts. Properly sized caps improve connection reliability and audio quality in your car stereo setup.
Can Wrong Size Crimp Caps Damage Car Stereo?
Yes, using wrong size crimp caps can cause poor connections. This leads to intermittent audio, signal loss, or wire damage. Always match crimp caps to wire gauge to maintain stereo performance and avoid costly repairs.
Are Insulated Crimp Caps Better For Car Stereos?
Insulated crimp caps provide better protection against shorts and corrosion. They ensure safer, more durable connections in car audio wiring. Insulated caps help maintain signal integrity and extend the lifespan of your stereo wiring.
Conclusion
Choosing the right crimp caps improves your car stereo’s performance. Correct size ensures a secure connection. No loose wires, no sound issues. Measure wires accurately before buying. Match cap size to wire gauge for best results. Also, consider cap material.
Durability matters. Quality caps last longer, saving you time and money. Always keep spare caps on hand. They come in handy during emergencies. Proper installation prevents future hassles. Enjoy clear sound and hassle-free driving. Happy listening!

Similar Posts