How to Install Component Speakers in Car: Step-by-Step Guide
Are you tired of the tinny sound quality from your car’s factory-installed speakers? Installing component speakers can transform your driving experience, delivering crisp highs and powerful lows.
Imagine cruising down the highway with concert-like audio enveloping you. You don’t need to be a tech expert to achieve this. With the right guidance, you can install these speakers yourself and enjoy superior sound quality every time you hit the road.
You’ll discover a step-by-step process that makes the installation straightforward and satisfying. Ready to turn your car into a rolling sound machine? Let’s dive in!

Credit: fhrxstudios.com.au
Tools And Materials Needed
Installing component speakers in your car can significantly improve sound quality, but having the right tools and materials makes the job smoother and safer. Without proper equipment, you might damage your vehicle or the speakers themselves. Let’s look at what you’ll need to get started and how each item plays a crucial role in the installation process.
Essential Tools
- Screwdrivers:Both Phillips and flat-head screwdrivers help remove panels and secure speaker mounts.
- Wire strippers:These make clean cuts and strips on speaker wires, preventing connection issues.
- Crimping tool:Useful for securing wire connectors firmly and ensuring a solid electrical connection.
- Panel removal tool:Avoid damaging your car’s interior by gently popping out door panels and trim.
- Multimeter:Check continuity and voltage to verify wiring before finalizing connections.
- Drill with bits:Sometimes you need to create new mounting holes for the speakers.
Having these tools ready before you start can save you frustration and prevent unnecessary trips to the hardware store.
Speaker Components
- Component speakers:These usually include separate woofers, tweeters, and crossovers.
- Speaker wires:High-quality wires ensure clear sound transmission without interference.
- Mounting brackets and screws:Secure your speakers firmly in place to avoid rattling.
- Sound deadening material:Adding this around the speaker area reduces vibrations and improves audio clarity.
Not all cars come ready for component speakers, so check if your model requires additional parts or adapters. Have you measured your speaker openings yet? Matching sizes will avoid extra modifications.
Safety Gear
- Safety glasses:Protect your eyes from flying debris when drilling or prying panels.
- Gloves:Prevent cuts and scrapes while handling sharp metal edges or wires.
- Mask:Avoid inhaling dust or insulation particles when working inside your car’s doors.
Safety is often overlooked, but a small precaution can prevent injuries that would delay your project. Do you have your safety gear ready? It’s a simple step that makes the installation experience more comfortable and risk-free.
Preparing Your Car
Preparing your car before installing component speakers is key to a smooth and safe upgrade. It ensures you avoid damage and makes the installation process much easier. Taking the time to get your vehicle ready pays off with better sound and less hassle.
Disconnecting The Battery
Always start by disconnecting your car’s battery. This step protects you from electrical shocks and prevents short circuits while working with the wiring. Use a wrench to loosen the negative terminal first, then remove it completely.
Have you ever skipped this step and accidentally blown a fuse? It’s a common mistake that can cost time and money. Taking this simple precaution saves headaches later.
Removing Door Panels
Next, remove the door panels carefully to access the speaker area. Most panels are held by screws and clips—locate them before you start pulling. Use a trim removal tool or a flat screwdriver wrapped in cloth to avoid scratching the surface.
Keep all screws and clips in a small container to prevent losing them. This makes reassembly faster and ensures everything fits back perfectly. If you notice any stubborn clips, don’t force them; instead, check for hidden screws or fasteners.
Cleaning Speaker Areas
Once the panels are off, clean the speaker mounting areas thoroughly. Dirt and debris can affect how well the new speakers fit and sound. Use a damp cloth to wipe down surfaces and vacuum out any dust inside the door cavity.
Have you checked for rust or moisture buildup? Addressing these issues now can extend the life of your speakers. A clean, dry mounting spot helps your new speakers perform at their best.
Removing Old Speakers
Removing old speakers is the first step to install new component speakers. This process requires care and attention. Old speakers can be stuck tightly. You need to handle them gently to avoid damage to the car.
Start by gaining clear access to the speakers. This might mean removing door panels or speaker covers. Take your time to avoid breaking clips or wires. Proper removal makes installation of new speakers easier and safer.
Unfastening Mounts
Locate the screws or bolts holding the old speaker. Use a screwdriver or socket wrench to remove them. Keep the screws safe for later use. Some mounts may have clips; gently pry them open.
Avoid forcing mounts off. Slow and steady removal protects the speaker and car parts. If mounts feel stuck, check for hidden screws or bolts.
Detaching Wiring
Disconnect the speaker wires carefully. Most wires have plugs or clips. Press the release tab and pull gently. Avoid pulling wires directly to prevent damage.
If wires are soldered, use a soldering tool to detach them. Remember their position for correct reconnection later. Label wires if needed to keep track.
Inspecting Speaker Locations
Check the speaker cavity for dirt or damage. Clean the area to ensure a good fit for new speakers. Look for rust or loose parts that may need repair.
Measure the opening to confirm new speakers will fit. Proper inspection avoids problems during installation. Make sure the surface is flat and stable.

Credit: www.youtube.com
Installing Component Speakers
Installing component speakers can transform your car’s audio quality significantly. It’s not just about plugging them in; careful placement and secure mounting are key to getting the best sound experience. Let’s break down the main parts of the installation so you can enjoy crisp highs and rich lows on every drive.
Mounting Woofers
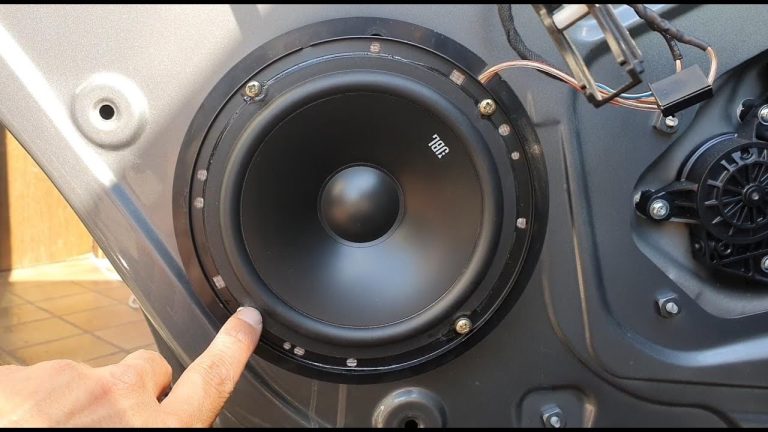
Woofers handle the bass and mid-range sounds, so their placement affects how you feel the music. Choose a sturdy location like the door panels or rear deck where the speaker can sit flush and avoid vibrations that distort sound.
Make sure the mounting surface is solid. If needed, add a spacer or adapter ring for a snug fit. Tighten screws evenly to prevent rattling. Have you noticed how a loose woofer can make even your favorite song sound muddy?
Positioning Tweeters
Tweeters deliver the high-frequency details, so their placement is crucial for clear vocals and crisp instruments. Ideal spots are near the dashboard or A-pillars, aimed towards your ears for direct sound.
Experiment with angles to find the sweet spot. Some cars allow you to mount tweeters on the sail panels or even the side mirrors. Think about whether you want a wider soundstage or focused audio—your ears will tell you what works best.
Securing Crossovers
Crossovers split the audio signal, sending the right frequencies to woofers and tweeters. Secure them in a dry, hidden spot like under the seat or behind the door panel to avoid damage.
Use zip ties or double-sided tape to keep them in place and prevent rattling. Remember, a loose crossover can cause inconsistent sound or connection issues. Have you checked that your crossovers are not exposed to moisture or heat?
Wiring Connections
Wiring connections are crucial for installing component speakers in a car. Proper wiring ensures clear sound and prevents damage to speakers or the amplifier. It requires careful attention to detail and basic knowledge of electrical wiring. Follow these steps to connect your speakers safely and effectively.
Connecting Speaker Wires
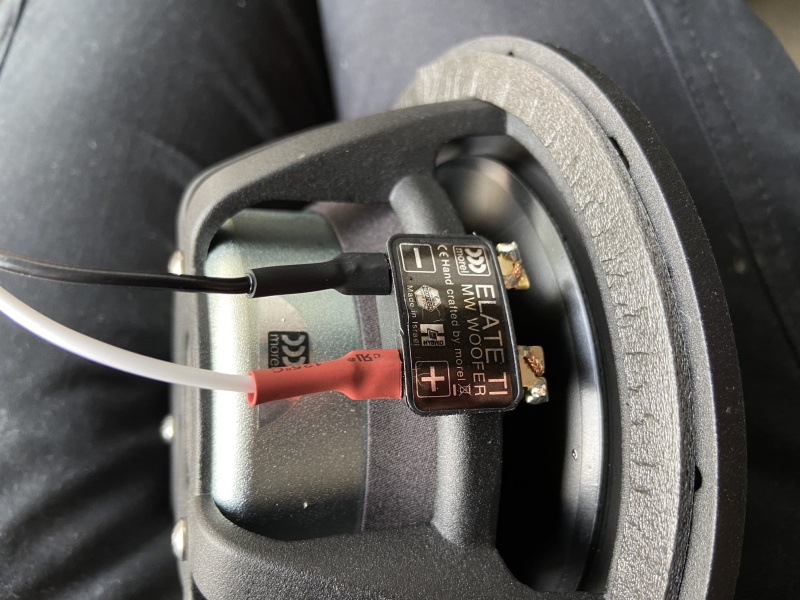
Start by identifying the positive and negative wires on your speakers. Usually, the positive wire is marked with a stripe or a plus sign. Connect the positive wire from the amplifier or head unit to the positive terminal on the speaker. Do the same for the negative wires. Use a wire stripper to remove insulation for a clean connection. Avoid loose or exposed wires to prevent short circuits.
Testing Polarity
Polarity affects sound quality and speaker performance. To test polarity, briefly connect the speaker wires to the power source. The speaker cone should move outward, not inward. If it moves inward, reverse the wires. Correct polarity ensures that all speakers work together, creating balanced and clear sound. Double-check each speaker’s polarity before finalizing the installation.
Using Connectors
Connectors make wiring easier and more secure. Common types include crimp connectors, solder joints, and quick-disconnect plugs. Crimp connectors require a crimping tool to attach wires firmly. Solder joints provide strong connections but need a soldering iron and skills. Quick-disconnect plugs allow easy removal and replacement of speakers. Always cover connectors with heat shrink tubing or electrical tape to protect against moisture and vibration.
Reassembling Car Panels
Reassembling car panels is a key part of installing component speakers. It restores the car’s interior and protects the new speakers. Careful reassembly ensures the panels fit well and stay secure. This step also helps keep the car looking neat and professional.
Reattaching Door Panels
Align the door panel with the door frame carefully. Check that all clips and hooks match their slots. Press the panel gently but firmly to snap clips back in place. Avoid forcing the panel to prevent damage. Reconnect any electrical connectors for power windows or locks before securing fully.
Ensuring Proper Fit
Inspect the panel edges to ensure they sit flush with the door. Look for gaps or uneven areas along the seams. Adjust the panel by pressing or repositioning clips if needed. Proper fit prevents rattling and improves sound quality. Take your time to get a smooth finish.
Final Tightening
Secure all screws and bolts firmly but not too tight. Use the original fasteners or those supplied with the speakers. Tightening holds the panel firmly without cracking or bending. Check all areas again for a solid, snug fit. Test door functions to confirm everything works well.
Testing And Adjustments
After installing your component speakers, testing and adjustments are crucial to ensure the best sound experience in your car. This phase lets you catch any wiring issues, balance sound levels, and optimize settings based on your preferences. Taking time here will save you from frustration and improve your daily drive soundtrack.
Powering On System
Before you power on, double-check all connections to avoid shorts or blown fuses. Turn on your car’s audio system and listen for any unusual noises like buzzing or distortion. If you hear anything off, turn off the system immediately and recheck your wiring.
Once everything sounds normal, gradually increase the volume to avoid sudden loud blasts. This slow approach protects your new speakers and gives you a chance to notice subtle issues early. Have your favorite track ready—something with clear vocals and varied instruments helps spot problems fast.
Sound Quality Checks
Listen carefully to different frequencies—bass, mids, and highs—to ensure all speakers work properly. If the bass feels weak or the highs are harsh, it might indicate a placement or wiring issue. Walk around your car while the music plays to see if the sound stays balanced from different seats.
Ask yourself: Are the vocals crisp and clear? Does the bass shake the car without distortion? If not, note down what needs fixing. Sometimes small tweaks in speaker positioning can make a big difference.
Tweaking Speaker Settings
Use your head unit’s equalizer to adjust frequencies and find the perfect balance. Try lowering the bass if it’s overpowering or boosting the treble for more clarity. Remember, small changes add up, so adjust settings in tiny steps.
Don’t forget to check the crossover settings if your system supports them. Setting the right crossover frequency ensures each speaker handles the sounds it’s designed for. Experiment with crossover points and listen carefully—does the music flow naturally or feel disjointed?
Have you noticed how your mood changes when the music sounds just right? Fine-tuning your speakers is about personalizing your driving soundtrack. Keep adjusting until your ears say, “This is perfect.”
Credit: medium.com
Troubleshooting Tips
Troubleshooting your component speaker installation can save you hours of frustration. Problems often arise from simple oversights that are easy to fix once you know what to look for. Let’s dive into some common issues and how to solve them so your car audio sounds just right.
Common Installation Issues
Sometimes speakers don’t fit perfectly, causing rattles or vibrations. Check if the mounting brackets are secure and properly aligned. Loose screws or ill-fitting mounts are often the root cause.
Another frequent problem is incorrect speaker placement. Placing tweeters too far from ear level can ruin the soundstage. Are your speakers positioned where you can hear their full effect?
Fixing Wiring Problems
Wiring errors can cause no sound or intermittent audio. Double-check that positive and negative wires connect correctly to the speaker terminals. Mixing them up can lead to phase issues, reducing sound quality.
Inspect wires for cuts, frays, or poor connections. Even a small break inside the insulation can disrupt the signal. Use a multimeter to verify continuity if you suspect wiring faults.
Addressing Sound Distortions
Distorted sound often signals an amplifier mismatch or speaker damage. Ensure your amplifier’s power matches the speakers’ rating to avoid clipping. Are you pushing your system beyond its limits?
Also, check the speaker cones for tears or debris. Dirt trapped inside can cause buzzing or crackling noises. Cleaning or replacing damaged parts can restore crisp sound.
Frequently Asked Questions
What Tools Do I Need To Install Component Speakers?
You need screwdrivers, wire strippers, a drill, panel removal tools, and electrical tape. A multimeter helps check connections. Having all tools ready ensures a smooth installation process.
How Do I Connect Component Speakers To My Car Stereo?
Connect the tweeters and woofers to the crossover, then the crossover to the stereo wires. Match positive to positive and negative to negative for proper sound output.
Can I Install Component Speakers Myself Without Professional Help?
Yes, if you follow instructions carefully. Basic wiring and mounting skills are needed. Take your time and use proper tools to avoid damage.
Where Should I Mount Tweeters For Best Sound Quality?
Mount tweeters at ear level or on the A-pillars. This placement improves sound clarity and imaging, giving a balanced audio experience inside the car.
Conclusion
Installing component speakers in your car can greatly improve sound quality. Take your time with each step and follow the instructions carefully. Test the speakers before finalizing the installation to ensure they work well. Use the right tools to avoid damage and make the process easier.
Enjoy clearer, richer music on every drive. This upgrade is worth the effort and adds value to your car audio system. Simple steps lead to better sound. Give your car a fresh audio boost today.